Table of contents
Open Table of contents
- Introduction
- Capturing WeChat Mini Program Traffic on iOS with Charles
- Installing Charles’s Self-Signed Certificate on macOS and iOS
- Safari Traffic Is Visible, but Mini Program Traffic Is Missing
- Apps for Capturing Traffic Directly on iOS
- Capturing WeChat Mini Program Traffic on Android 7.0 and Later or HarmonyOS
- Extracting the Token and Request Format from Captured Traffic
- Setting Up a Maintainable Python Project
- Building the Bot
- Rotating Proxy IPs
- Setting the User-Agent
- Sending the Bot’s Requests
- Pushing the Results to iOS
- Unresolved Issues
- Additional Considerations When Using a Bot
- How Can Production Applications Defend Against Crawlers?
- Closing Notes
Introduction
My company is planning to replace traditional shell scripts with Python for operations automation. I’ve been reviewing code in this area lately, so I decided to write a small bot in Python and learn the language along the way.
The bot has two functions:
- Send order requests to the target Mini Program at scheduled times.
- Push the results to iOS to notify me whether the requests succeeded or failed.
Capturing WeChat Mini Program Traffic on iOS with Charles
The setup works like this: connect your computer and phone to the same network, install Charles on the computer, and install Charles’s self-signed certificate on both devices. Then change the phone’s network settings to forward its requests through Charles on the computer so you can capture the traffic.
Installing Charles’s Self-Signed Certificate on macOS and iOS
macOS
For setup instructions, see the macOS section of the Charles documentation under SSL Certificates.
-
After installing the certificate, set it to Always Trust in Keychain Access.
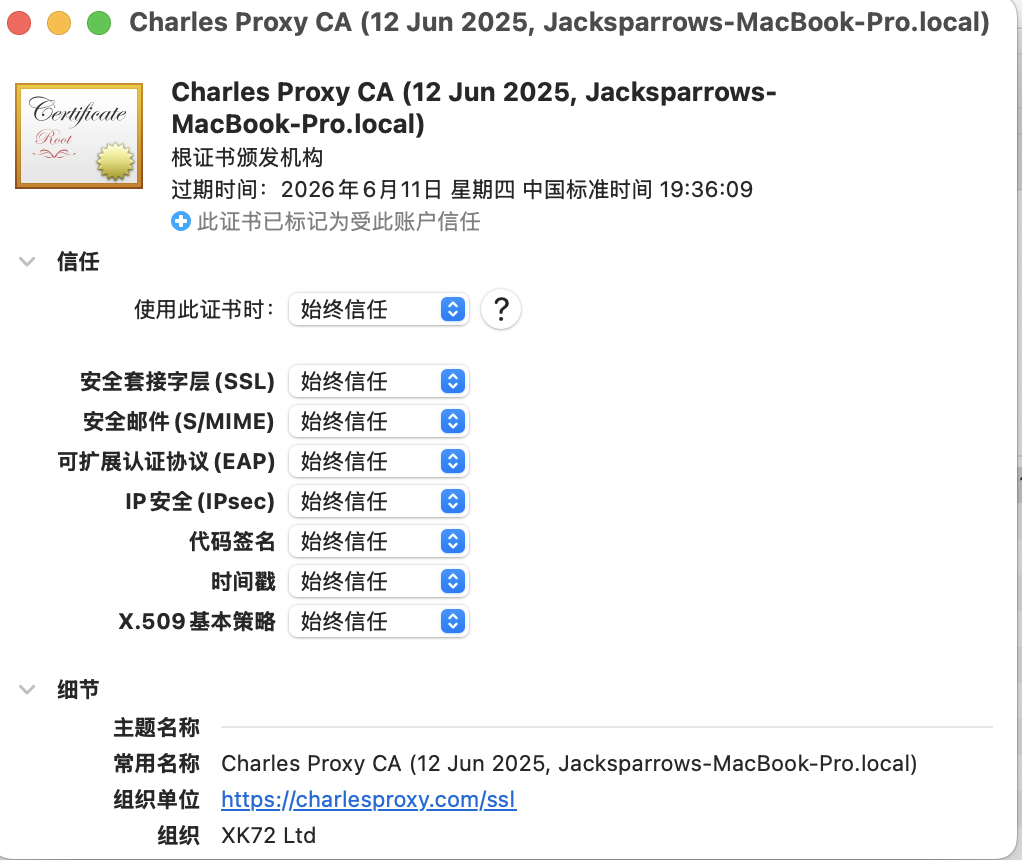
-
Add a domain under Proxy > SSL Proxy Settings > Include, then visit that website in a browser to check whether Charles can decode HTTPS traffic. To capture traffic for all domains, set the domain to
*and the port to443. I don’t recommend this for regular use, though: it produces a lot of irrelevant traffic that makes it harder to find what you need. Use this setting only to check that your configuration works.
iOS
For setup instructions, see the iOS section of the Charles documentation under SSL Certificates.
- After downloading and installing the certificate through the iOS browser, enable it under Settings > General > About > Certificate Trust Settings.
- In your network settings, go to Configure Proxy > Manual and enter your computer’s IP address, which you can find under Charles > Help > Local IP Address. The port is usually
8888. - Open a website in the browser. Note: its domain must match an entry under Charles > SSL Proxy Settings > Include. Check whether Charles can decode the HTTPS traffic.
Safari Traffic Is Visible, but Mini Program Traffic Is Missing
After the tests above, I started capturing the Mini Program’s traffic. Browser traffic on both macOS and iOS was visible, but the Mini Program’s traffic wasn’t. A Google search revealed that I needed to enable Settings > Apps > WeChat > Local Network.
Thanks to this blogger for sharing the solution.
Apps for Capturing Traffic Directly on iOS
Why did I look into this? The setup above felt a little cumbersome, so I wondered whether there were apps I could install directly on iOS. It turns out there are.
- Charles for iOS: CNY 58, or 58 Chinese yuan. I haven’t bought or tried it yet.
- Stream: free. In my testing, however, the app had not been updated in a long time and could not capture HTTPS traffic.
- Qingting Traffic Capture (蜻蜓抓包): free. I haven’t tried it.
If you know any other good iOS traffic capture apps, feel free to recommend them in the comments.
Capturing WeChat Mini Program Traffic on Android 7.0 and Later or HarmonyOS
I also tried capturing WeChat traffic on another Huawei phone running HarmonyOS 4.2, but couldn’t get it to work. A Google search showed that many people had encountered the same problem. In brief, on Android 7.0 and later, apps trust preinstalled system certificates but do not trust certificates installed by the user. Since my main phone is an iPhone, I didn’t investigate the solution further. If you want to resolve this, see this Zhihu answer and another blogger’s walkthrough.
Extracting the Token and Request Format from Captured Traffic
By capturing traffic, I obtained the request payload format used to place orders in the Mini Program. The Mini Program’s custom token comes from its own login endpoint. The response includes the token, the login time loginTime, and the expiration time expireTime. I found that the expiration interval was 24 hours. The request takes only one parameter, named code, which presumably comes from wx.login. After looking into it further, I concluded that the Mini Program probably uses silent login. For an explanation of how silent login works in WeChat Mini Programs, I recommend this blogger’s article.
session_key
As an aside, some Mini Programs may tie their token’s validity to the lifetime of WeChat’s session_key: as long as session_key remains valid, the token remains valid too. Regarding the expiration of session_key, this article states:
WeChat does not disclose the validity period of session_key to developers. We renew session_key based on how users interact with the Mini Program. The more frequently a user uses the Mini Program, the longer session_key remains valid.
Setting Up a Maintainable Python Project
With the target Mini Program’s request format and payload structure in hand, I started writing the Python script. Since this was a project, I figured I might as well establish good practices from the start: a project structure suitable for production Python development, a popular package manager, a consistent code style, style checks, unit tests, packaging, and so on.
Using a pip Mirror in Mainland China
If you’re downloading packages from mainland China, switching to a local mirror can make downloads faster and more reliable.
I use Tsinghua University’s mirror.
pip config set global.index-url https://mirrors.tuna.tsinghua.edu.cn/pypi/web/simple
pip config set global.trusted-host mirrors.tuna.tsinghua.edu.cn
A Guide to Python Project Setup
For the project setup, I used some of the tools described in the Python Project Guidelines. I recommend reading the guide and working through the small example in its Quick Start chapter.
Project Scaffolding
- The guide uses cookiecutter for scaffolding. If you use it too, update some of the dependencies after initializing the project. Some dependency versions in the generated project are old enough to cause errors if used as-is.
- The Cookiecutter commit information I saw was already five years old. Another, more active scaffolding project is pyscaffold. I haven’t explored it yet; once I understand it better, I’ll cover it in detail in another post.
For this article, I used cookiecutter.
Python Virtual Environments
I use poetry to manage Python virtual environments. For the command to activate your project’s virtual environment, see Poetry’s Managing environments documentation.
Updated 2026-08-20: I now recommend uv, mainly because it feels smoother to use.
Building the Bot
After generating the project scaffold from the guide and updating the relevant dependencies, I started writing the bot. Its core logic takes only a few lines: build the order payload, then send the request with requests.
Rotating Proxy IPs
During testing, I found that the target Mini Program does not allow two requests from the same IP address within a one-second window. I found a paid TLS proxy provider in mainland China and bought access to an IP pool. Paid HTTP/TLS proxy providers in mainland China offer broadly similar plans for individual users: some charge by the number of proxy IPs obtained, while others charge by the hour or day. I chose a plan billed by the number of proxy IPs obtained, with each IP expiring after about five minutes.
When choosing a product, pay attention to:
- Anonymity: the proxies should be highly anonymous so the target server cannot trace the original client IP.
- IP quality: the proxies need to be stable and have low latency.
Finding Proxies with Low Enough Latency
To keep request latency to the target Mini Program low, start by choosing proxy IPs in the same region as its server. The traffic capture revealed the Mini Program’s domain, so I used dig to look up its IP address:
dig www.xxxx.comYou can then use an IP geolocation lookup to find where the server is located.
HTTP proxy providers usually let you choose a city. Pick the city closest to the server’s IP location.
Of course, location isn’t the only factor. A proxy closer to the target website isn’t necessarily faster; the provider’s own infrastructure probably matters too. If a nearby proxy turns out to be slower, switch to another node.
Even after these steps, not every IP in the provider’s pool will have low latency. After obtaining an IP, test how quickly it can reach the target Mini Program. If it doesn’t meet your latency requirement, discard it and obtain another one. Repeat until you find an IP that does.
"""get low latency proxy servers"""
import json
import logging
import time

import requests

logger = logging.getLogger(__name__)

PROXY_SERVICE_PROVIDER_URL = ("YOUR_PROXY_PROVIDER_API_URL")
TARGET_SERVER_URL = "YOUR_TARGET_MINI_PROGRAM_API_URL"

def get_proxy_ips_latency_less_than_one_second(need_ip_nums: int) -> dict:
    """return a set of ip latency less than 1 second"""
    good_proxy_ip = {}
    request_start_time = time.time()
    proxy_index = 1
    while len(good_proxy_ip) < need_ip_nums :
        reponse = requests.get(PROXY_SERVICE_PROVIDER_URL, timeout=5)
        logger.debug(json.dumps(reponse.json(), indent=4, ensure_ascii=False))
        ip = reponse.json()["data"][0]["ip"]
        port = reponse.json()["data"][0]["port"]
        proxy_ip = f'http://{ip}:{port}'
        proxies = {
            "http": proxy_ip,
            "https": proxy_ip
        }
        if test_proxy_delay(proxies, TARGET_SERVER_URL, 1):
            good_proxy_ip[proxy_index] = proxies
            proxy_index += 1
    request_end_time = time.time()
    logger.info("successfully get a batch of proxy IPs with a delay"
                "of less than or equals 1 second, cost %d seconds", request_end_time - request_start_time)
    logger.info("IP proxies:\n%s", good_proxy_ip)
    return good_proxy_ip
def test_proxy_delay(request_proxies, target_url: str, request_timeout: int) -> bool:
    "test proxy ip's latency whether less than timeout seconds"
    request_start_time = time.time()
    logger.debug("start time: %s", time.strftime("%H:%M:%S", time.localtime(request_start_time)))
    # add try-except block to avoid program crashes
    try:
        response = requests.get(target_url, timeout=5, proxies=request_proxies)
        # The API response value "操作成功" means "Operation successful".
        if response.status_code == 200 and response.json().get("code") == 200 and response.json().get("msg") == "操作成功":
            request_end_time = time.time()
            logger.debug("end time: %s", time.strftime("%H:%M:%S", time.localtime(request_end_time)))
            delay = request_end_time - request_start_time
            logger.debug("Proxy %s response time: %.2f seconds", request_proxies, delay)
            return  delay <= request_timeout
        return False
    except requests.exceptions.RequestException as e:
        logger.error("Error testing proxy %s: %s", request_proxies, str(e))
        return False
Choosing a Paid HTTP Proxy Service
Define Your Requirements
My requirement is simple: latency from the proxy server to the target server must be low enough. For a flash sale, if high proxy latency causes you to miss the first second or two after sales open, there’s little point in continuing. I want proxy latency below 100 ms.
Plans Billed per Proxy IP vs. Static IPs
- I tested IPs from several HTTP proxy providers’ plans billed by the number of proxy IPs obtained. These plans generally couldn’t deliver the low latency I wanted, such as less than 100 ms.
- I haven’t tested static IPs much. Based on the providers’ claims, though, they offer low latency through dedicated lines in their own data centers. That sounds appealing, but static IPs are just too expensive.
Setting the User-Agent
Use fake-useragent to spoof the User-Agent. When using this library for multiple requests or across multiple threads, reuse the same object to avoid wasting time on repeated initialization.
ua = UserAgent(platforms='mobile')
ua.random
Sending the Bot’s Requests
When sending the request, simply set the proxies argument in requests:
response = requests.post(request_url,request_json_data, headers=request_header,
                             timeout=5, verify=CERT_PATH, proxies=request_proxies)
Configuring the Certificate for Requests
There are three cases:
- If you want to keep Charles running while sending requests, use the certificate from Charles. Save Charles’s certificate locally and set
CERT_PATHto its path. The Python section of the official Charles documentation covers this. - If you have already captured the target Mini Program’s payload format, you no longer need to route requests through Charles. In this case, open the Mini Program’s domain in a browser, view its certificate, and download it. Before downloading, open the certificate details and make sure its name does not contain Charles. If it does, turn off Charles, delete the cookies for the Mini Program’s domain in the browser, and reload the page to obtain the backend server’s certificate.
- You can also omit the
verifyargument when sending requests.
Disabling Other VPN or Proxy Tools
If you use VPN or proxy tools to access sites from mainland China, a misconfigured setup may route all traffic through their nodes, including traffic to servers in China. This can make requests much slower.
Making the Bot Faster
Increasing Concurrency with Multiple Threads
I haven’t used a scheduler here yet; I’m just using threading.Thread. Each thread prepares its data as soon as it starts:
- Obtain a proxy IP with sufficiently low latency.
- Build the request payload.
- Immediately before
requests.post, calculate the number of milliseconds remaining until the target time, then sleep withtime.sleep. Once the target time arrives, all threads send their requests at once, with no other preparation left to do.
Establishing the HTTP Connection with a TCP Handshake in Advance
With my current plan, which is billed by the number of proxy IPs obtained, proxy latency is generally under one second. If I wait until the scheduled time to establish the TCP connection and send the request, I lose at least a few hundred milliseconds even before accounting for proxy latency. Those milliseconds go toward completing the TCP three-way handshake. Add proxy latency, and the request may not reach the server until more than two seconds after sales open.
To improve this, I send a HEAD request to the target website a few seconds before the bot is due to run. The purpose is to complete the TCP three-way handshake and establish the HTTP connection. I also use requests.Session to keep the HTTP connection alive. Since the request travels from us to the proxy server and then from the proxy to the target website, it’s unclear whether both connections remain persistent. Based on the logs, it looks like both are kept alive.
How did I check?
- Enable debug logging for the project.
- Send a request.
- During the request, urllib3’s
connectionpool.pyprints the following log:Starting new HTTPS connection - Send another request a few seconds later. If that log does not appear again, the same connection is being reused.
This one small optimization made a huge difference to my bot and gave it an edge over the competition. Computer science fundamentals really do matter!
Sending Requests N Milliseconds Early Based on Previous Latency Measurements
The bot records the start and end times of every request. From those measurements, I can estimate the latency from the proxy server to the target server. I can then send a request N milliseconds before the flash sale opens so that it reaches the server when ticket sales begin.
For example, suppose the flash sale starts at 8:30 p.m. and the measured latency from the proxy server to the target server is about 300–400 ms. I would send the request at 8:29:59.700 p.m.
Competing with Other Bots
During actual runs, I found that other bots were competing too. How could I beat them? In practice, the competition includes both other bots and requests from regular users. How can I get the server to process my requests first?
- Lower latency. With my current rotating-IP plan, billed by the number of proxy IPs obtained, I have little control over latency. I could use my own high-quality home connection without a proxy, but I don’t want to expose my IP address.
- More requests. Increase the number of threads to dozens or even hundreds, using sheer request volume to occupy the server’s request-processing threads, such as Tomcat’s worker threads. If our bot occupies all those threads, other requests naturally have to queue. If this isn’t controlled carefully, though, it turns into a DDoS attack.
Pushing the Results to iOS
Because the bot runs at scheduled times, I may not be home when it runs. I therefore need a way to push its results to iOS.
APNs, or Apple Push Notification service, is a little complicated, and I didn’t want to spend time on it. Instead, I used Bark to get notifications working quickly. Integration is very simple; I recommend reading the documentation.
Unresolved Issues
After these steps, the basic bot meets my needs: it places orders at scheduled times and pushes notifications to iOS to remind me to pay. A few issues remain unresolved, however.
- Since I’m assuming that the token expires after 24 hours, I need to keep track of its age after obtaining a valid one. There is a workaround, though: manually remove the Mini Program from WeChat each day, then open it again. This gives me a fresh token before the bot runs, so I don’t have to worry about expiration.
- The Mini Program’s anti-bot protection only applies limits at the user ID level: each user can place at most two orders. It does not use protections such as CAPTCHAs.
Using a CAPTCHA-Solving Service
If the Mini Program adds CAPTCHAs in the future, I plan to use a paid CAPTCHA-solving service to solve them.
For an introduction to these services, see How Do CAPTCHA-Solving Services Efficiently Solve the Various CAPTCHA Formats Used by Different Providers?.
Additional Considerations When Using a Bot
- If the target website has an account system, as Mini Programs do, it may be able to associate your account with information such as your phone number through identifiers such as
openid. Prefer a secondary WeChat account so that an account ban on the target site does not affect your main account.
How Can Production Applications Defend Against Crawlers?
Our company’s systems are constantly visited by all kinds of crawlers, including those from Google and Meta. Those are relatively legitimate and tend to behave reasonably. Others have no regard for our systems: they crawl at unpredictable times and with no consistent pattern. When they crawl too aggressively, they can trigger alerts for CPU usage, memory usage, thread pool exhaustion, and frequent garbage collection. We started with Google CAPTCHA, then moved to AWS WAF, but neither worked particularly well. Recently, we integrated DataDome, and so far the results look decent.
Closing Notes
Since the bot’s core logic is simple enough—it just sends an API request—I won’t provide sample source code beyond the snippets above. The approach described here should be enough. I’ll cover other Python best practices in future posts; this article is intended to give you an overall understanding of maintainable Python project setup and basic bot techniques.