Table of contents
Open Table of contents
- Learning and Understanding Maven
- Install Maven
- Quickly Create a Maven Project and Understand Its Standard Structure
- Maven Lifecycles
- Phases and Goals
- Maven Plugins
- POM Structure
- Common Maven Requirements
- How Do We Find Dependencies That Need Updating?
- How Do We Find Dependencies with Security Vulnerabilities?
- How Do We See Which JARs Changed After a Dependency Upgrade?
- What Is mvnw? How Do We Pin a Project’s Maven Version?
- When Should We Use Optional Dependencies?
- How Do We Quickly Scaffold a Maven Project?
- How Do We Quickly Scaffold a Multi-Module Maven Project?
- How Can Profiles Select Different Modules for Different Environments?
- How Do We Filter Resource Files or Replace ${value} with POM Properties During Packaging?
- How Do We Skip Unit Tests?
- Can the JAR Produced by Maven’s Default Packaging Be Run with java -jar?
- How Do We Build an Executable JAR or Fix “No Main Manifest Attribute”?
- How Do We Analyze Project Dependencies?
- How Do We Install a JAR into the Local Repository?
- How Do We Deploy a JAR to a Remote or Private Repository?
- How Do We Connect Maven to a Private Nexus Repository over HTTPS?
- How Do We Check Code Style During a Maven Build?
- How Do We Build a Multi-Module Project?
- How Do We Speed Up Builds? What Does -T Mean in mvn -T 4 clean install?
- How Do We Replace web.xml Values Dynamically When Packaging a Traditional Web Application?
- Useful Resources
- Example Project Used in This Article
Learning and Understanding Maven
Install Maven
Download from the Official Website
On the download page, choose a file under Files. Usually, select Binary zip archive.
Install on a Mac
On macOS, install Maven with Homebrew.
brew update
brew search maven
# Choose the version to install
brew install maven
Installation
The official installation guide covers Windows and macOS. It mainly involves configuring environment variables for the machine.
Verify the Installation
mvn -vIf the command prints the Maven version, installation path, and Java version, installation succeeded.
This also shows that Maven depends on Java. Maven is written in Java; if that is unfamiliar, the Configuring Apache Maven documentation also contains a statement confirming it.
This variable contains parameters used to start up the JVM running Maven
How Do We Select the Java Version Used by Maven?
Change the JAVA_HOME environment variable.
How Do We Set JVM Options for Maven?
Use the MAVEN_OPTS environment variable.
Configure Maven in an IDE
See here for Eclipse and IntelliJ IDEA configuration instructions.
Quickly Create a Maven Project and Understand Its Standard Structure
-
Generate a Maven project scaffold.
mvn -B archetype:generate -DgroupId=com.mycompany.app -DartifactId=my-app -DarchetypeArtifactId=maven-archetype-quickstart -DarchetypeVersion=1.4The command generates a Maven project in a directory named my-app.
-
A standard Maven project has this structure:
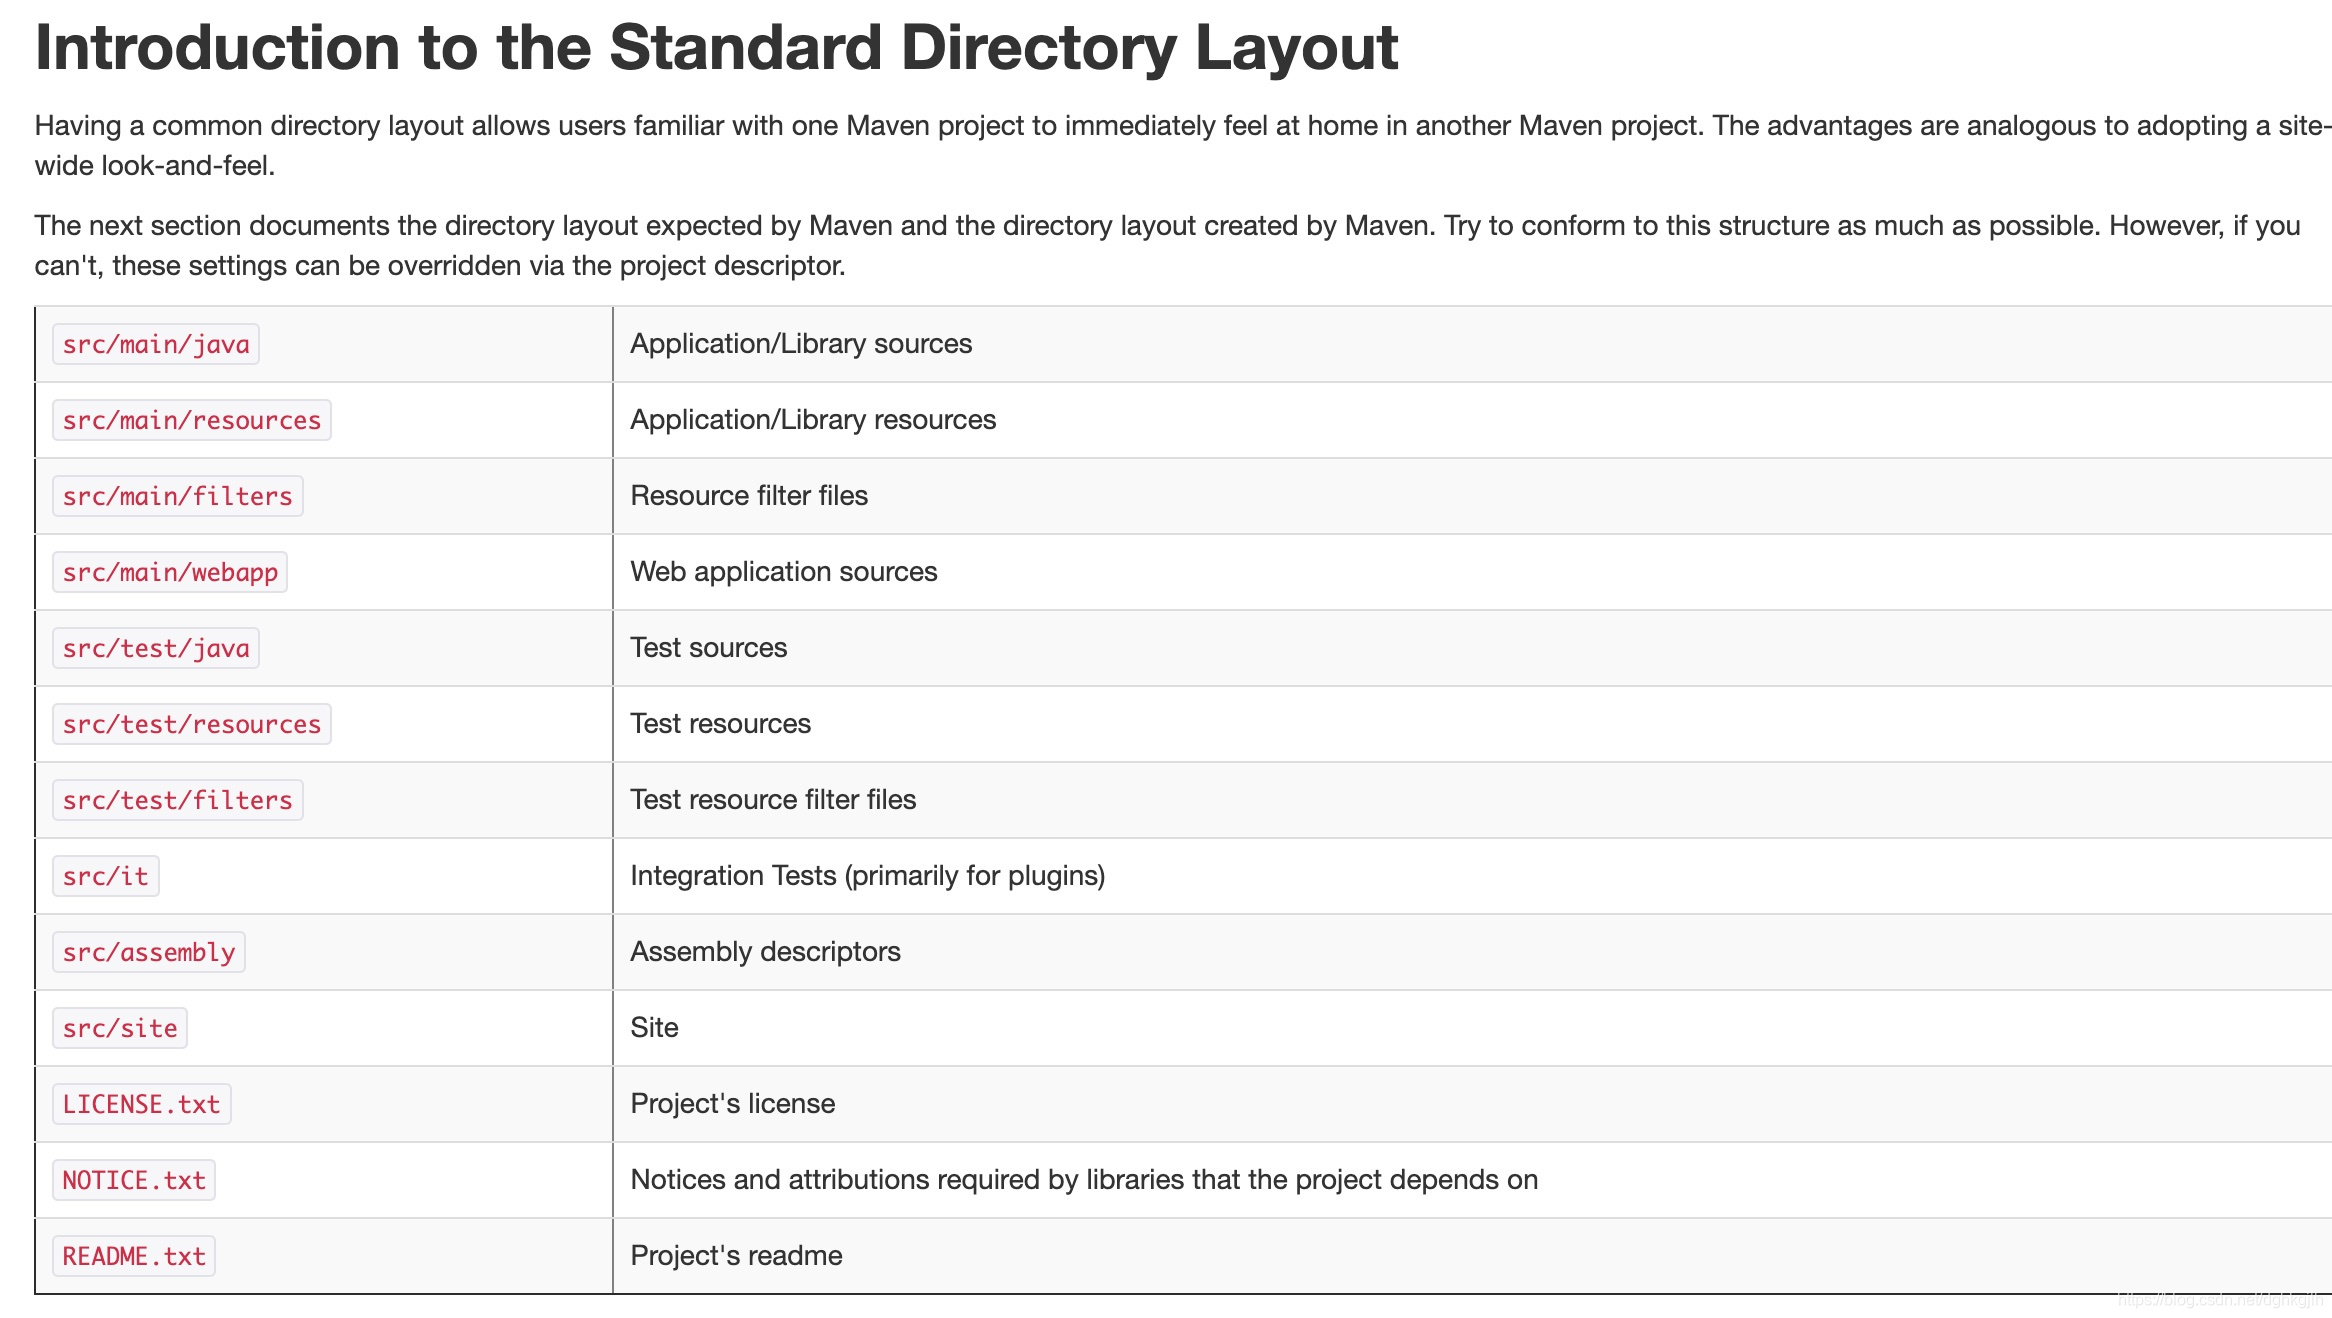
See the standard directory layout documentation. Not every directory shown is required, but the main ones should be present: src/main/java, src/main/resources, src/test/java, src/test/resources, and pom.xml.
In an ordinary Maven project, pom.xml and src are at the same directory level.
Maven Lifecycles
The long command above generated a basic project. What does each part mean? First, we need to understand Maven’s overall structure.
A Common Scenario
When starting with Maven—or mainly adding dependencies at work—we sometimes need to configure a plugin or perform extra operations during packaging. Without understanding Maven’s structure, the process usually looks like this:
- Open a search engine.
- Search for “How do I do XXX with Maven?”
- Find several blog posts, copy commands, and run them.
- Encounter errors or incorrect results, then keep searching.
- Continue until a working command is found.
This wastes time, and learning isolated fragments does not help us solve problems thoroughly. The next similar scenario sends us back to searching instead of applying what we have learned.
Lifecycles
A lifecycle is Maven’s highest-level unit of organization.
Complete lifecycle documentation
Maven has three lifecycles: default, clean, and site. Most everyday project work uses default; we rarely use site. The key point is that lifecycles form the top level.
Phases
A lifecycle comprises many phases.
For example, the default lifecycle has seven major phases:
- validate: verify that the project is correct.
- compile: compile the project source.
- test: run unit tests.
- package: package the project.
- verify: integration testing.
- install: put the verified package into the machine’s local repository.
- deploy: publish the package to a remote repository.
These phases execute in sequence. Even when you request only install, all preceding phases must run before it.
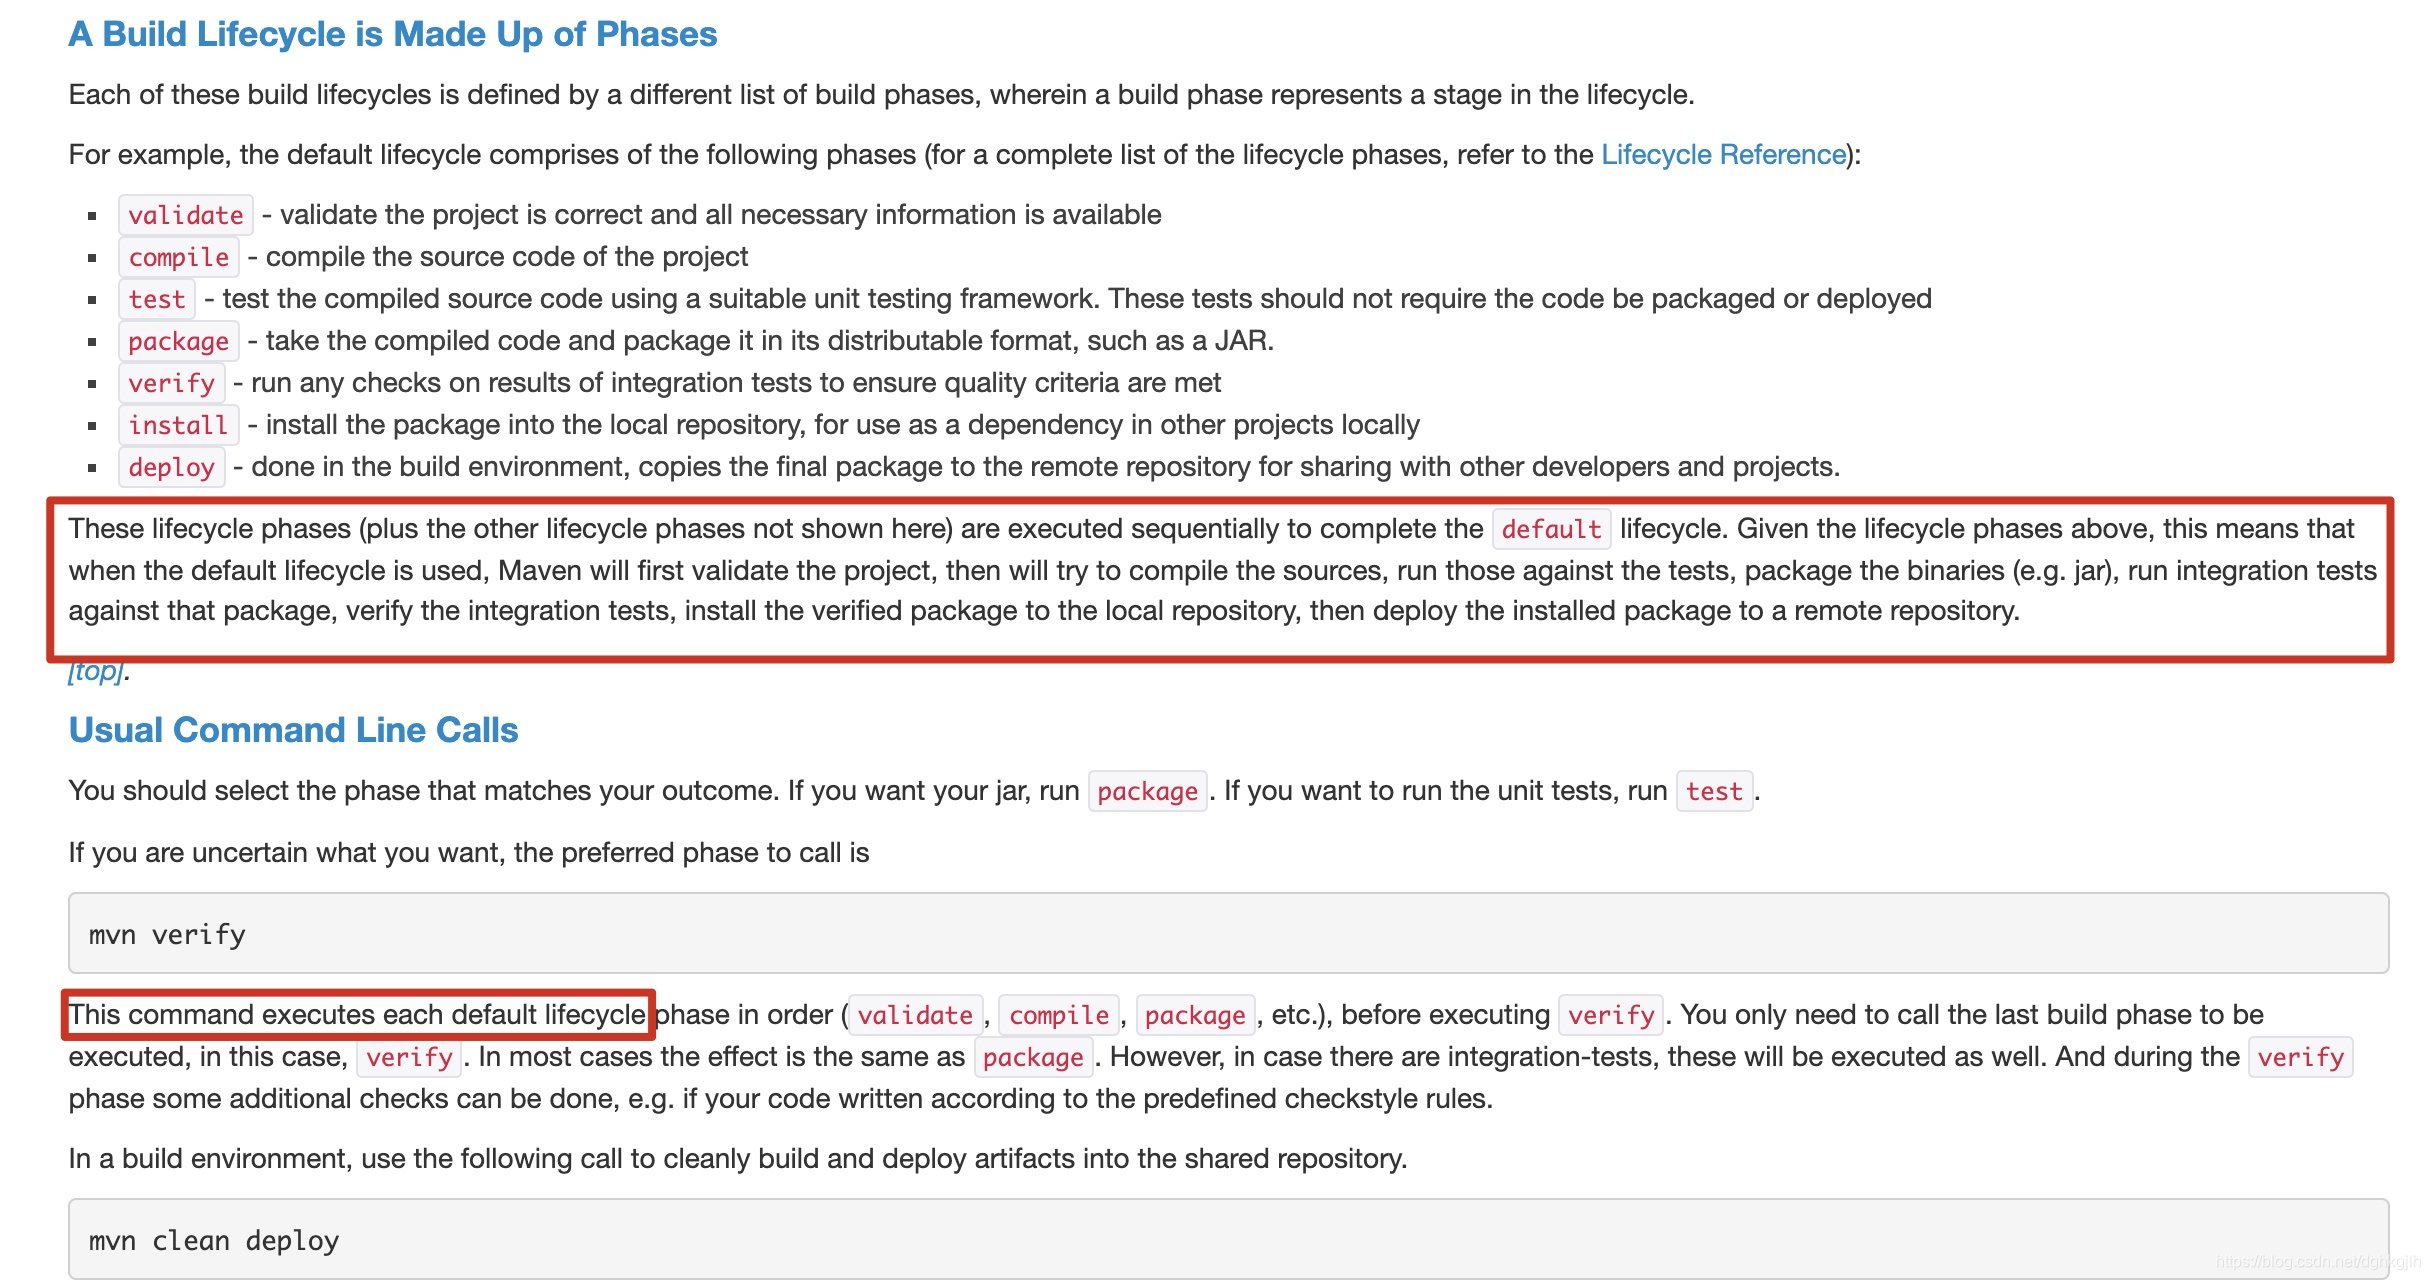
Why say seven major phases? The full default lifecycle has many more, but these are representative. See the complete lifecycle reference.
Execute a Phase
Maven’s structure is lifecycle → phase, and its commands follow that organization.
The format is:
mvn PHASE (mvn followed by the phase to execute through)
You can specify several phases, such as mvn clean package. Here, clean belongs to the clean lifecycle and package to the default lifecycle. Maven identifies the lifecycle from each phase. The lifecycle reference above lists all phases.
# Follow mvn with the phase to execute through
mvn package
Phases and Goals
A lifecycle is the highest level, followed by phases. Phases are the basic units used when invoking lifecycle commands. Each phase has corresponding goals, which specify the actual work to perform.
Who implements those goals? Rather than Maven itself, plugins do the work. Maven has a rich collection of plugins implementing goals for different phases.
At the level of actual execution, the basic unit therefore becomes the goal.
The format is:
mvn PLUGIN_NAME:GOAL
mvn Plugin:goal
Why do common commands such as mvn package and mvn install not use this format?
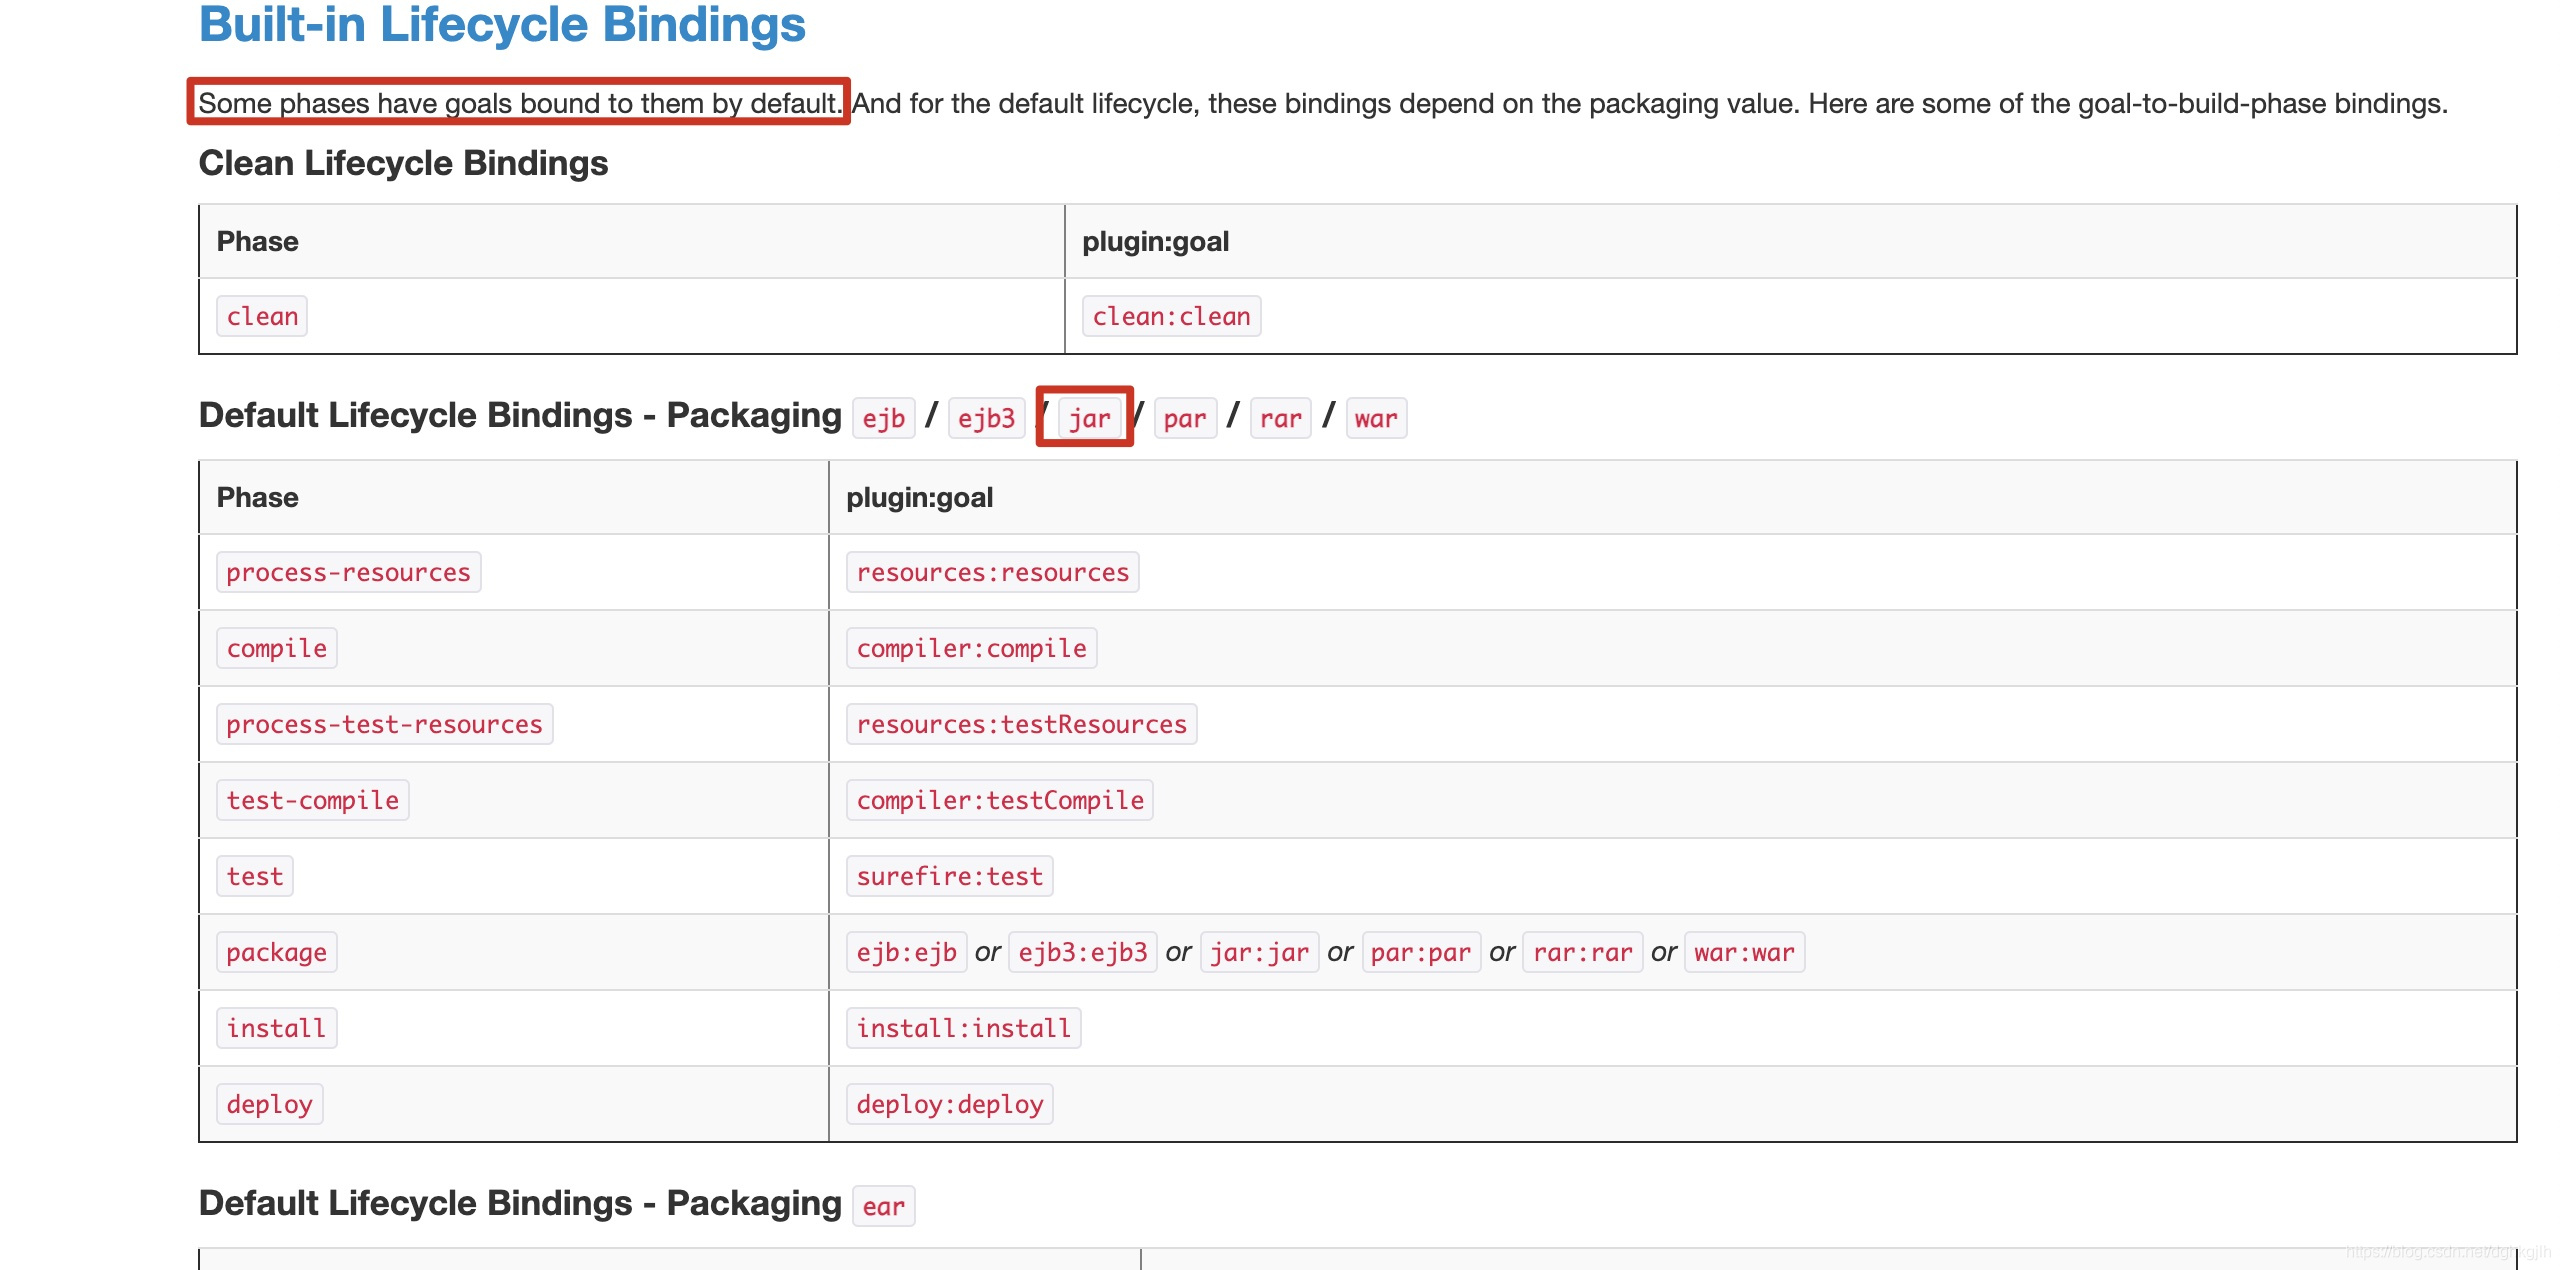
Some lifecycle phases have default plugin-goal bindings, so those goals need not be written explicitly. See the official documentation.
For example, mvn package is effectively mvn jar:jar.
Similarly, mvn install is effectively mvn install:install.
Maven Plugins
During execution, Maven uses plugins to run the corresponding goals. See the plugin list.
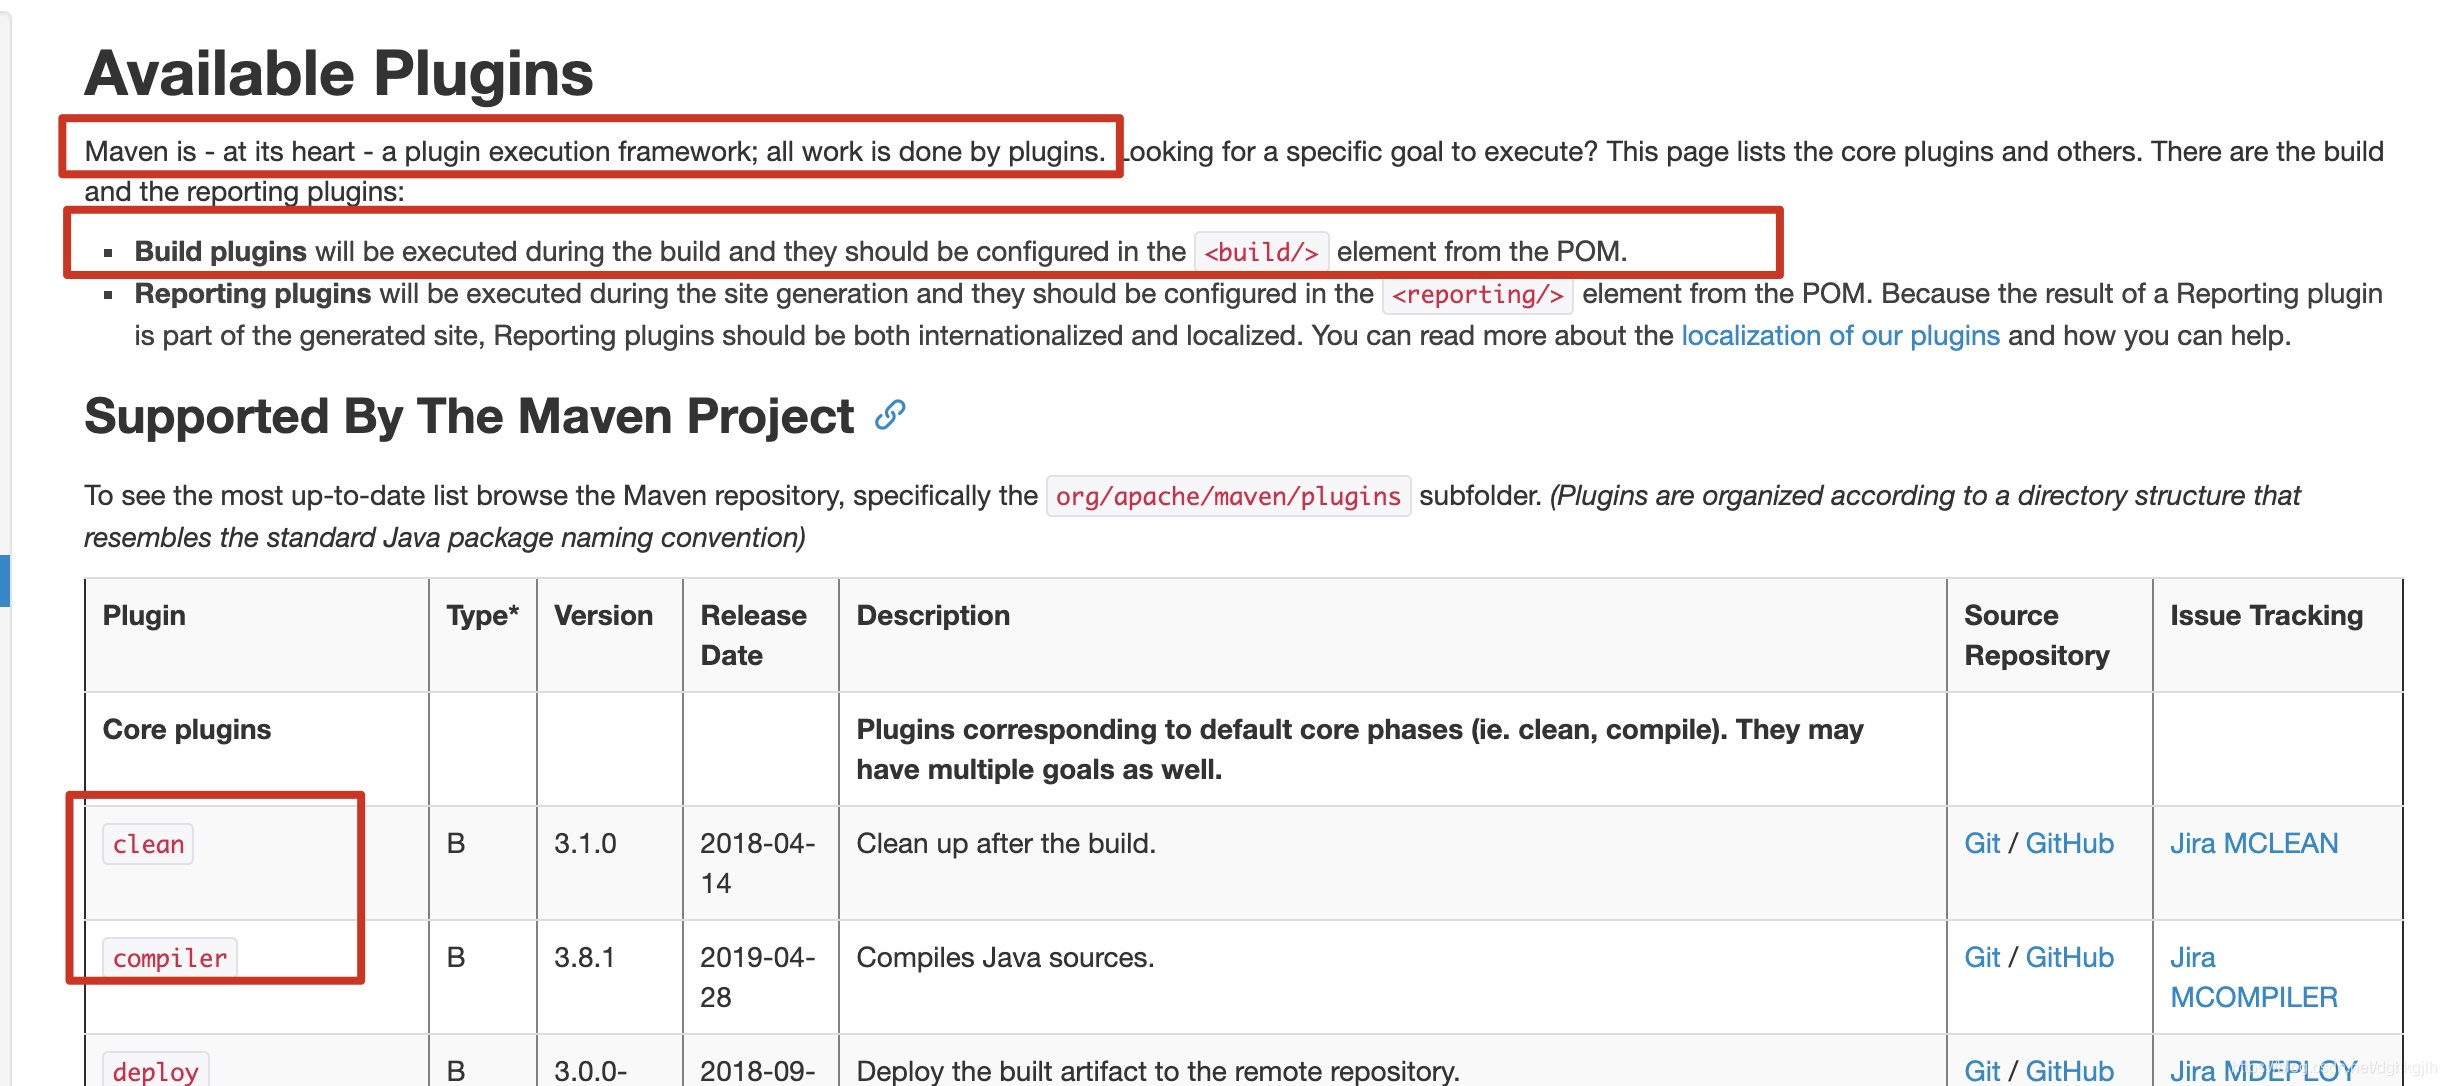
Its first sentence confirms that plugins perform Maven’s actual work. Plugins are usually configured under
Find a matching Description in the plugin list, then click the Plugin entry to open its documentation. It generally explains the phase in which the plugin runs and how to configure it.
A Plugin Example
At work, project JARs are usually compiled, built, packaged, and automatically published to the company’s private Maven repository. What if we want to publish a locally built JAR ourselves?
The requirement is to publish a JAR to a Maven repository.
Find a matching description in the plugin list.
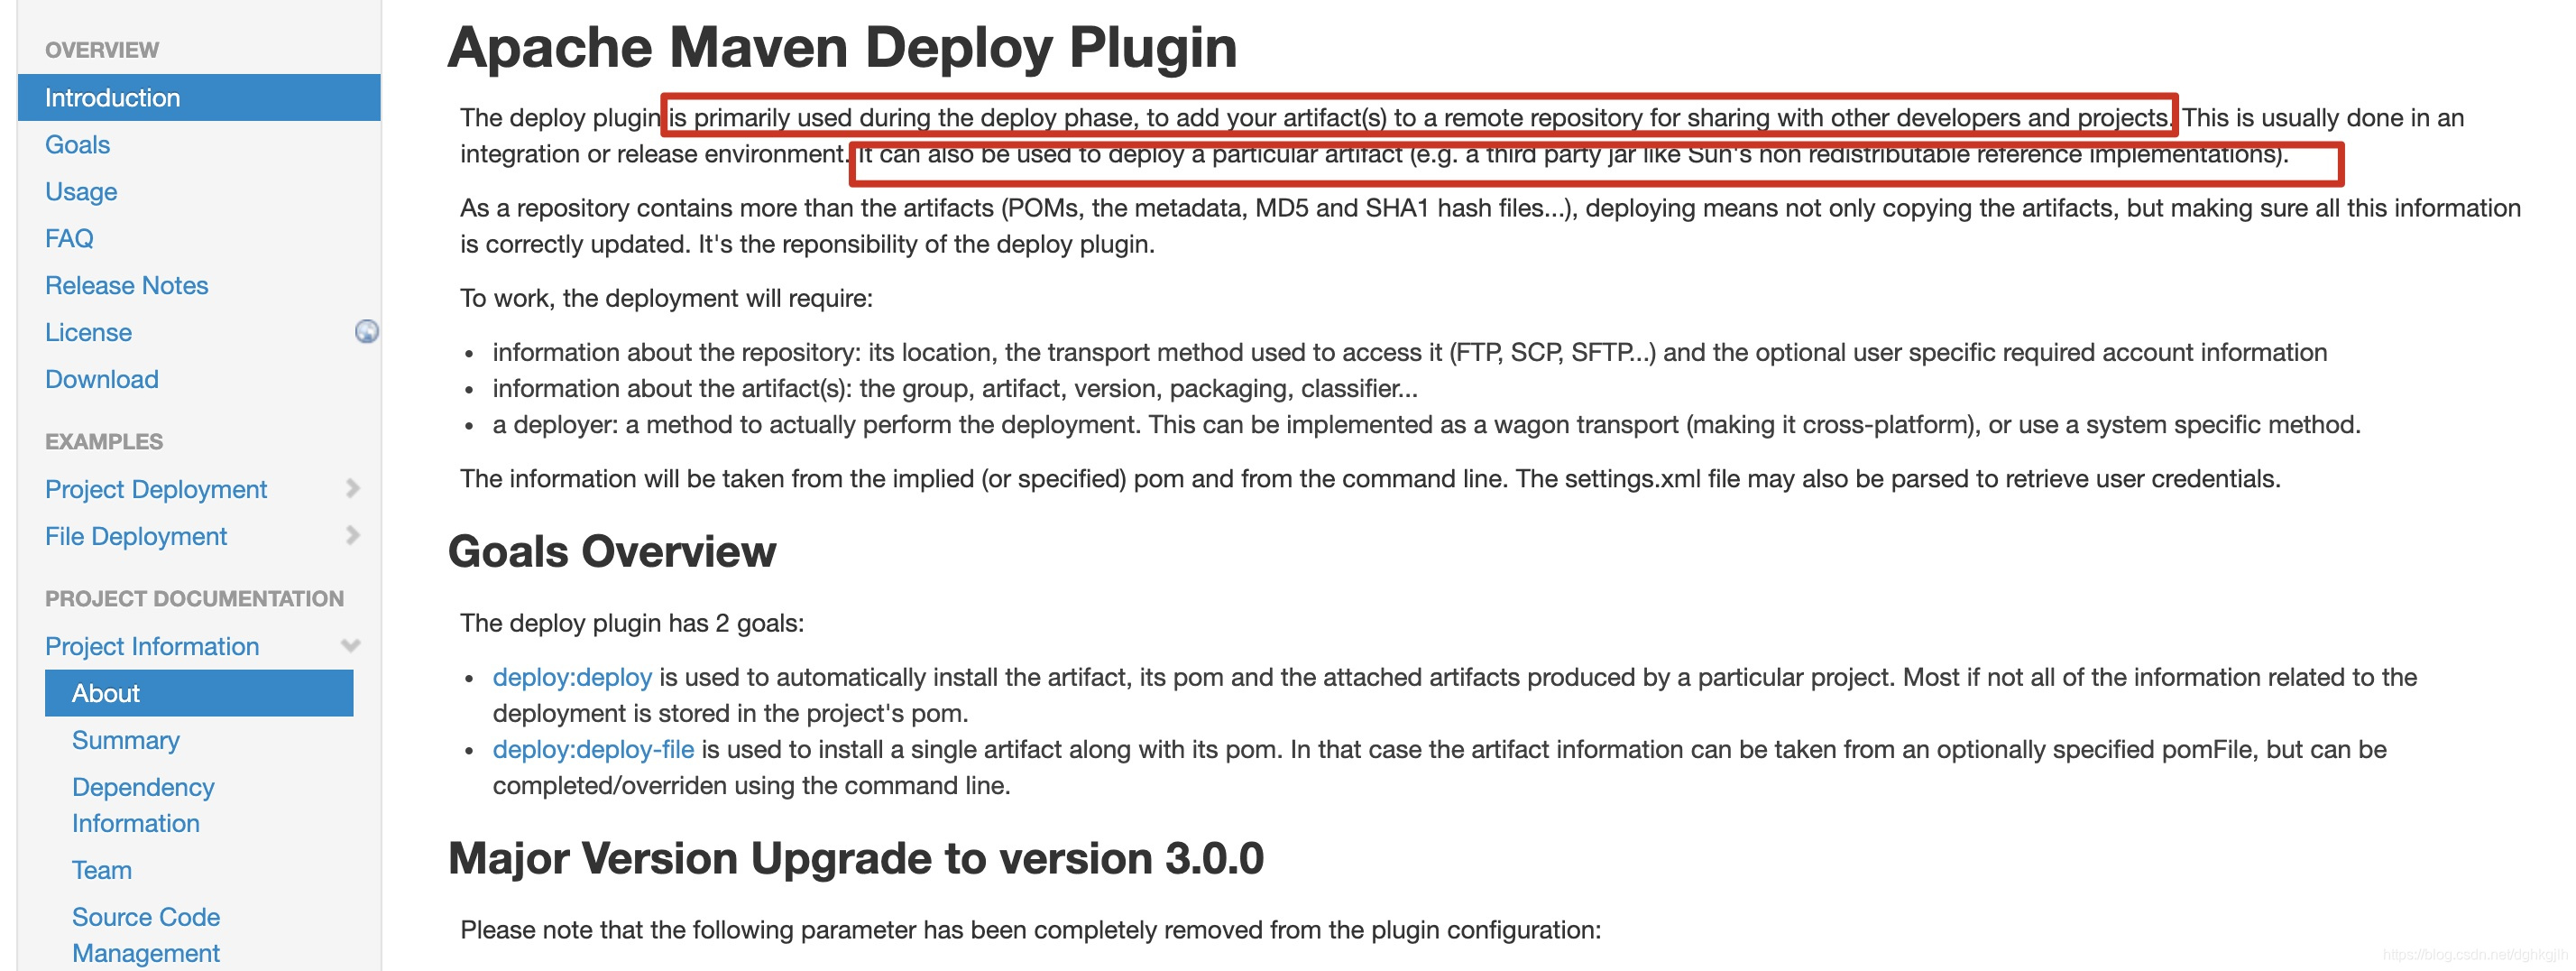
Click deploy to open the plugin documentation.
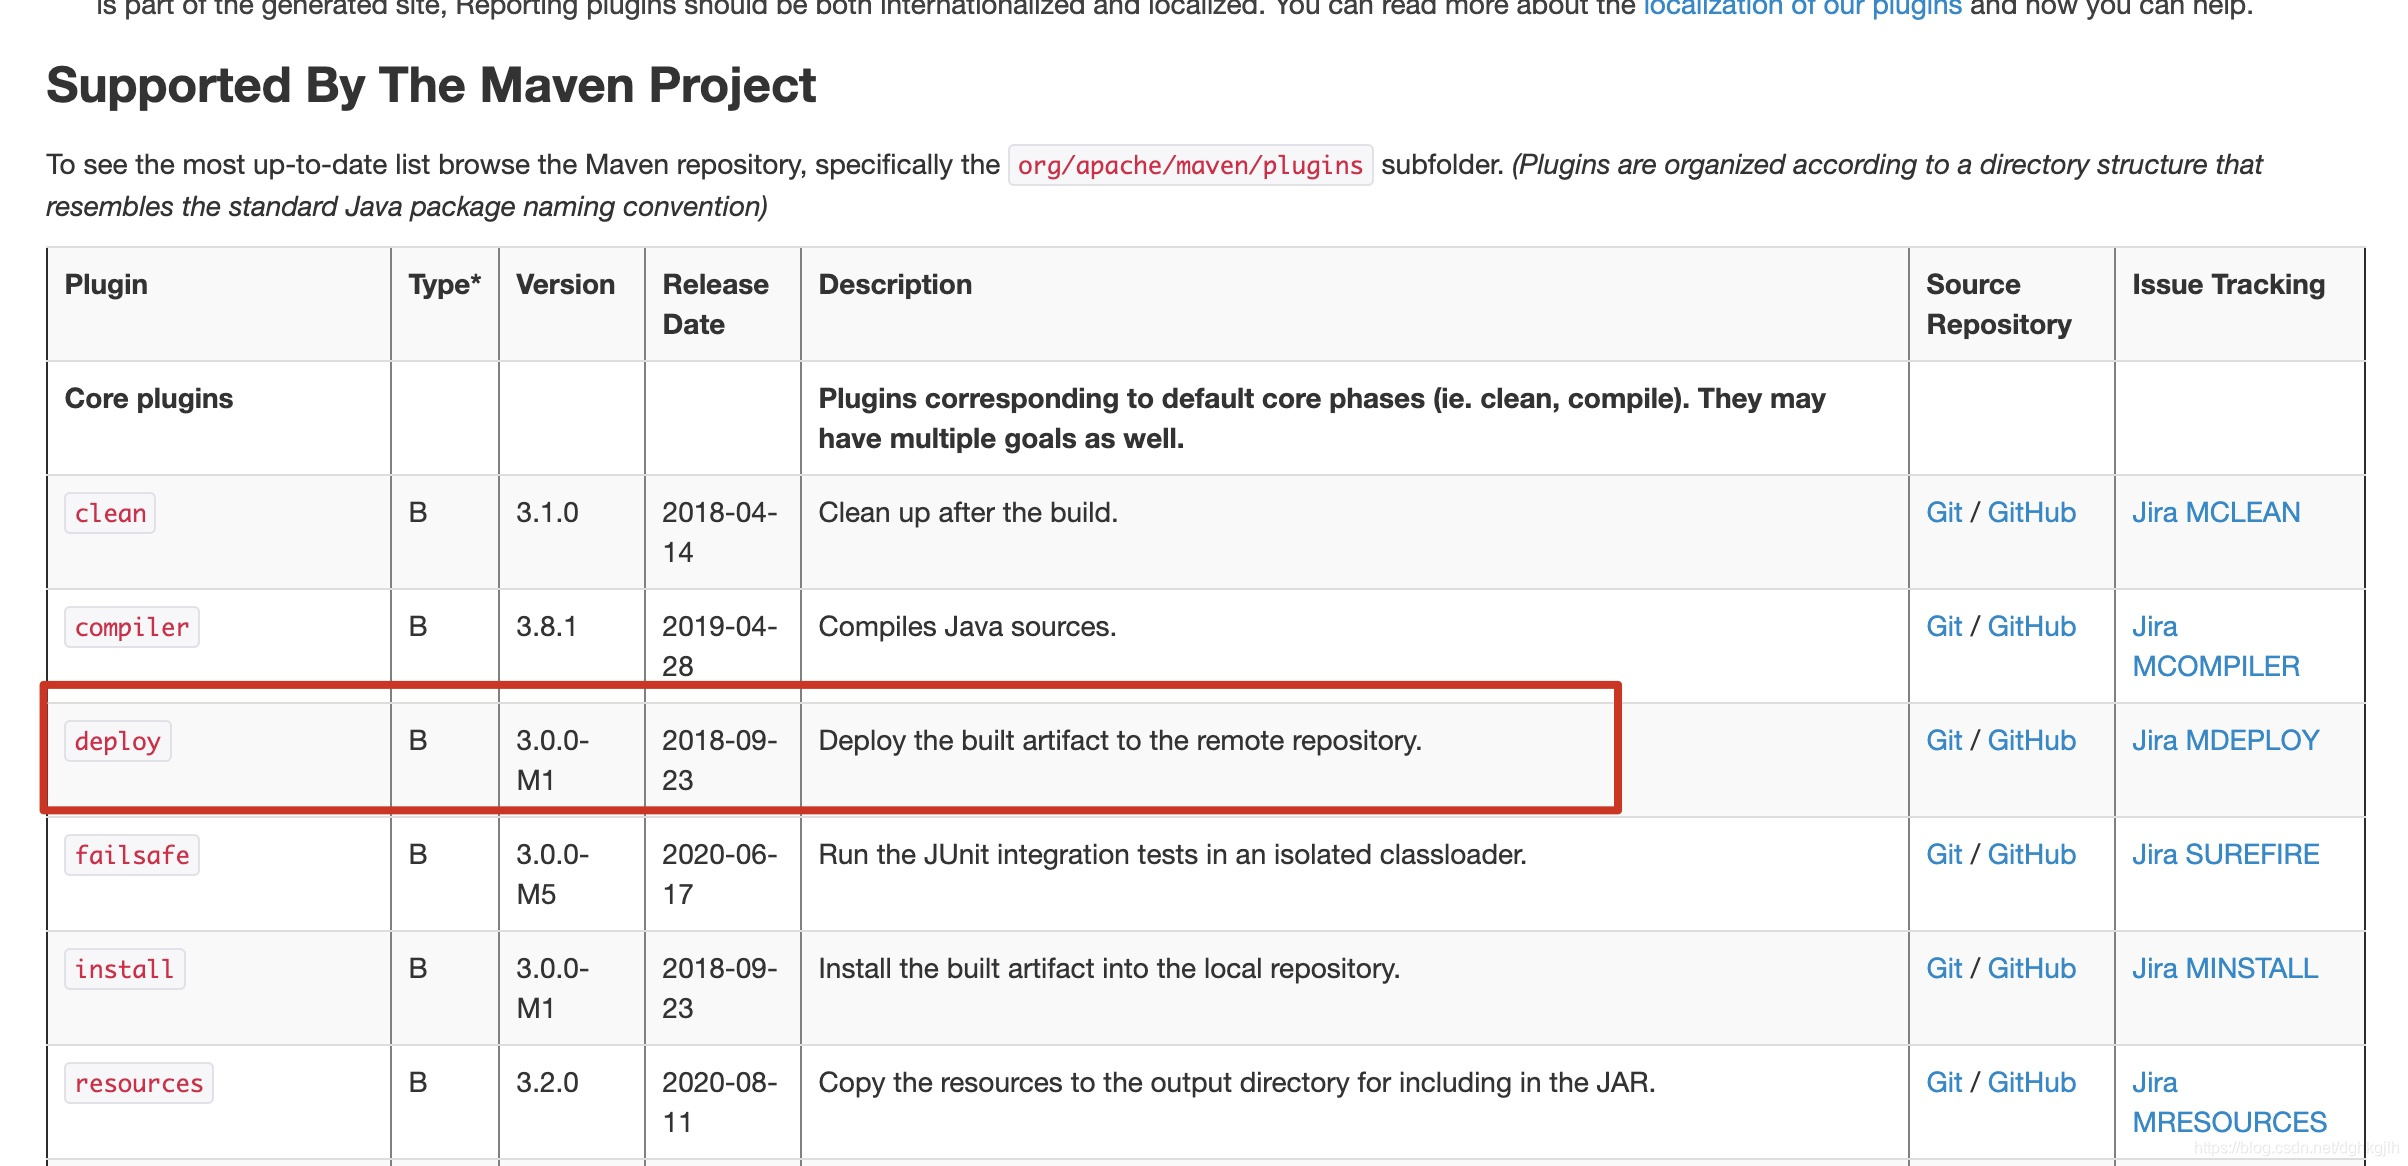 This plugin runs in the default lifecycle’s deploy phase and publishes to remote repositories. It can also deploy third-party JARs and generate corresponding POM files.
It has two goals: deploy and deploy-file.
The Usage section on the left explains how to use them.
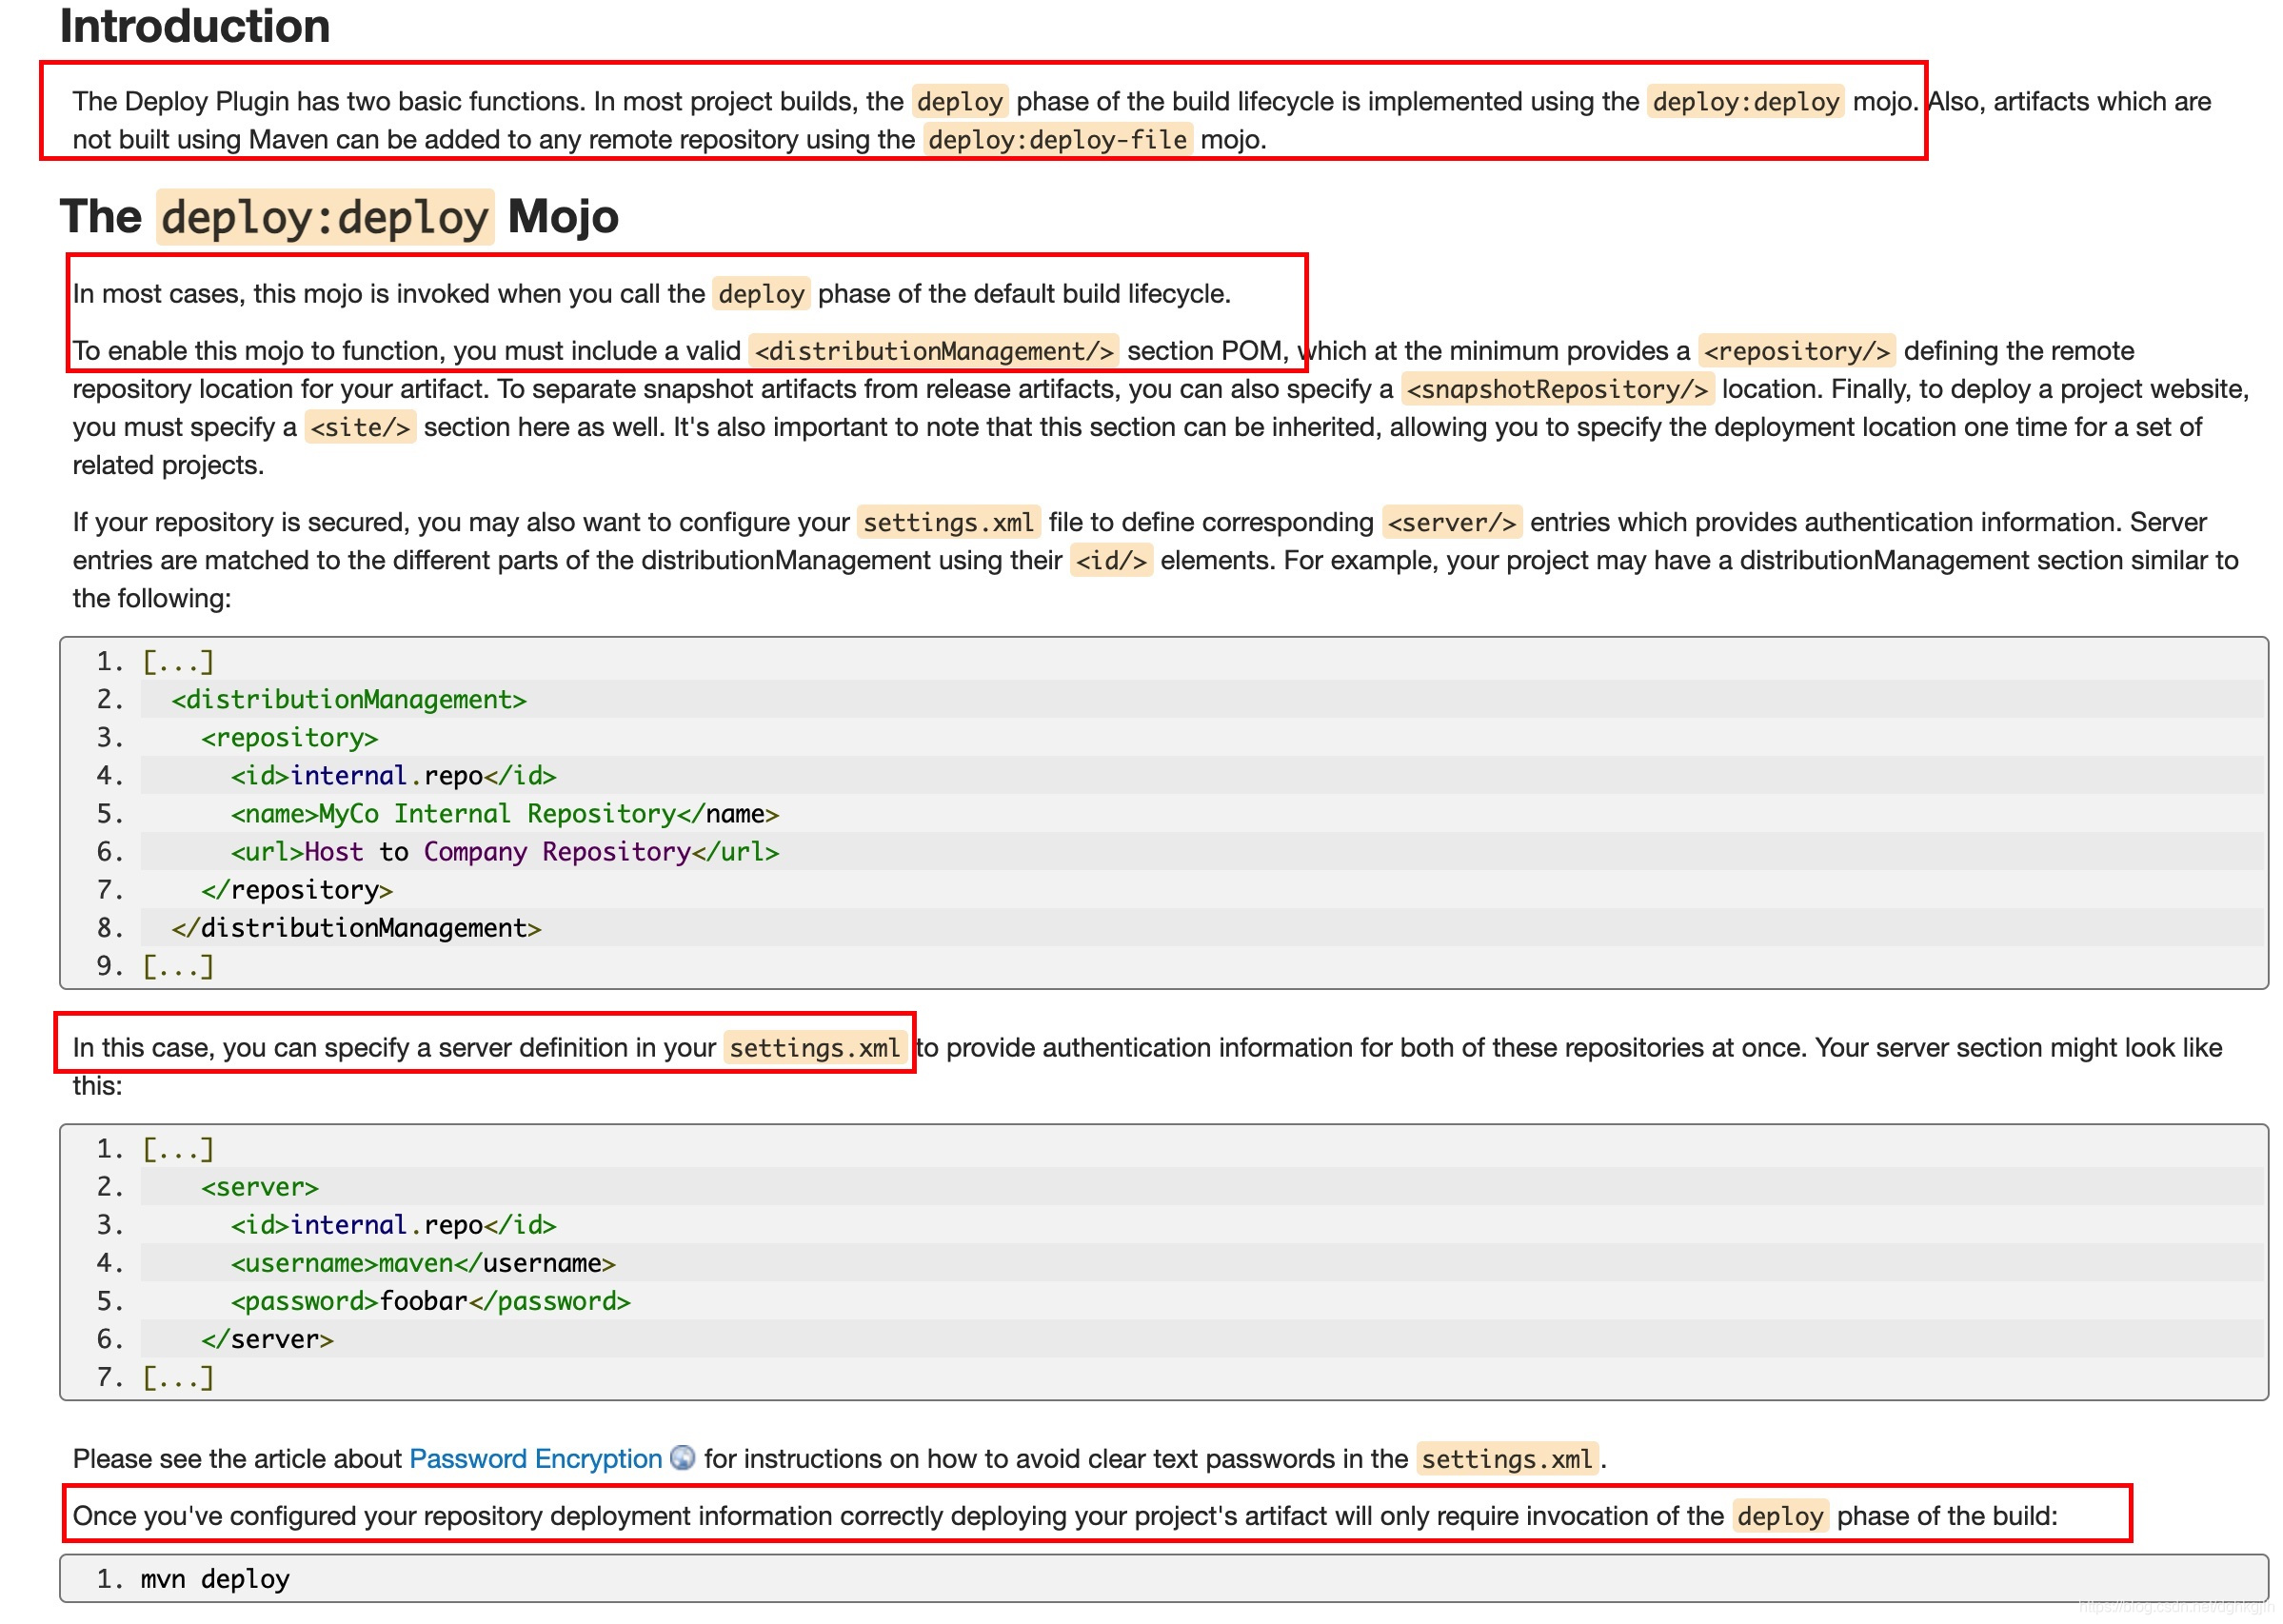 The usage page describes the appropriate scenario for each goal. Usually, mvn deploy uses deploy:deploy. Configure the repository in pom.xml and the server in the global setting.xml file, then use mvn deploy to publish the POM to the remote repository.
deploy-file applies when a project was not built with Maven. A common case is a third-party JAR without a Maven POM that we need in a Maven project. Download the JAR and deploy it manually to the remote repository. A POM is generated by default, letting us reference the dependency in pom.xml.
mvn deploy:deploy-file -Durl=repositoryUrl -DrepositoryId=repositoryId -Dfile=my-app.jar -DgoupId=com.mycompany.app -DartifactId=my-app -Dversion=1.0
-Dpackaging=jar
url: the private Maven repository URL.
repositoryId: the private repository server ID.
file: the JAR’s location.
groupId, artifactId, and version are all required.
packaging: the package format.
A corresponding POM is generated by default.
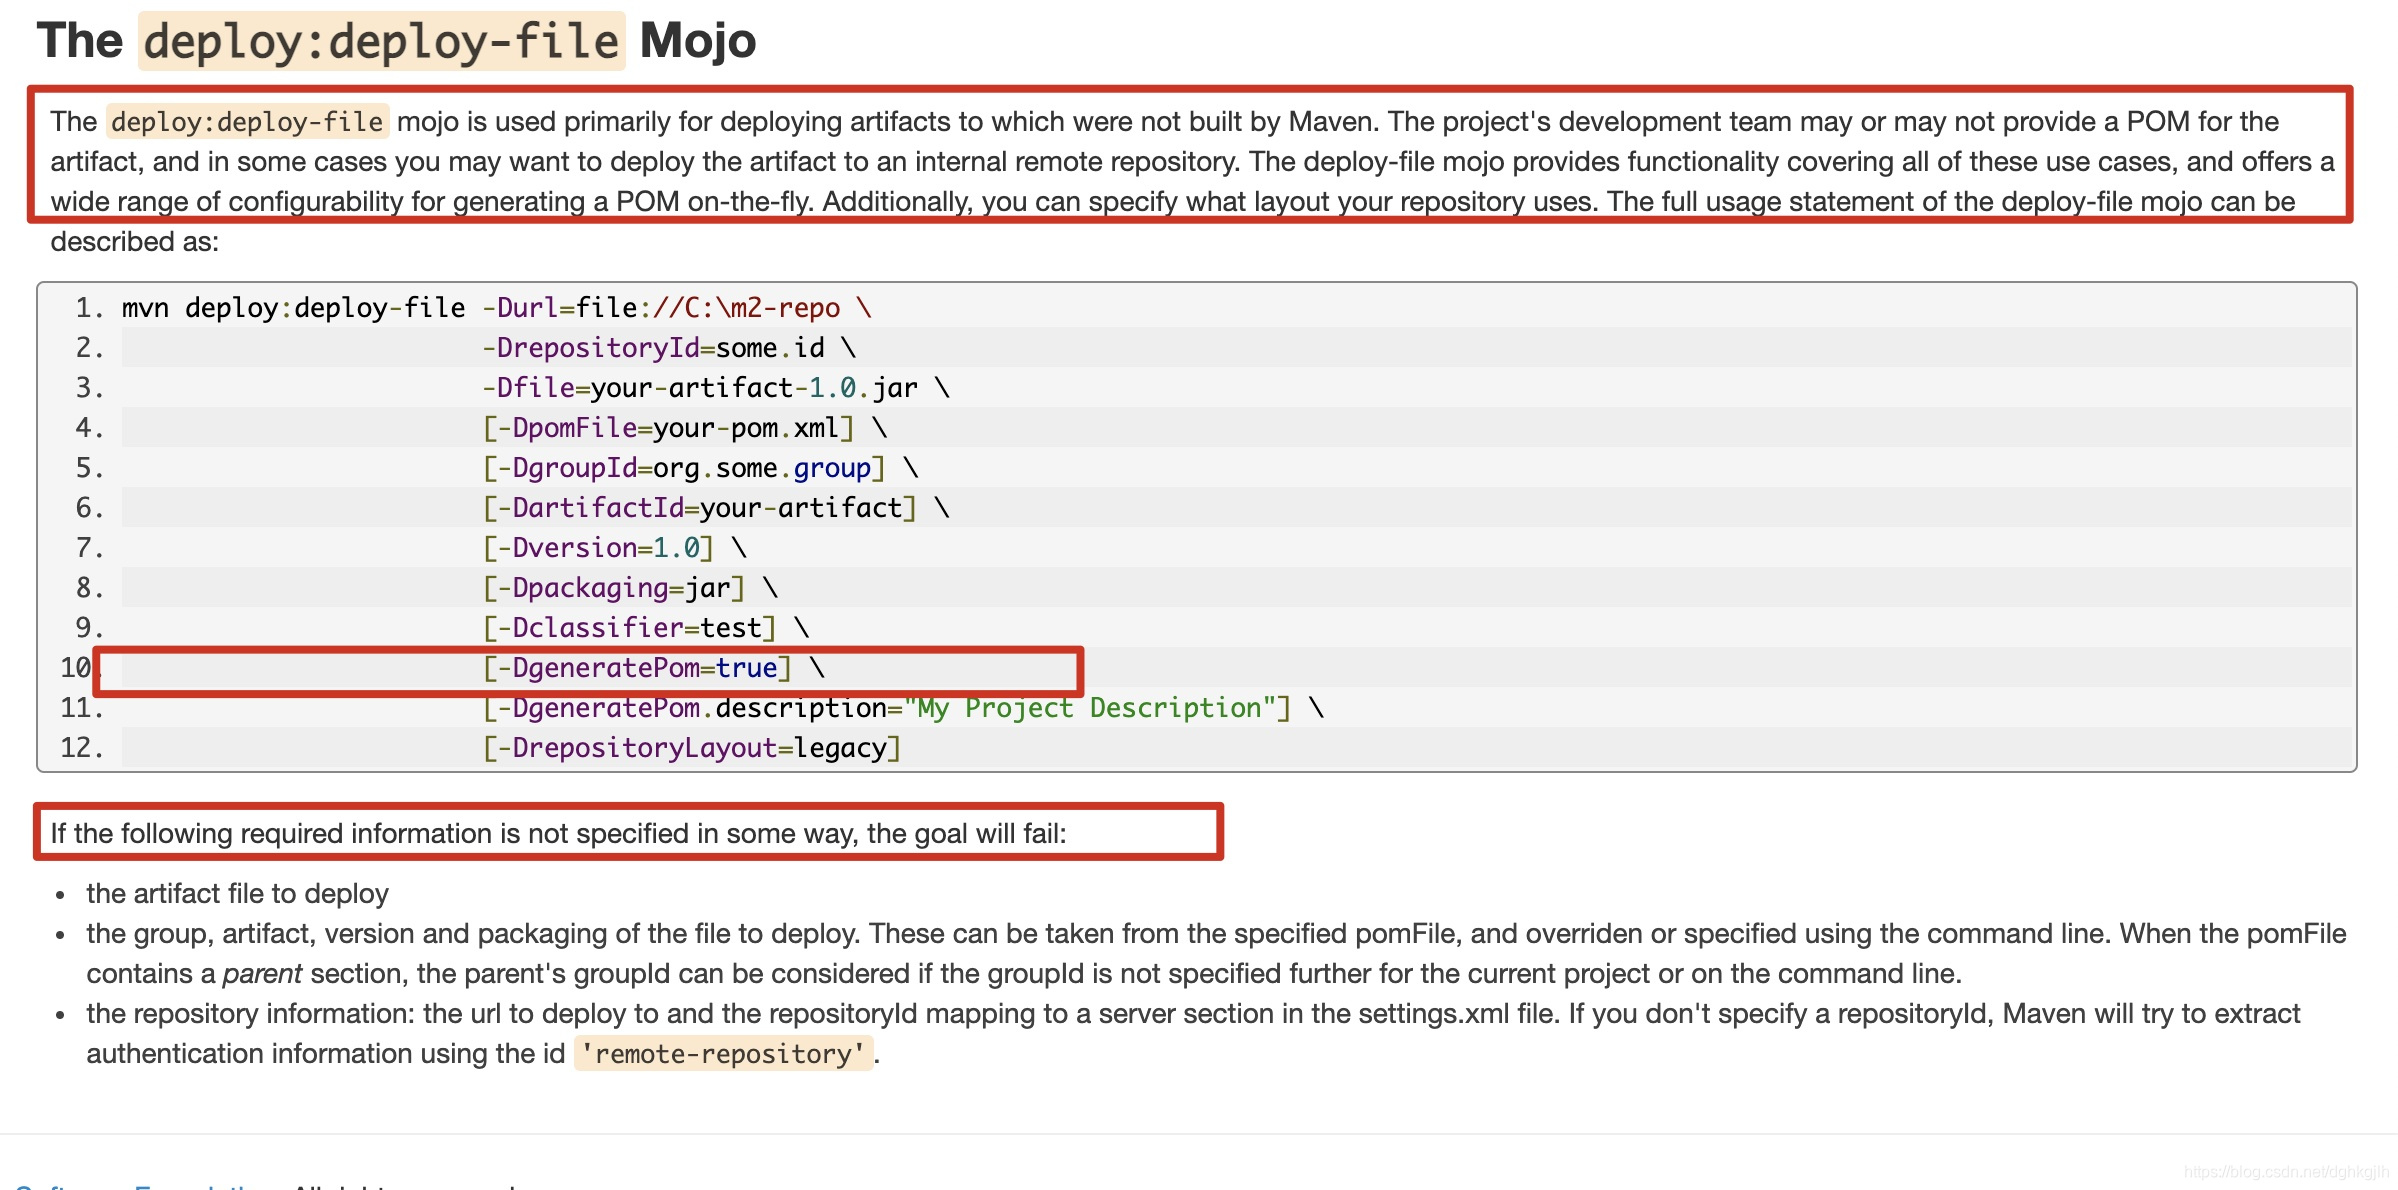
Choose plugins according to the actual requirement. We cannot remember every plugin, so searching may still be necessary—but we only need to find its name, locate it in the plugin list, and follow its documentation. We need not rely on miscellaneous articles for the entire process. Many online posts are unreliable or copied from one another, wasting our time.
Configure Plugins in the POM: pluginManagement vs. plugins
The plugin configuration guide explains configuration, including specifying phases and goals inside execution.
Individual plugin documentation usually provides a default configuration. Most Maven plugins follow common configuration rules.
Plugins are generally configured under pluginManagement within
For example, configure Surefire, which runs unit tests in the test phase.
<build>
    <pluginManagement>
      <plugins>
        <plugin>
          <!--Plugins must specify groupId, artifactId, and version-->
          <groupId>org.apache.maven.plugins</groupId>
          <artifactId>maven-surefire-plugin</artifactId>
          <version>2.22.2</version>
        </plugin>
      </plugins>
    </pluginManagement>
     <plugins>
        <plugin>
          <!--Plugins must specify groupId, artifactId, and version-->
          <groupId>org.apache.maven.plugins</groupId>
          <artifactId>maven-surefire-plugin</artifactId>
          <version>2.22.2</version>
           <configuration>
            <skipTests>true</skipTests>
          </configuration>
        </plugin>
      </plugins>
  </build>
Some plugins need an executions section specifying which goal runs in which phase.
Note the distinction between
If it is declared but not included, the plugin cannot be found.
Another common mistake is placing a plugin directly inside pluginManagement when trying to use it. The plugin is then unavailable.
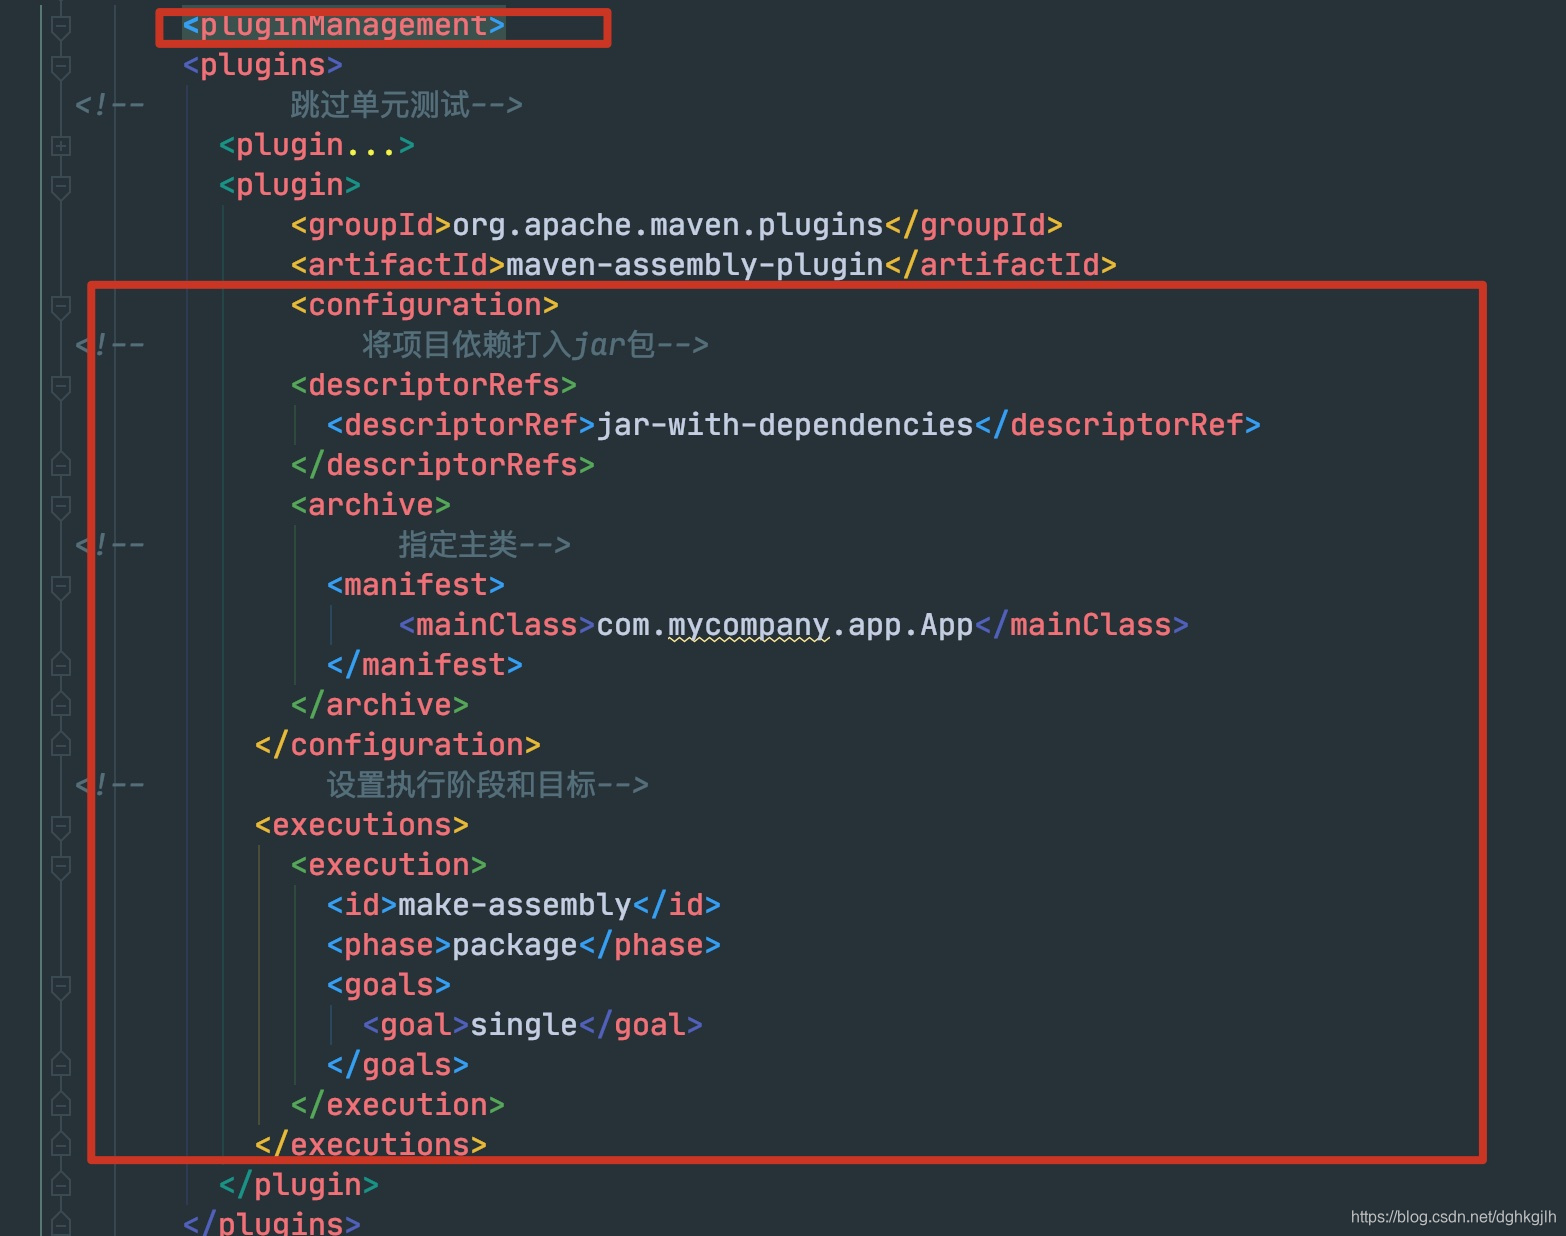
For example, putting the assembly plugin directly in pluginManagement does not activate it. IntelliJ IDEA’s panel can help determine whether it is active.
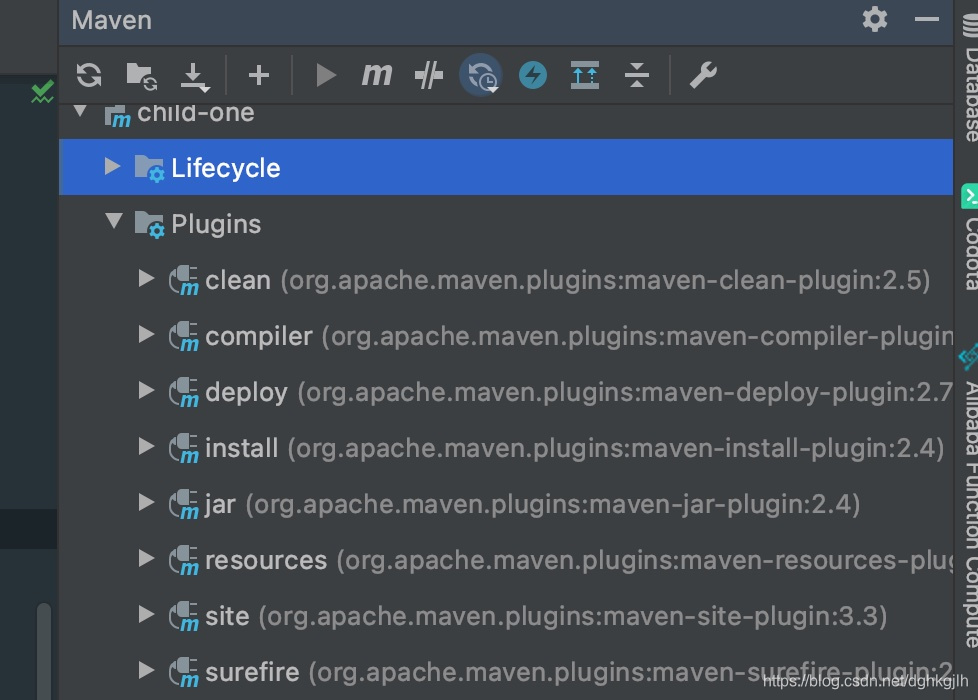
Although we configured it in pluginManagement, it does not appear under the IDE’s plugins, showing that the configuration has not taken effect.
Remove the pluginManagement wrapper or configure the plugin in a sibling plugins section.
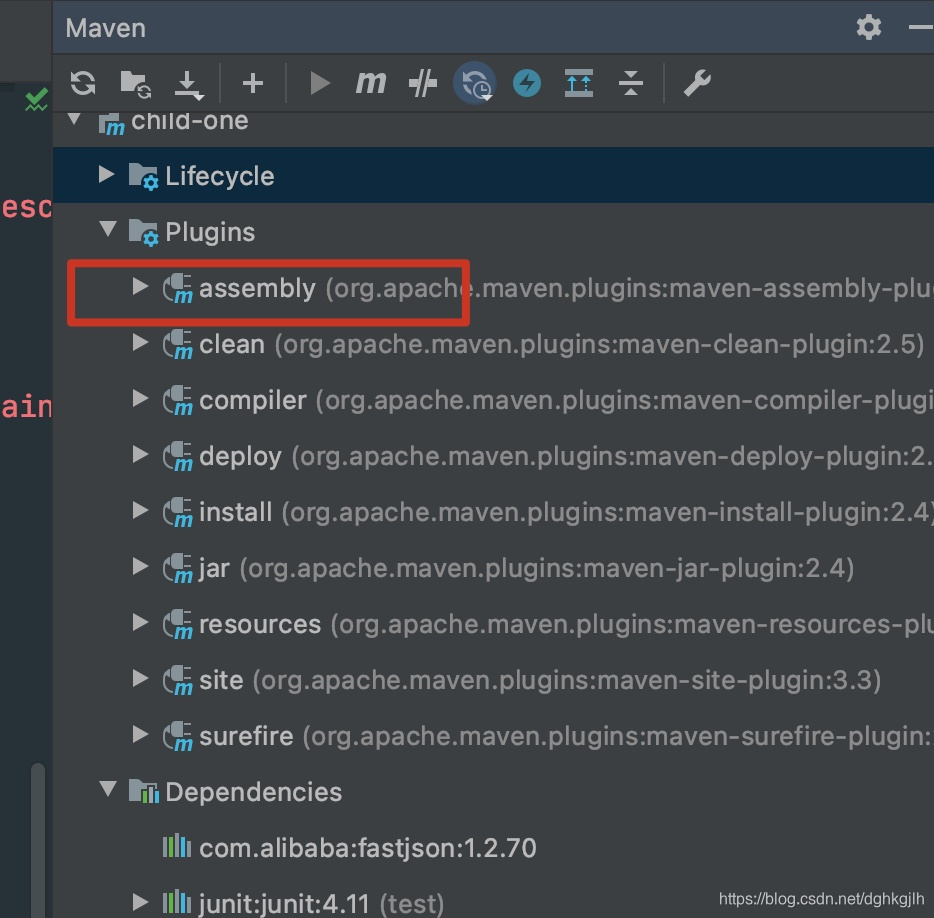
This is the correct configuration.
How Do We Skip Unit Tests?
Generally, do not skip unit tests; they are important.
Surefire handles the unit tests. See its test-skipping configuration.
<properties>
  <skipTests>false</skipTests>
</properties>

<build>
   <plugins>
     <plugin>
       <groupId>org.apache.maven.plugins</groupId>
       <artifactId>maven-surefire-plugin</artifactId>
       <version>2.22.2</version>
       <configuration>
         <skipTests>${skipTests}</skipTests>
       </configuration>
     </plugin>
   </plugins>
</build>
Commands:
Run unit tests:
mvn testSkip unit tests:
# The property after -D is the custom skipTests property under properties in the POM; true is passed here
# The property name is configurable, so a Surefire test-skipping command depends on the property name in the POM
mvn -DskipTests=true
The second form:
# This skips both test compilation and execution. I do not recommend it: after code changes, some tests may not even start, and tests are generally required to pass. Skipping compilation entirely is undesirable
mvn -Dmaven.test.skip=true
Run Only Some Unit Tests
<plugin>
   <groupId>org.apache.maven.plugins</groupId>
   <artifactId>maven-surefire-plugin</artifactId>
   <version>2.22.2</version>
    <configuration>
      <includes>
        <include>SimpleServletTest.java</include>
      </includes>
    </configuration>
</plugin>
See the inclusion and exclusion documentation.
POM Structure
pom:Project Object Model
So far, we have not configured a POM in detail. Once we understand lifecycles, phases, plugins, and goals—and that Maven delegates actual work to plugin goals—POM configuration becomes much easier.
Basic Structure
Required POM elements:
<preject>
  <modelVersion>4.0.0</modelVersion>
  <groupId>com.mycompany.app</groupId>
  <artifactId>my-app</artifactId>
  <version>1.0.0</version>
</preject>
The complete artifact coordinates are
The default packaging type is jar.
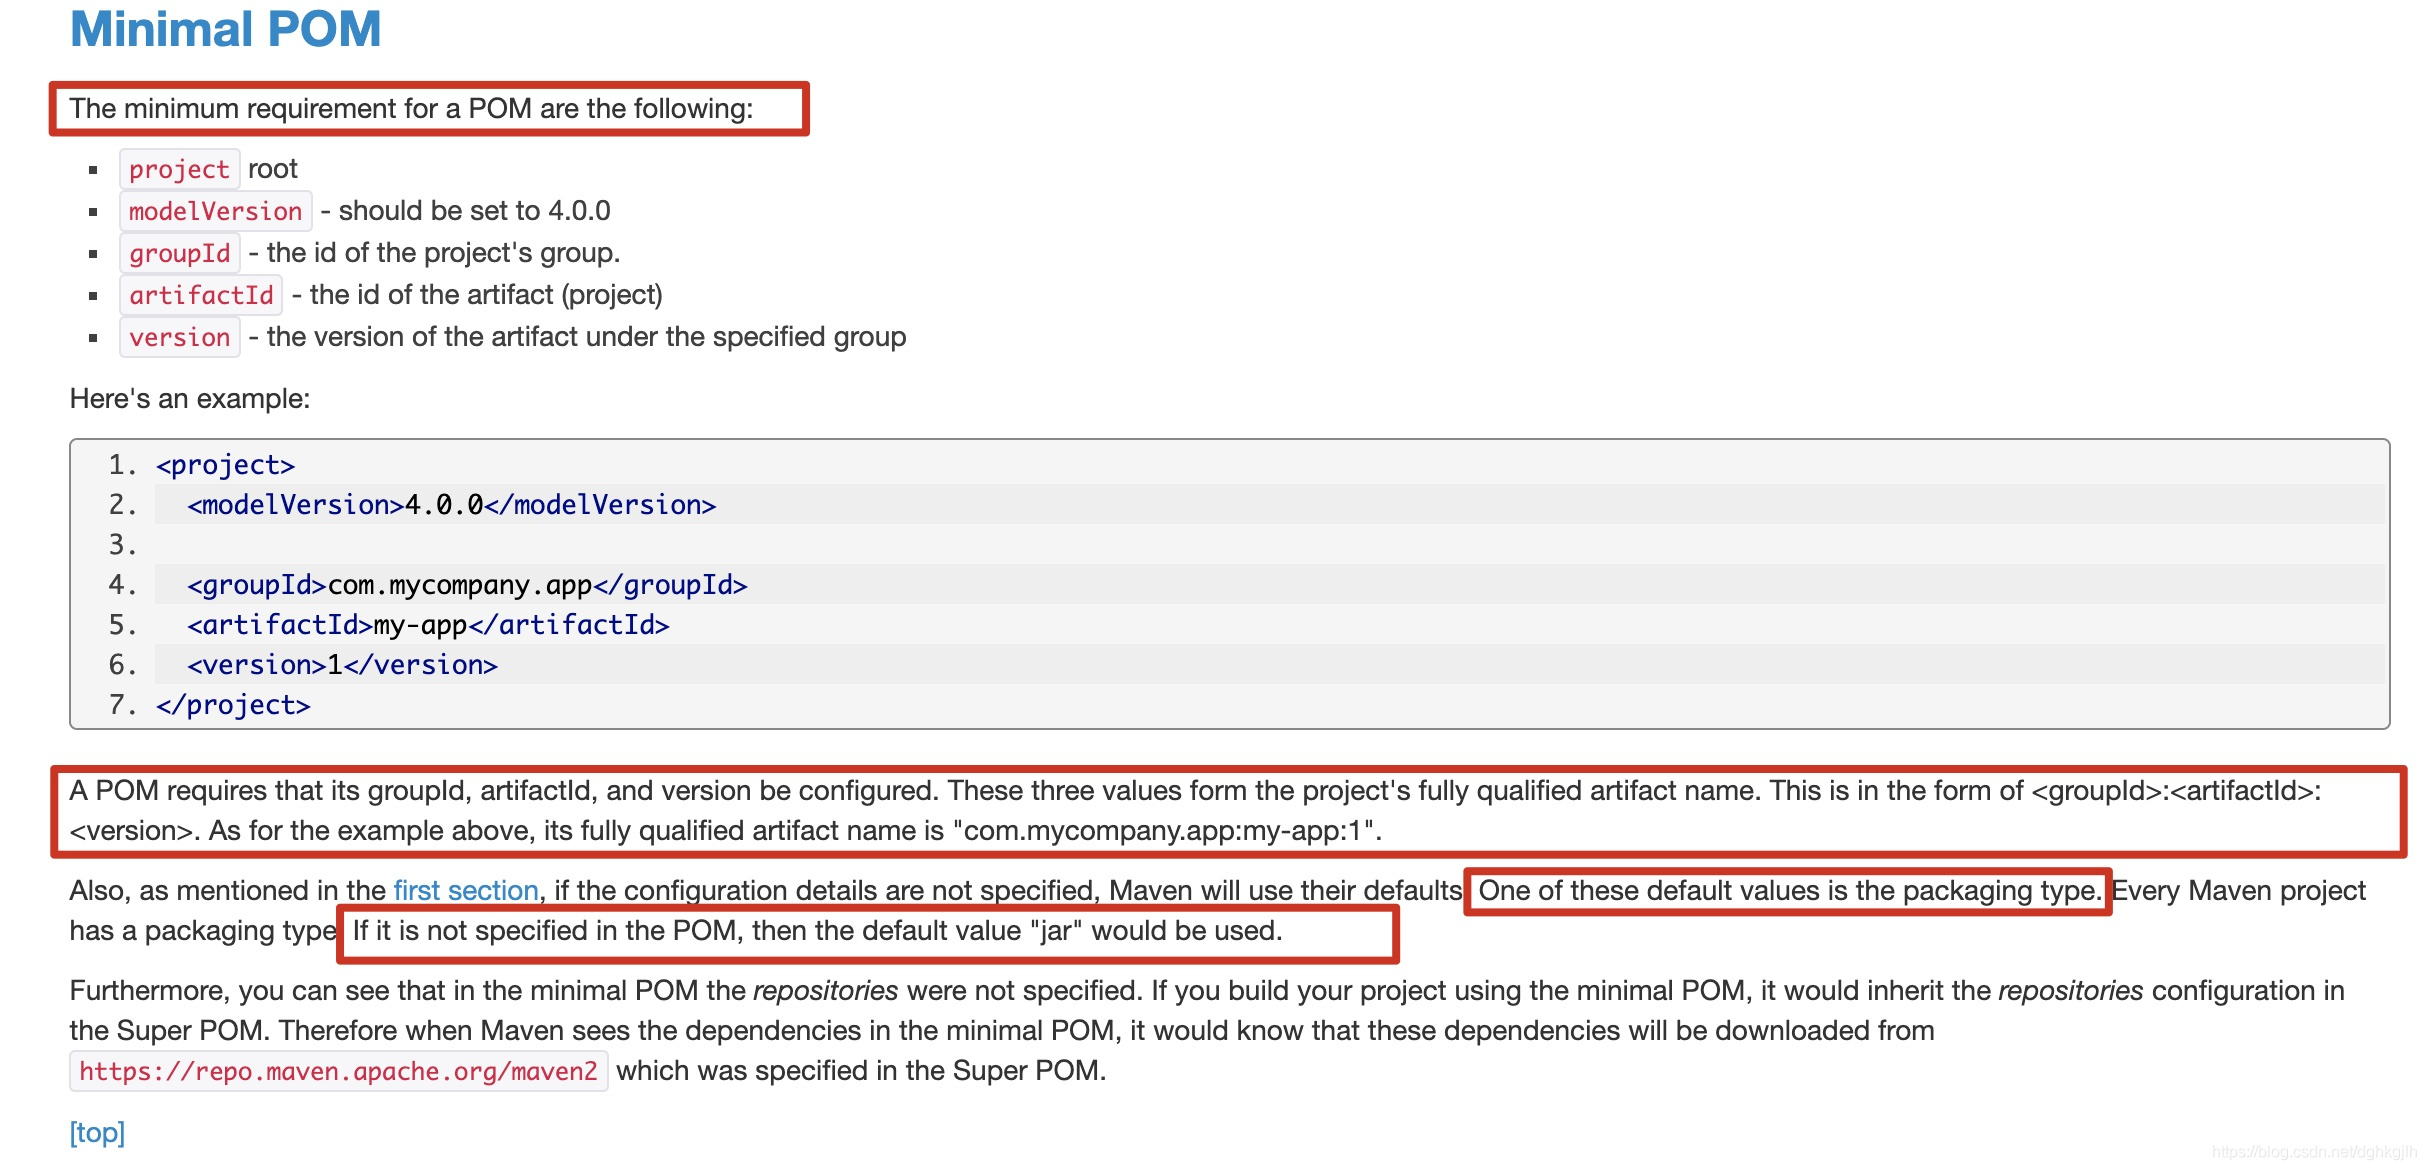 A version containing SNAPSHOT is a development version whose reliability is not guaranteed. Projects should minimize these dependencies and use release versions.
Manage Dependency Versions
A POM may contain dozens or hundreds of dependencies, each with a version. Searching throughout it to change versions is inconvenient and makes the project’s dependencies harder to review. Versions are therefore generally collected near the top for easy inspection.
For example:
<properties>
  <fast.json.version>3.1.0</fast.json.version>
  <mysql.version>8.0.0</mysql.version>
</properties>

<dependencies>
  <dependency>
    <groupId>com.alibaba</groupId>
    <artifactId>fast.json</artifactId>
    <version>${fast.json.version}</version>
  </dependency>
</dependencies>
Put custom version properties inside
properties can also receive property values passed through Maven command-line arguments.
For example:
mvn package -DskipTests=trueThe argument after -D requires a
The rules are:
- Define a property named for the dependency and its version, and assign the desired version.
- Reference that property inside the dependency’s
element, using ${PROPERTY_NAME}.
Dependency Management: dependencyManagement vs. dependencies
See the dependency mechanism documentation.
A company may have many projects sharing dependencies such as the MySQL driver, Druid, and Spring Boot. For unified management, extract the shared dependencies into a parent POM used by all projects. Each project can add its other dependencies separately.
Why manage dependencies centrally? A few lessons from practice illustrate the reasons:
- If projects use different Spring Boot versions, later requirements may make previously unrelated projects communicate, particularly in a microservice environment. Version differences may cause project B to fail when using an API from project A. Standardizing versions at that point may break other parts of a project. Avoid this situation by aligning shared dependencies from the beginning, especially those used throughout the platform.
- Even without that problem, a private Maven repository must store many versions of a framework if different projects use different versions. This wastes storage and complicates cleanup: which versions can safely be removed? With many projects, nobody can easily guarantee that deleting one will not cause a problem. Unified dependencies leave one common framework POM, substantially reducing storage. A platform-wide upgrade then lets us remove the previous POM.
Example:
Define a shared POM to manage common dependencies.
parentPom.xml
<!--The parent POM has packaging type pom-->
<packaging>pom</packaging>

<properties>
  <fast.json.version>3.1.0</fast.json.version>
  <Druid.version>3.0.0</Druid.version>
  <!--...Other dependency version settings omitted-->
</properties>

<dependencyManagement>
  <dependencies>
     <groupId>com.alibaba</groupId>
     <artifactId>fast.json</artifactId>
     <version>${fast.json.version}</version>
  </dependencies>
  <!--...Other common dependencies omitted-->
</dependencyManagement>

  <dependencies>
     <groupId>com.alibaba</groupId>
     <artifactId>Druid</artifactId>
     <version>${Druid.version}</version>
  </dependencies>
Reference the parent POM’s dependencies when creating project A.
<project>
  <modelVerson>4.0.0</modelVerson>

  <!--Declare the parent POM in the child project-->
  <parent>
     <groupId>com.mycompany.myapp</groupId>
     <artifactId>my-parent</artifactId>
     <version>1.0.0</version>
  </parent>

  <!--Child project configuration-->
  <groupId>com.mycompany.app</groupId>
  <artifactId>my-app</artifactId>
  <version>1.0.0</version>
</project>
The parent POM can declare dependencies inside dependencyManagement or directly under dependencies. What is the difference?
The distinction is:
-
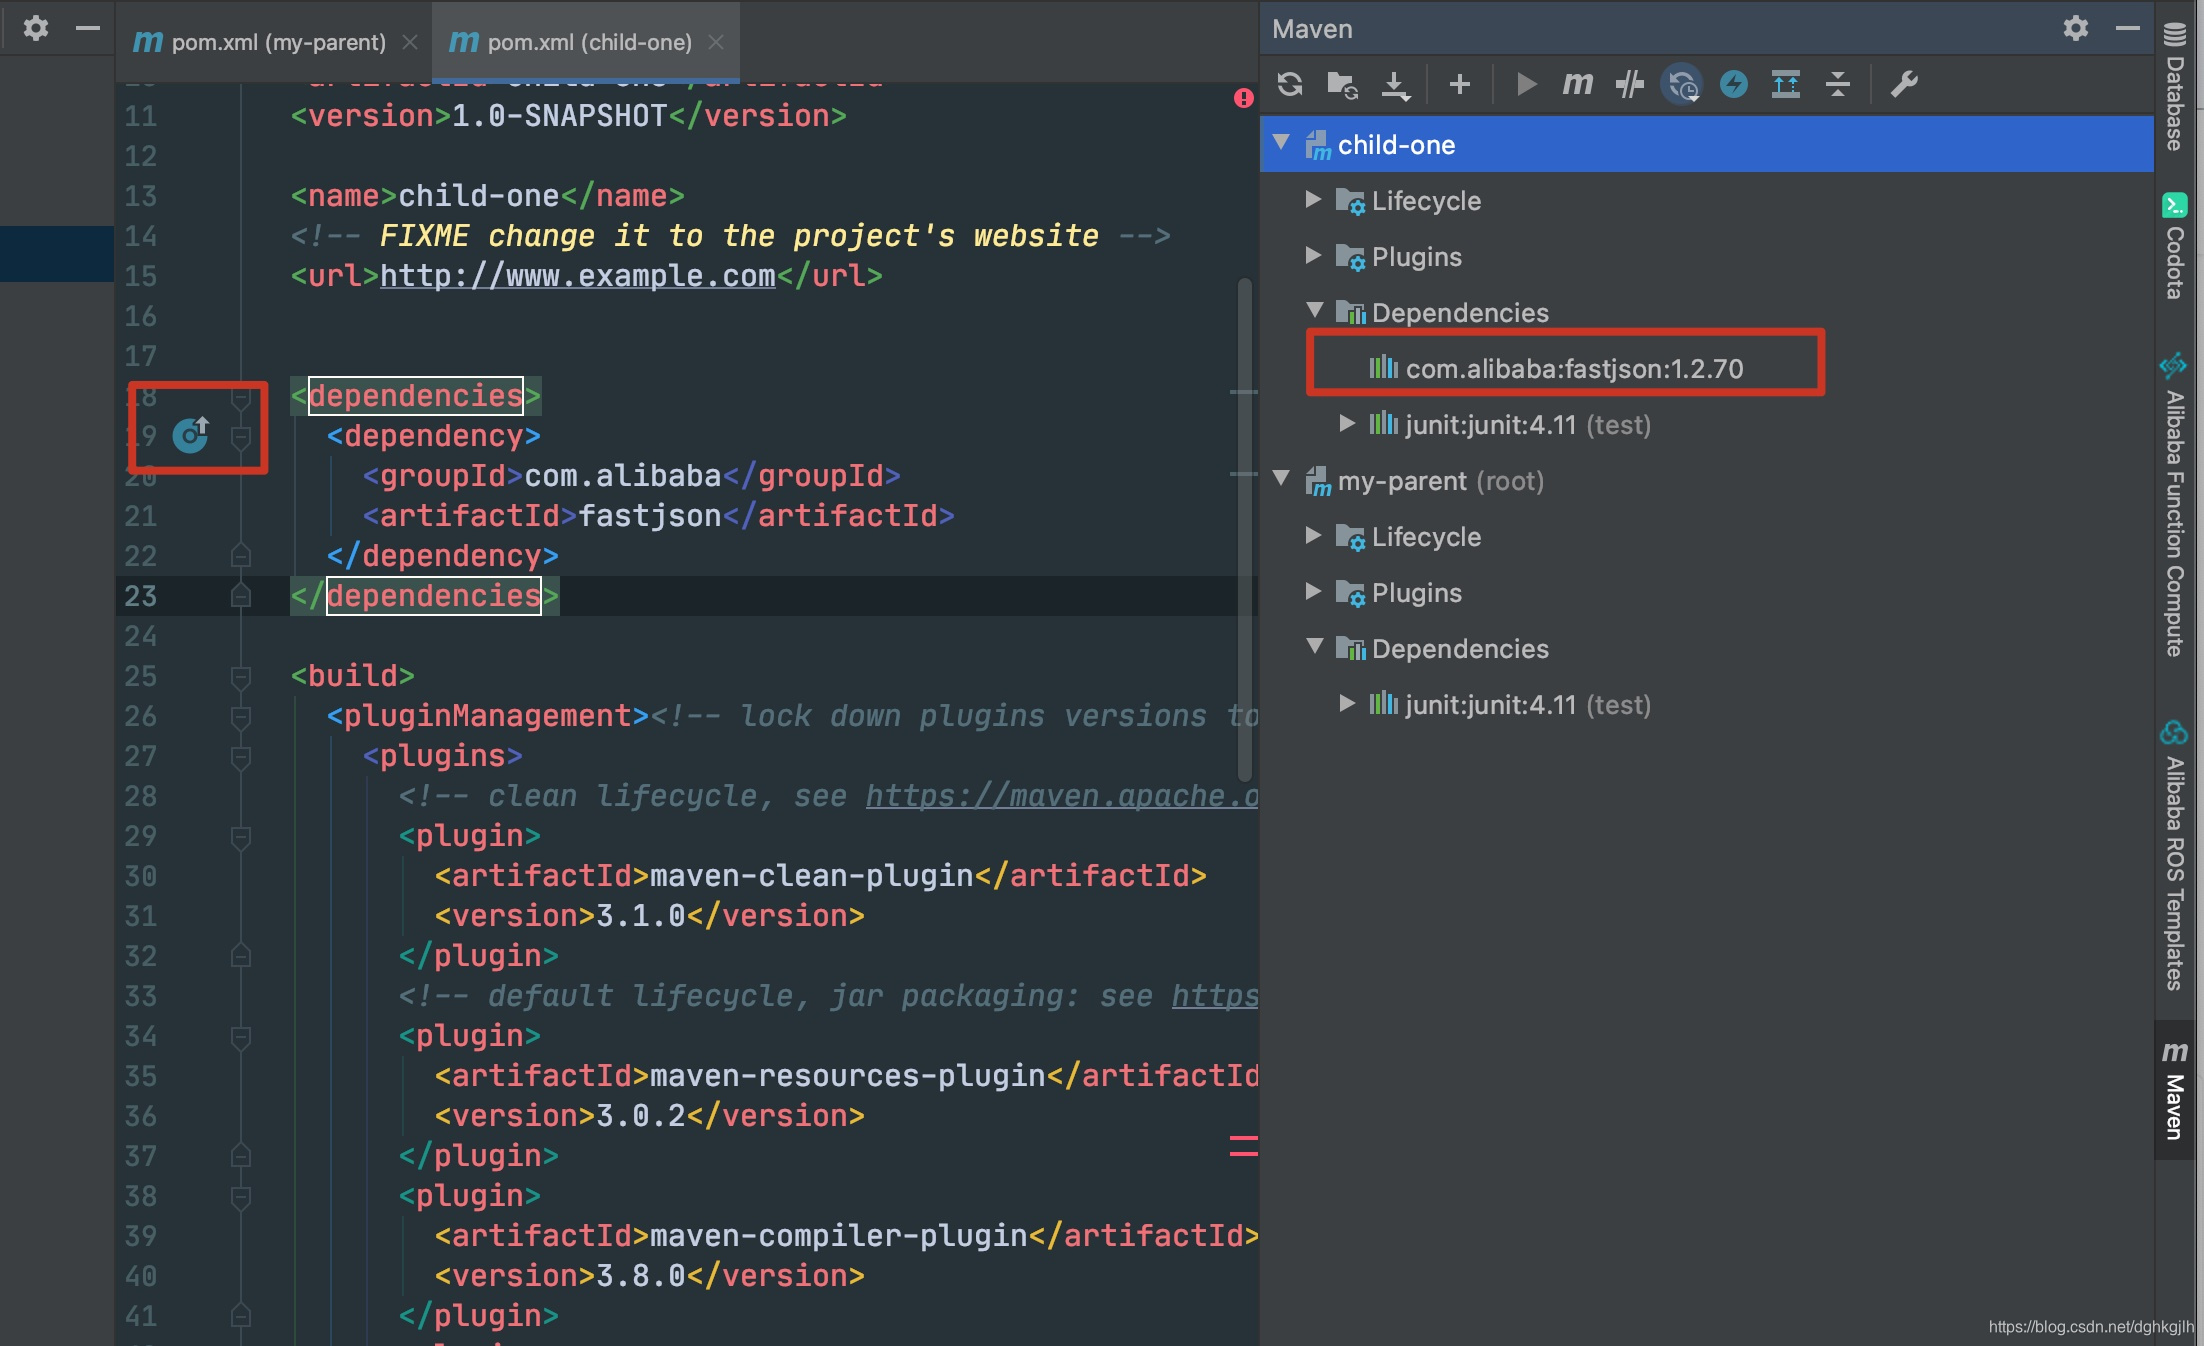
Dependencies inside <dependencyManagent> in the parent POM are not inherited by default. If a child includes such a dependency without declaring its version, it inherits the version from the parent.
-
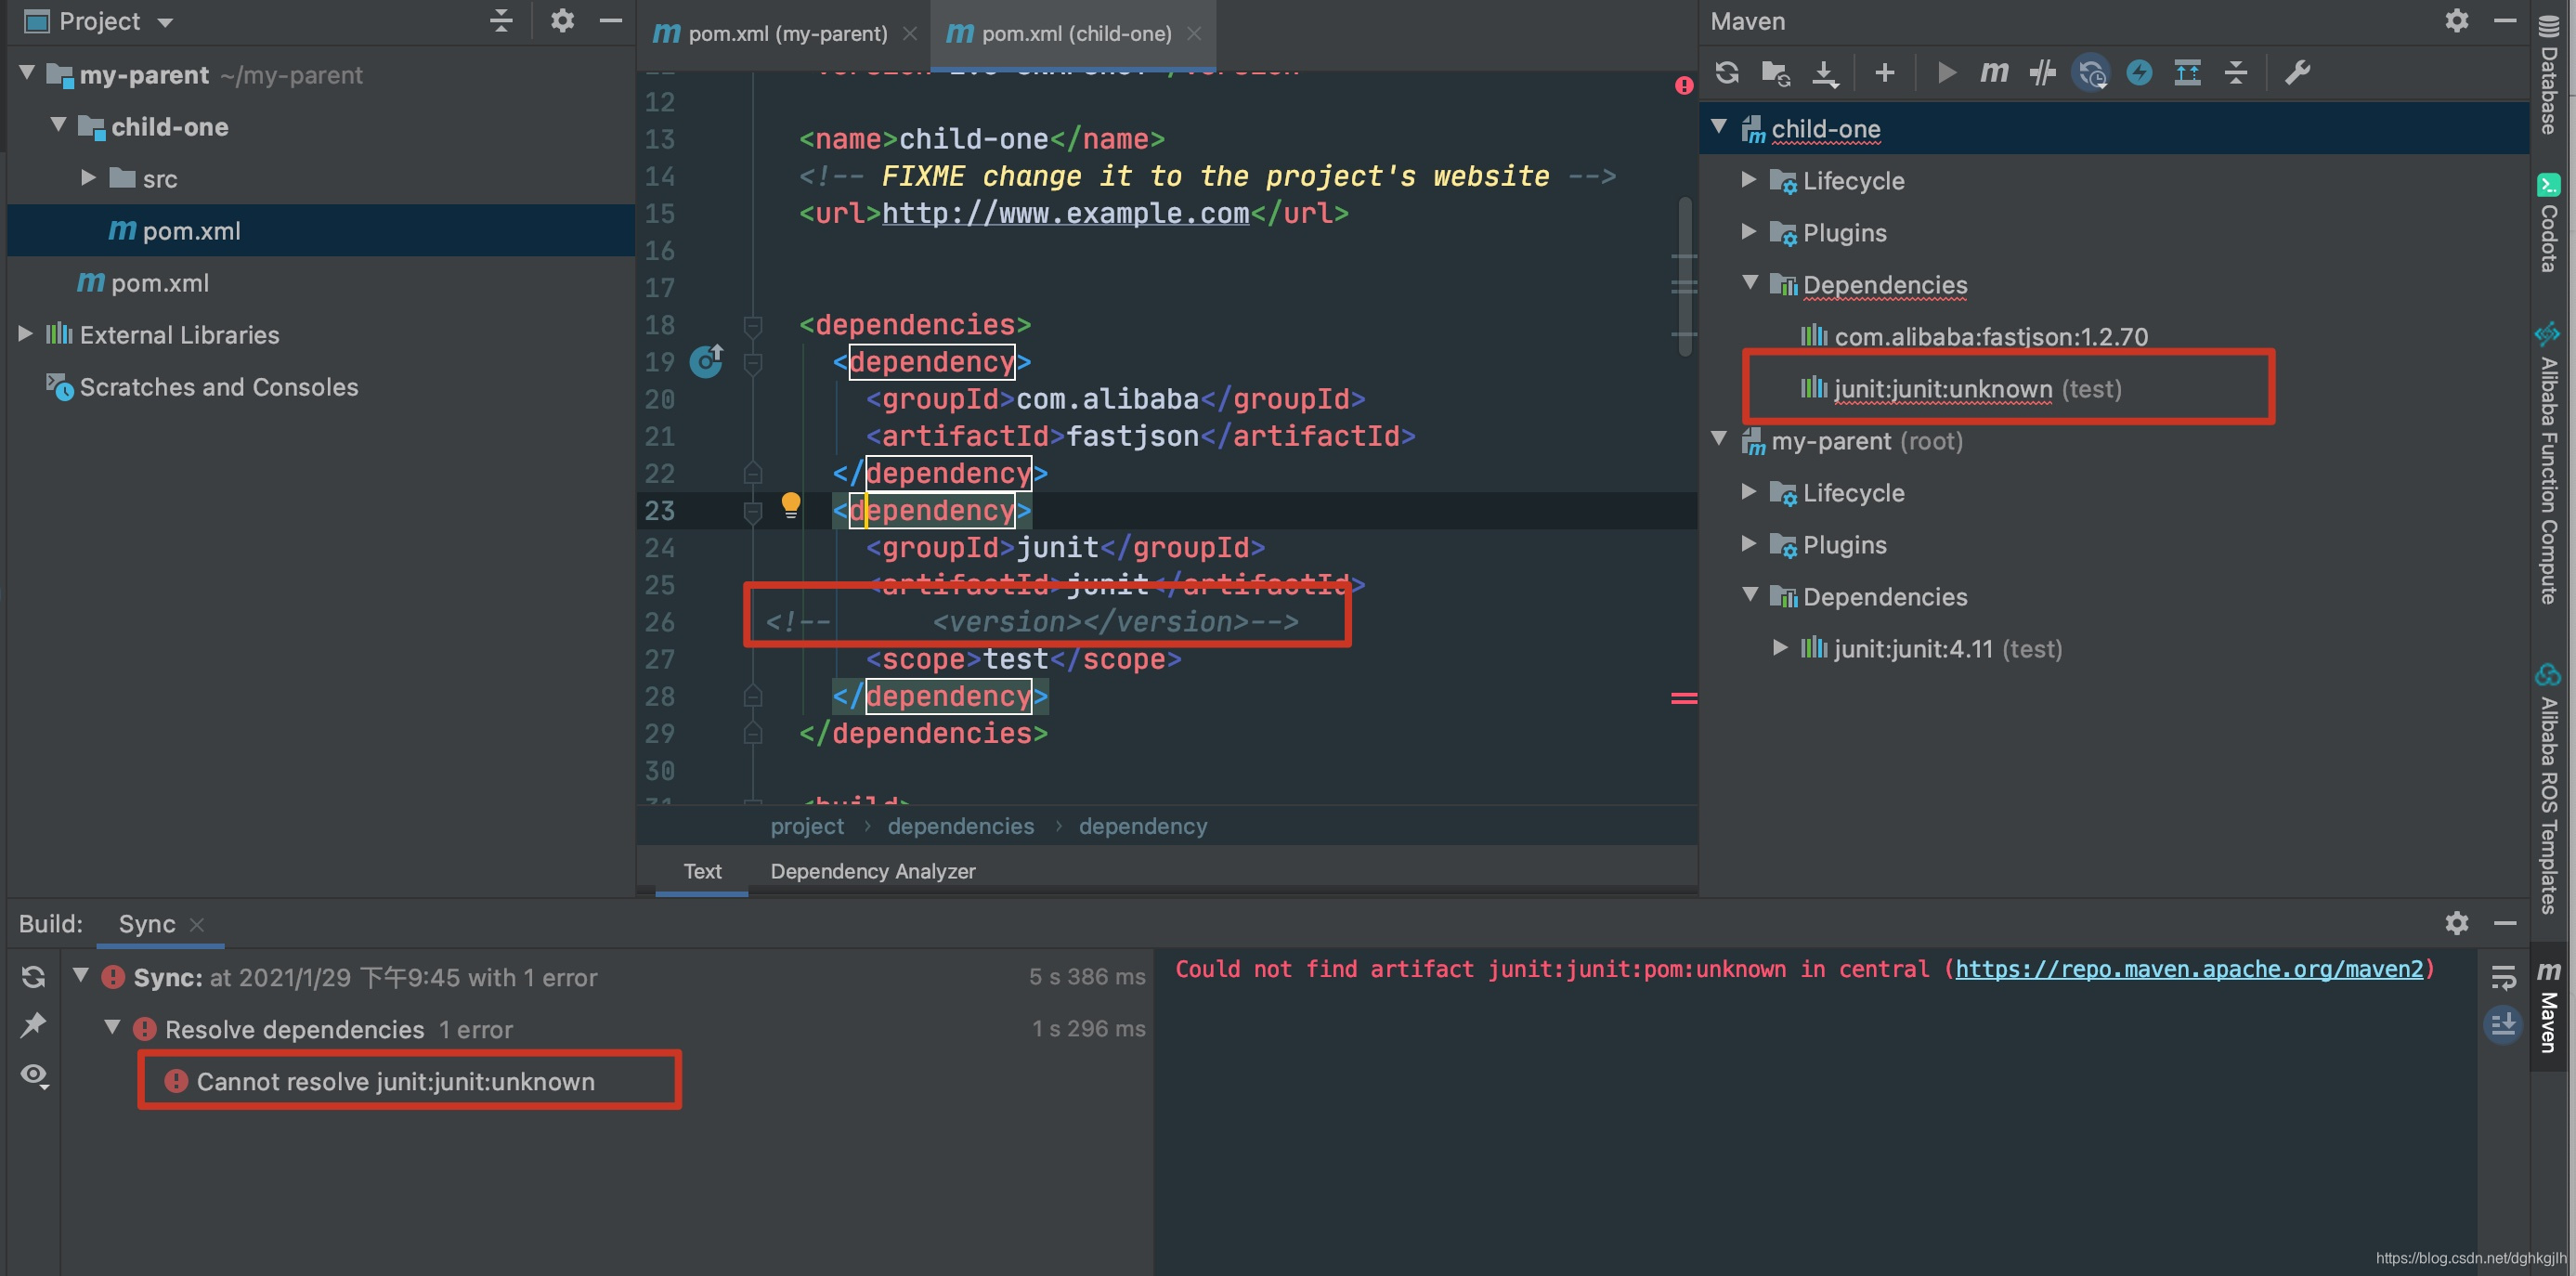
Dependencies declared directly under the parent’s <dependencies> are inherited by default. If a child explicitly declares one, it must specify its version; otherwise, an error occurs.
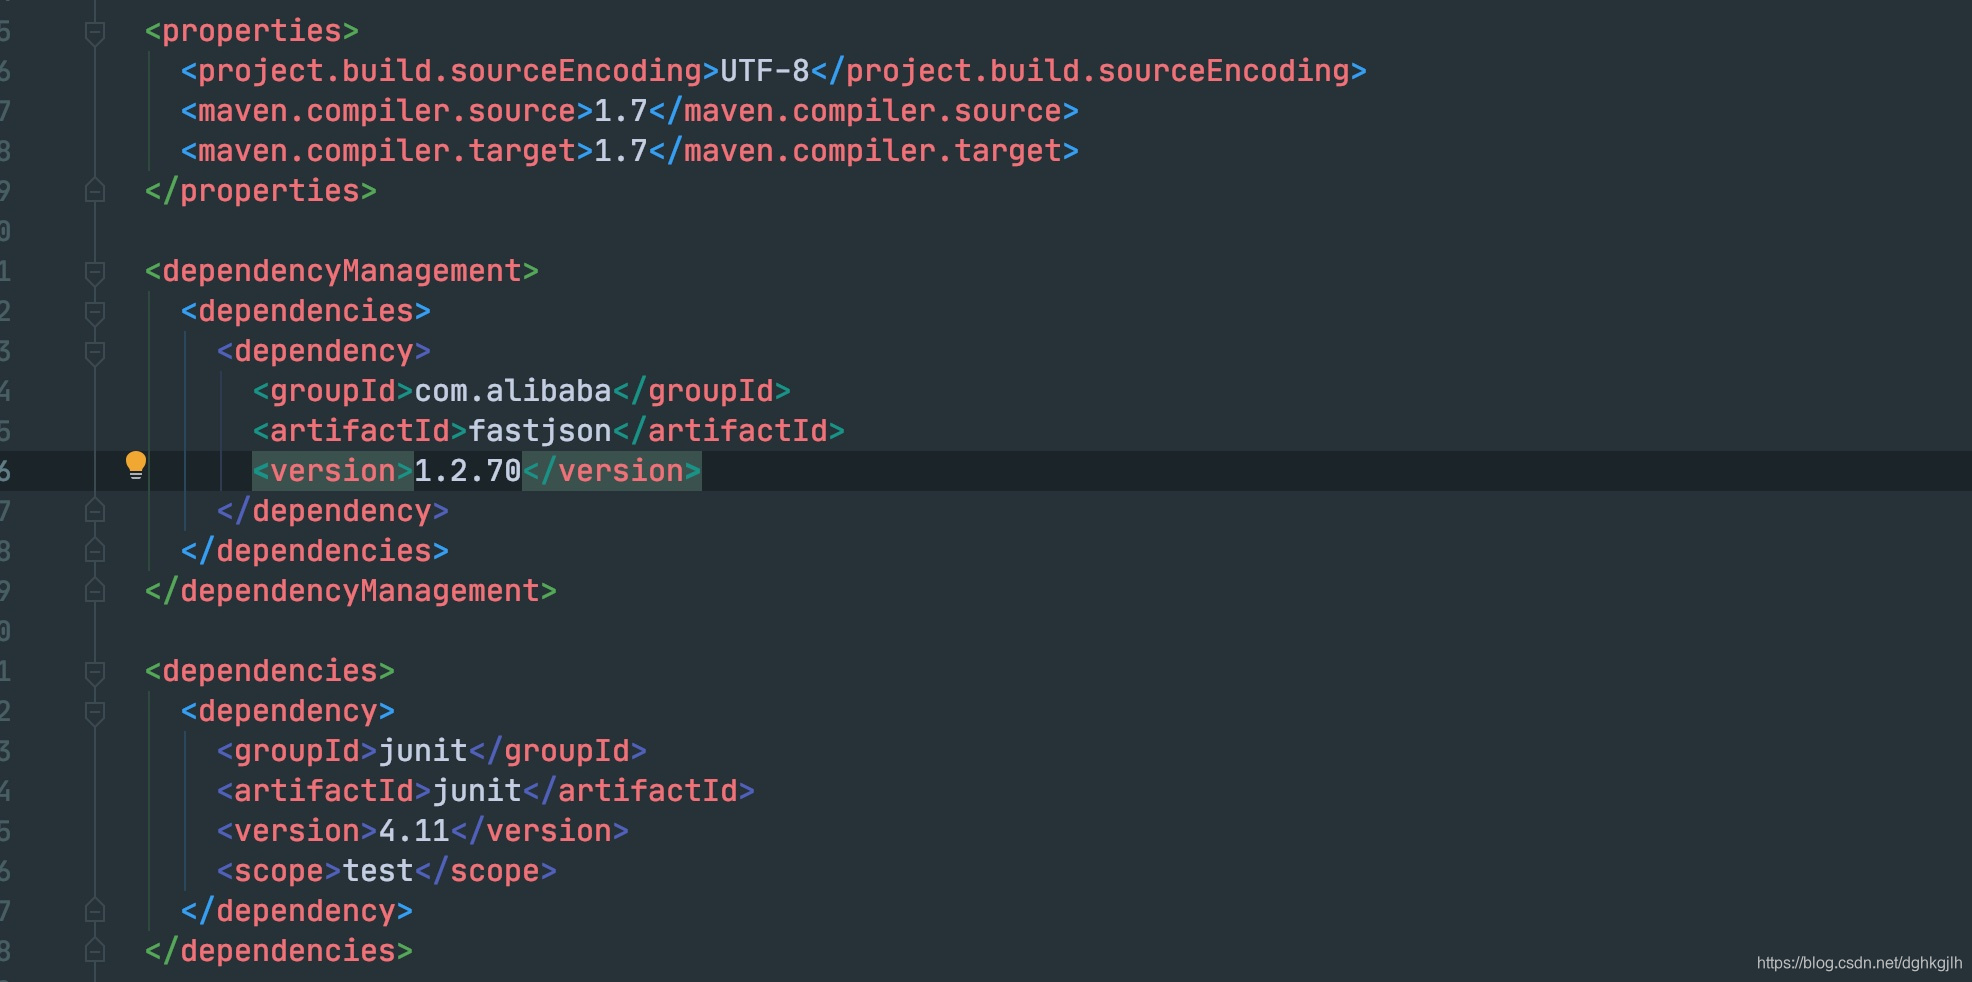
Here are the parent dependencies. What does the child POM contain?
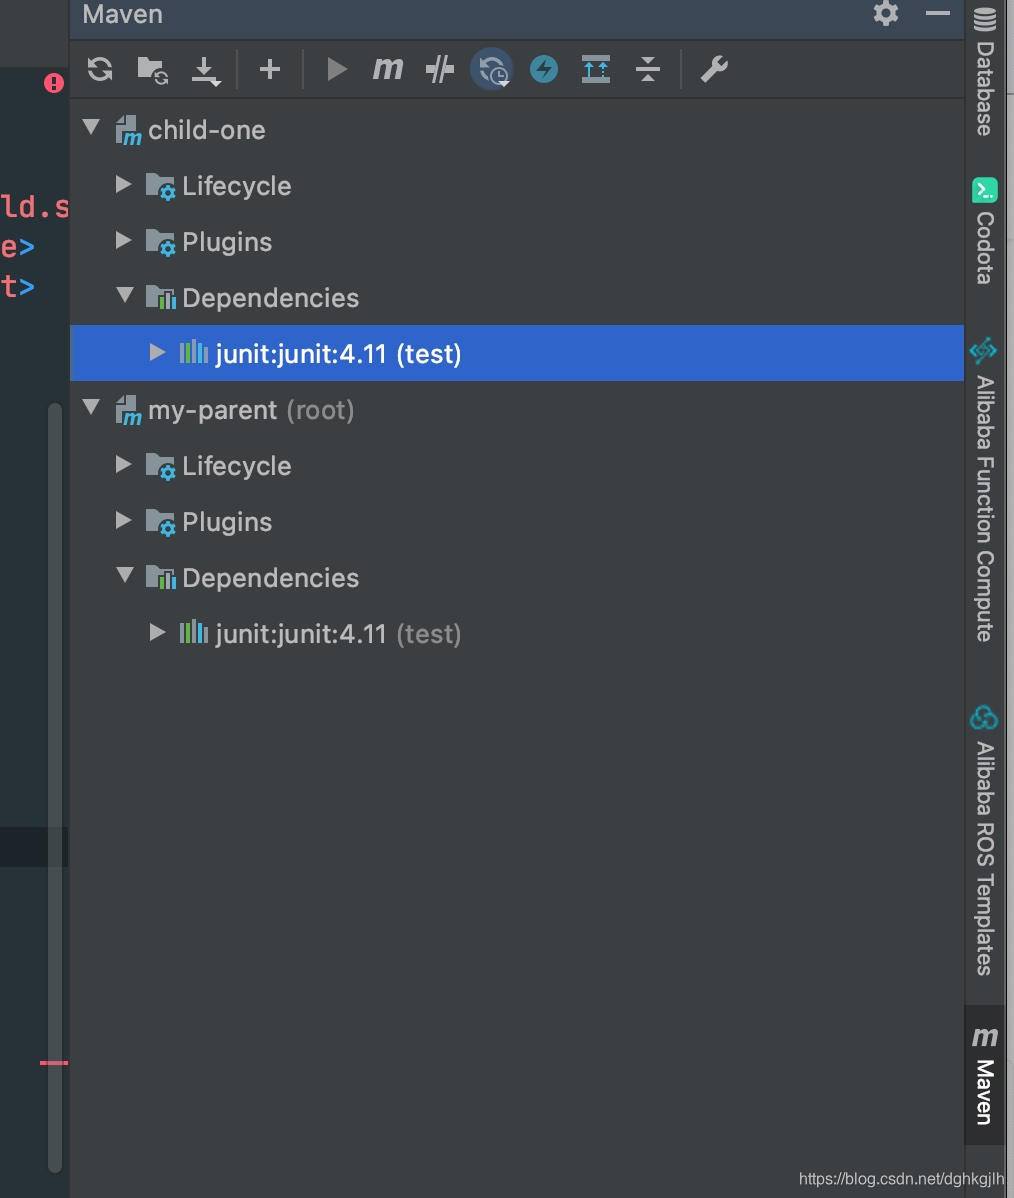
The parent has two dependencies, but Fastjson is under dependencyManagement, so the child only inherits JUnit by default, with the same version as the parent.
When the child includes Fastjson without a version, it inherits the parent’s version.
 When the child explicitly declares a dependency already inherited from the parent, it must specify a version; otherwise, an unknown error occurs.
What If Different Dependencies Bring Different Versions of the Same Library?
For example, framework A brings in Guava, while our project also declares Guava at a different version. Which version will be used? This is where exclusions inside dependency comes in.
When versions conflict, use exclusions to remove the dependency version we do not want.
Dependency Scopes
There are six scopes:
- compile: the default when no scope is explicitly declared. The dependency is needed during compilation; otherwise, compilation may fail.
- provided: supplied by the deployment container.
- runtime: not required at compile time, but required when the application runs.
- test: irrelevant to ordinary application execution, but required during testing.
- system: generally used for additional JARs at specified project paths, such as JARs under lib that are also needed at runtime.
- import: less common; it must be used inside <dependencyManagent> with type pom. For example, our child POM already has a company parent POM, but also needs Spring Boot dependencies. Since a POM can have only one <parent>, the ordinary approach would declare each Spring Boot dependency and version separately. Can we import Spring Boot’s dependencyManagement so versions need not be repeated? See Spring’s explanation of import and this shorter blog explanation.
<dependencyManagement>
    <dependencies>
      <dependency>
        <groupId>org.springframework.boot</groupId>
        <artifactId>spring-boot-dependencies</artifactId>
        <version>2.3.3.RELEASE</version>
        <type>pom</type>
        <scope>import</scope>
      </dependency>
    </dependencies>
  </dependencyManagement>
  <dependencies>
    <dependency>
            <groupId>org.springframework.boot</groupId>
            <artifactId>spring-boot-starter-web</artifactId>
        </dependency>
        <dependency>
            <groupId>org.mybatis.spring.boot</groupId>
            <artifactId>mybatis-spring-boot-starter</artifactId>
            <version>2.1.3</version>
        </dependency>
   </dependencies>
This lets us use both the parent POM’s dependencyManagement and Spring Boot’s dependencyManagement. You can look up the difference between spring-boot-dependencies and spring-boot-parent. They are essentially similar here; the choice depends on developer preference and the company’s Maven structure. If the common parent is not spring-boot-parent, spring-boot-dependencies may be used.
Inheritance and Aggregation
Inheritance means projects share a common parent POM.
Aggregation means a project comprises multiple modules.
The project in the screenshots uses both inheritance and aggregation.
Common Maven Requirements
How Do We Find Dependencies That Need Updating?
Dependencies need regular upgrades during maintenance. To identify updates, use versions-maven-plugin with the following custom rules.
<ruleset comparisonMethod="maven"
         xmlns="http://mojo.codehaus.org/versions-maven-plugin/rule/2.0.0"
         xmlns:xsi="http://www.w3.org/2001/XMLSchema-instance"
         xsi:schemaLocation="http://mojo.codehaus.org/versions-maven-plugin/rule/2.0.0 https://www.mojohaus.org/versions-maven-plugin/xsd/rule-2.0.0.xsd">
    <ignoreVersions>
        <ignoreVersion type="regex">.*[-_\.](alpha|Alpha|ALPHA|b|beta|Beta|BETA|rc|RC|M|EA)[-_\.]?[0-9]*</ignoreVersion>
    </ignoreVersions>
</ruleset>
How Do We Find Dependencies with Security Vulnerabilities?
Our approach is a scheduled Jenkins job that regularly runs both plugins against the latest main-branch code. They generate HTML reports, which are emailed to the people responsible for dependencies. This supports regular dependency maintenance and upgrades.
How Do We See Which JARs Changed After a Dependency Upgrade?
Specific people maintain most dependencies, but developers occasionally add or upgrade JARs while implementing features. They may not realize which other JARs change. Upgrading POI from 5.2.3 to 5.2.5, for example, changes not only POI but also its dependencies. Without informing developers or reviewers, this can introduce incompatible JARs or dependency conflicts.
Our approach: Pushing a branch triggers a Jenkins build. Its result is compared with the main-branch build using diff between the two workspaces, for example:
diff -rq /home/jenkins/.jenkins/workspace/main-branch/project-name/target/package/WEB-INF/lib /home/jenkins/.jenkins/workspace/develop-branch/project-name/target/package/WEB-INF/libReplace the following variables with values appropriate to your environment.
- main-branch
- package
- develop-branch
What Is mvnw? How Do We Pin a Project’s Maven Version?
Use the Maven Wrapper, mvnw.
When Should We Use Optional Dependencies?
How Do We Quickly Scaffold a Maven Project?
The initial project-creation example used a long command. Unless we use it daily, remembering every option for an occasional task is difficult. What can we do instead?
Maven performs its work through plugin:goal, so we only need to remember the scaffolding plugin.
The plugin is archetype.
Run its generate goal to create a project.
mvn archetype:generateThe command then prompts interactively.
It offers several project templates, including J2EE and Spring Boot. Enter the number of the desired template; the default is maven-archetype-quickstart.
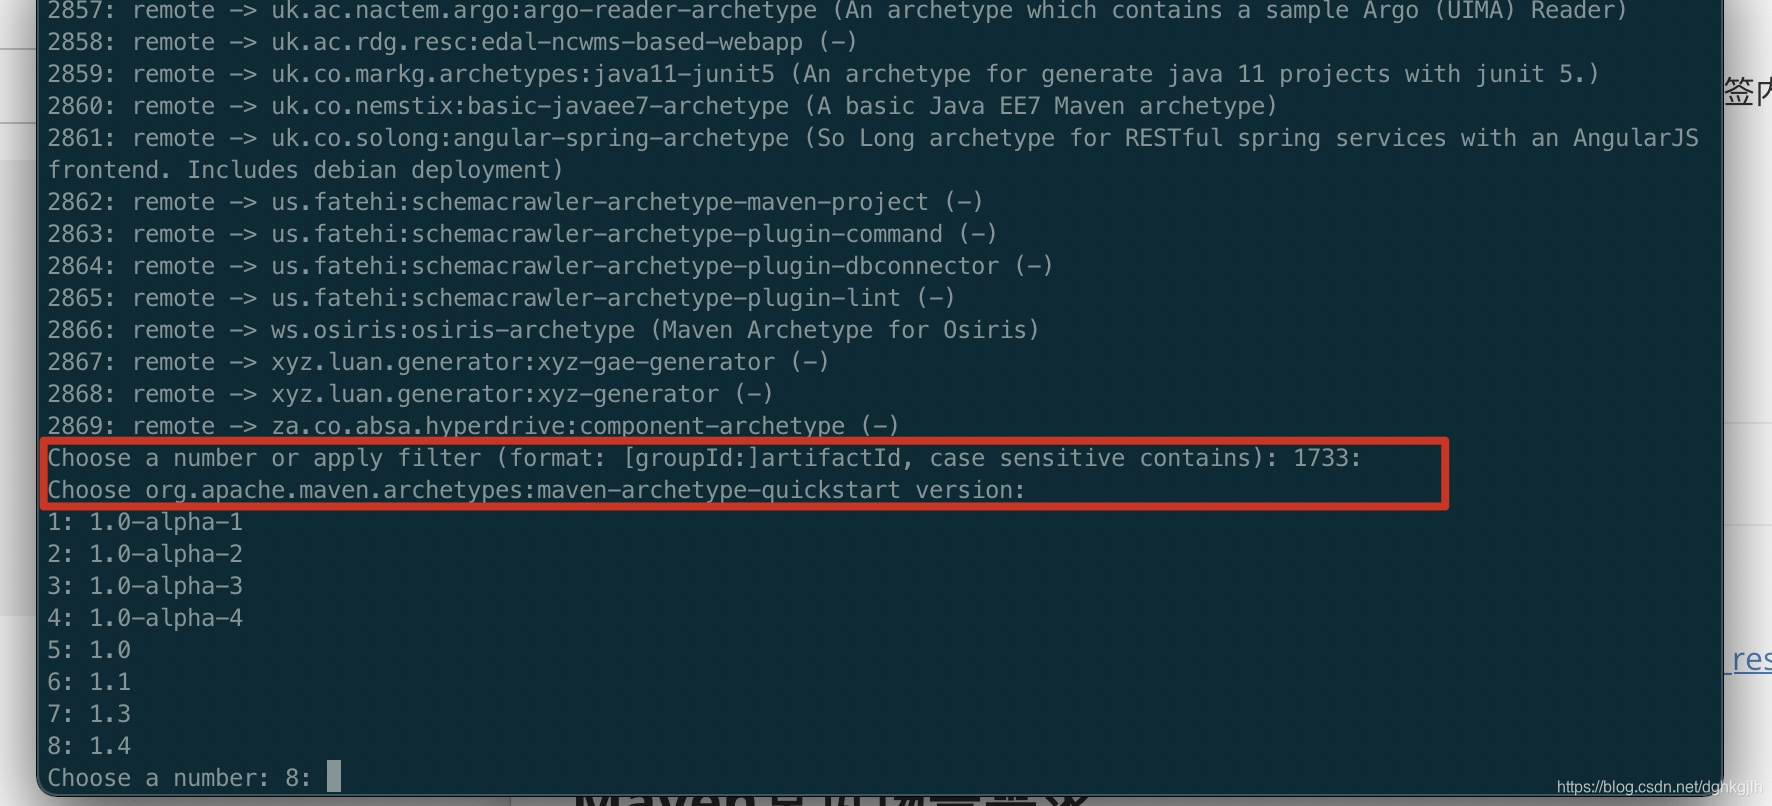
Next, enter groupId, artifactId, and version.
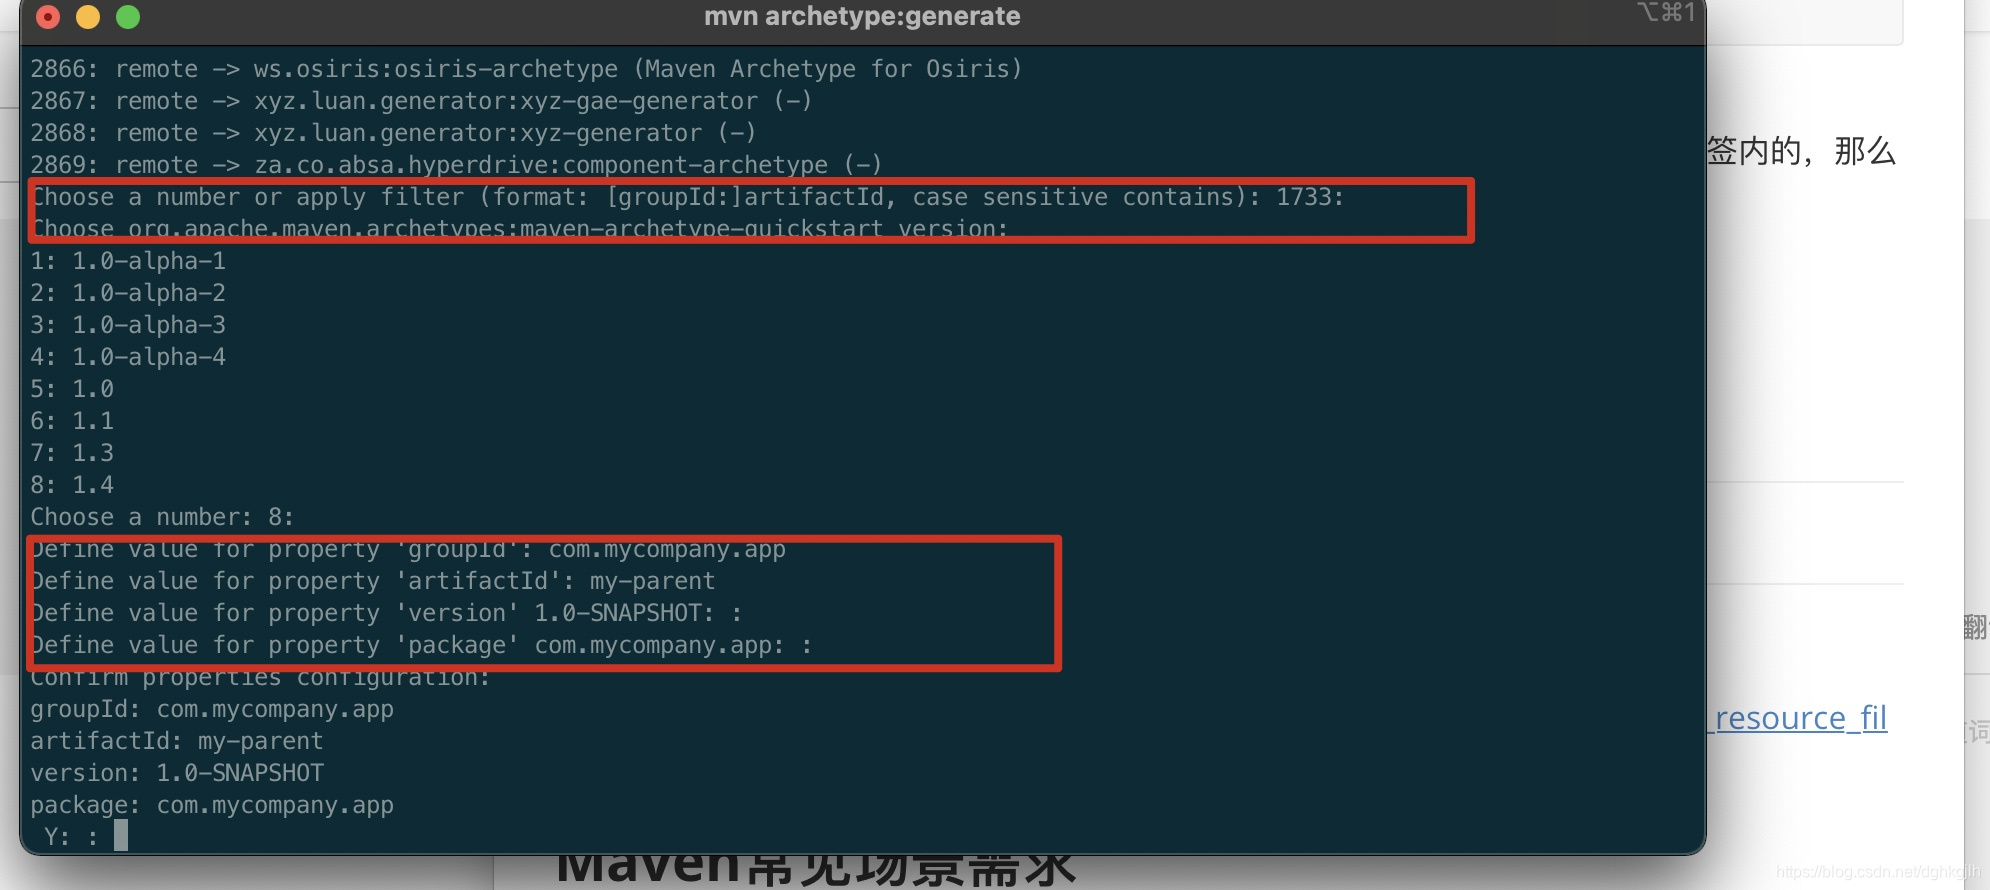
Check the values and enter Y to confirm. The project is generated. Compared with the opening command, we only need mvn archetype:generate and the interactive prompts. Simple and convenient.
How Do We Quickly Scaffold a Multi-Module Maven Project?
The same idea applies to multiple modules: run the project-generation command several times.
Continue from the project created above:
-
Change into the directory containing the POM.
-
rm -rf src
-
vim pom.xml
-
Set the packaging type to pom:
pom . -
Press Esc and enter :wq.
-
Run the project-generation command again.
-
Enter the same groupId.
-
Choose an artifactId.
-
After generation, notice the small changes in the generated project’s POM and its parent POM.
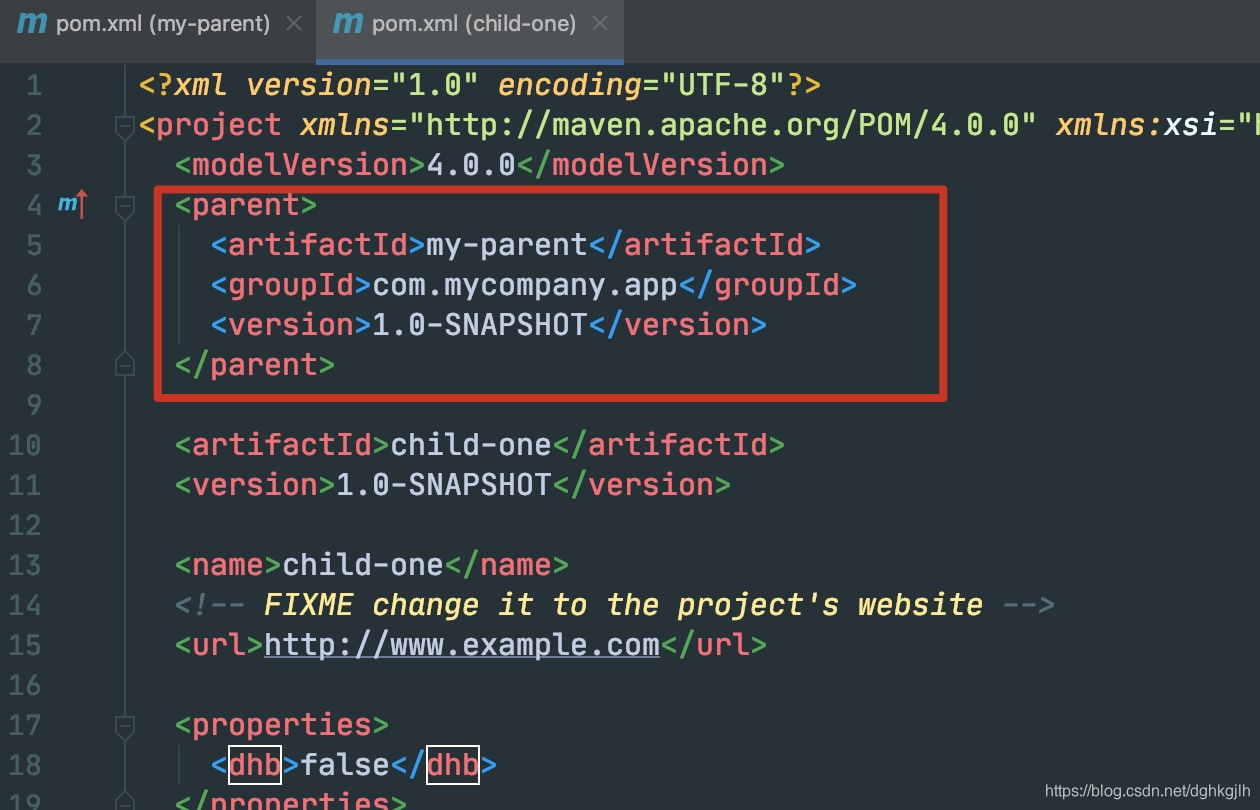
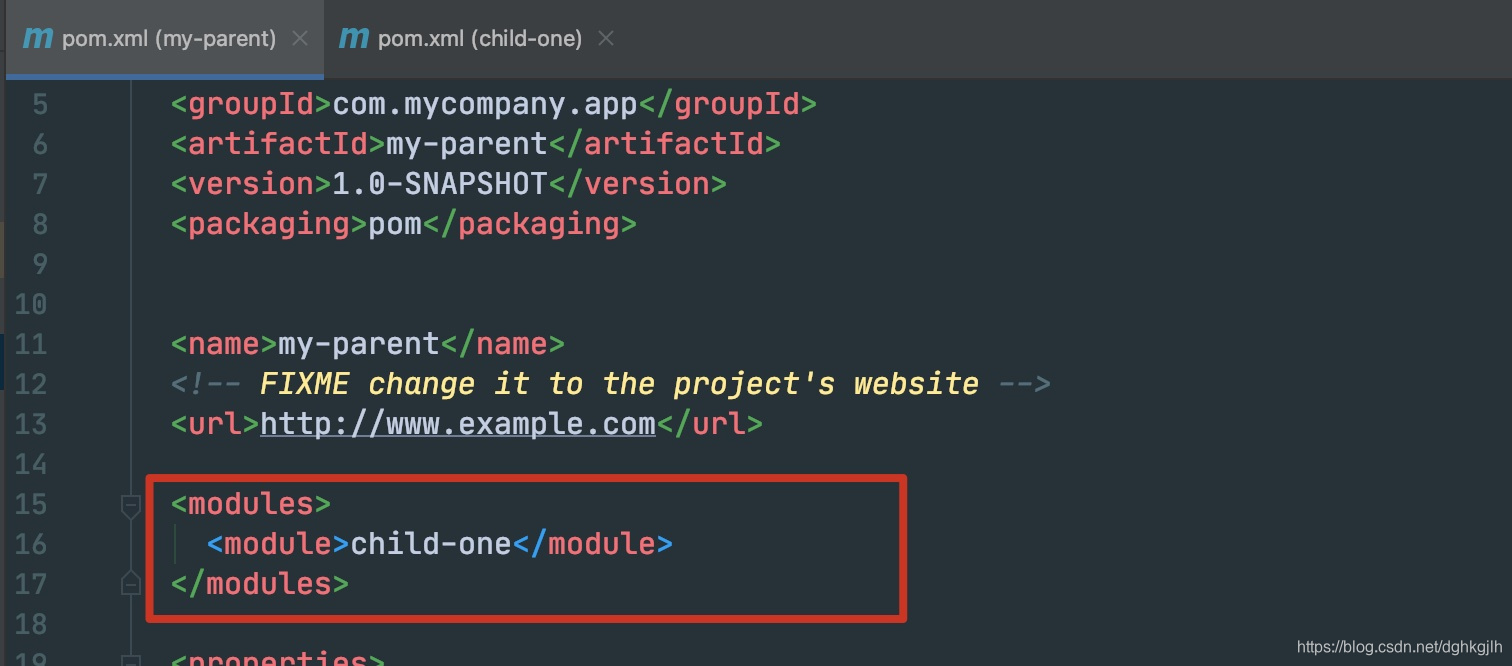
How Can Profiles Select Different Modules for Different Environments?
Suppose a project has modules A, B, and C, but not all are always needed. A is required; local development also needs B, while testing needs B and C. How can we implement this?
Use Maven profiles in the root POM, as follows:
   <modules>
		<module>message-common</module>
   </modules>
   <profiles>
        <profile>
            <id>dev</id>
            <activation>
                <activeByDefault>true</activeByDefault>
            </activation>
            <modules>
                <module>business-server</module>
            </modules>
        </profile>
        <profile>
            <id>test</id>
            <modules>
                <module>message-server</module>
                <module>business-server</module>
            </modules>
        </profile>
    </profiles>
For the test environment, activate test with -P.
mvn clean install -PtestIn IntelliJ IDEA, open Maven > Profiles and select the desired profile.
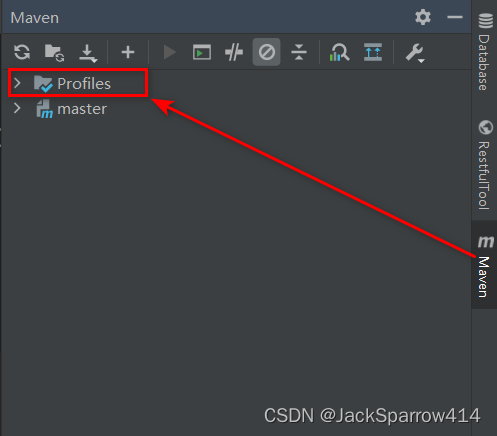
Profiles can also be combined with resource filtering below to replace file property values dynamically. See injecting Maven profile values into properties files.
How Do We Filter Resource Files or Replace ${value} with POM Properties During Packaging?
For including and excluding resources, see the Resources Plugin documentation.
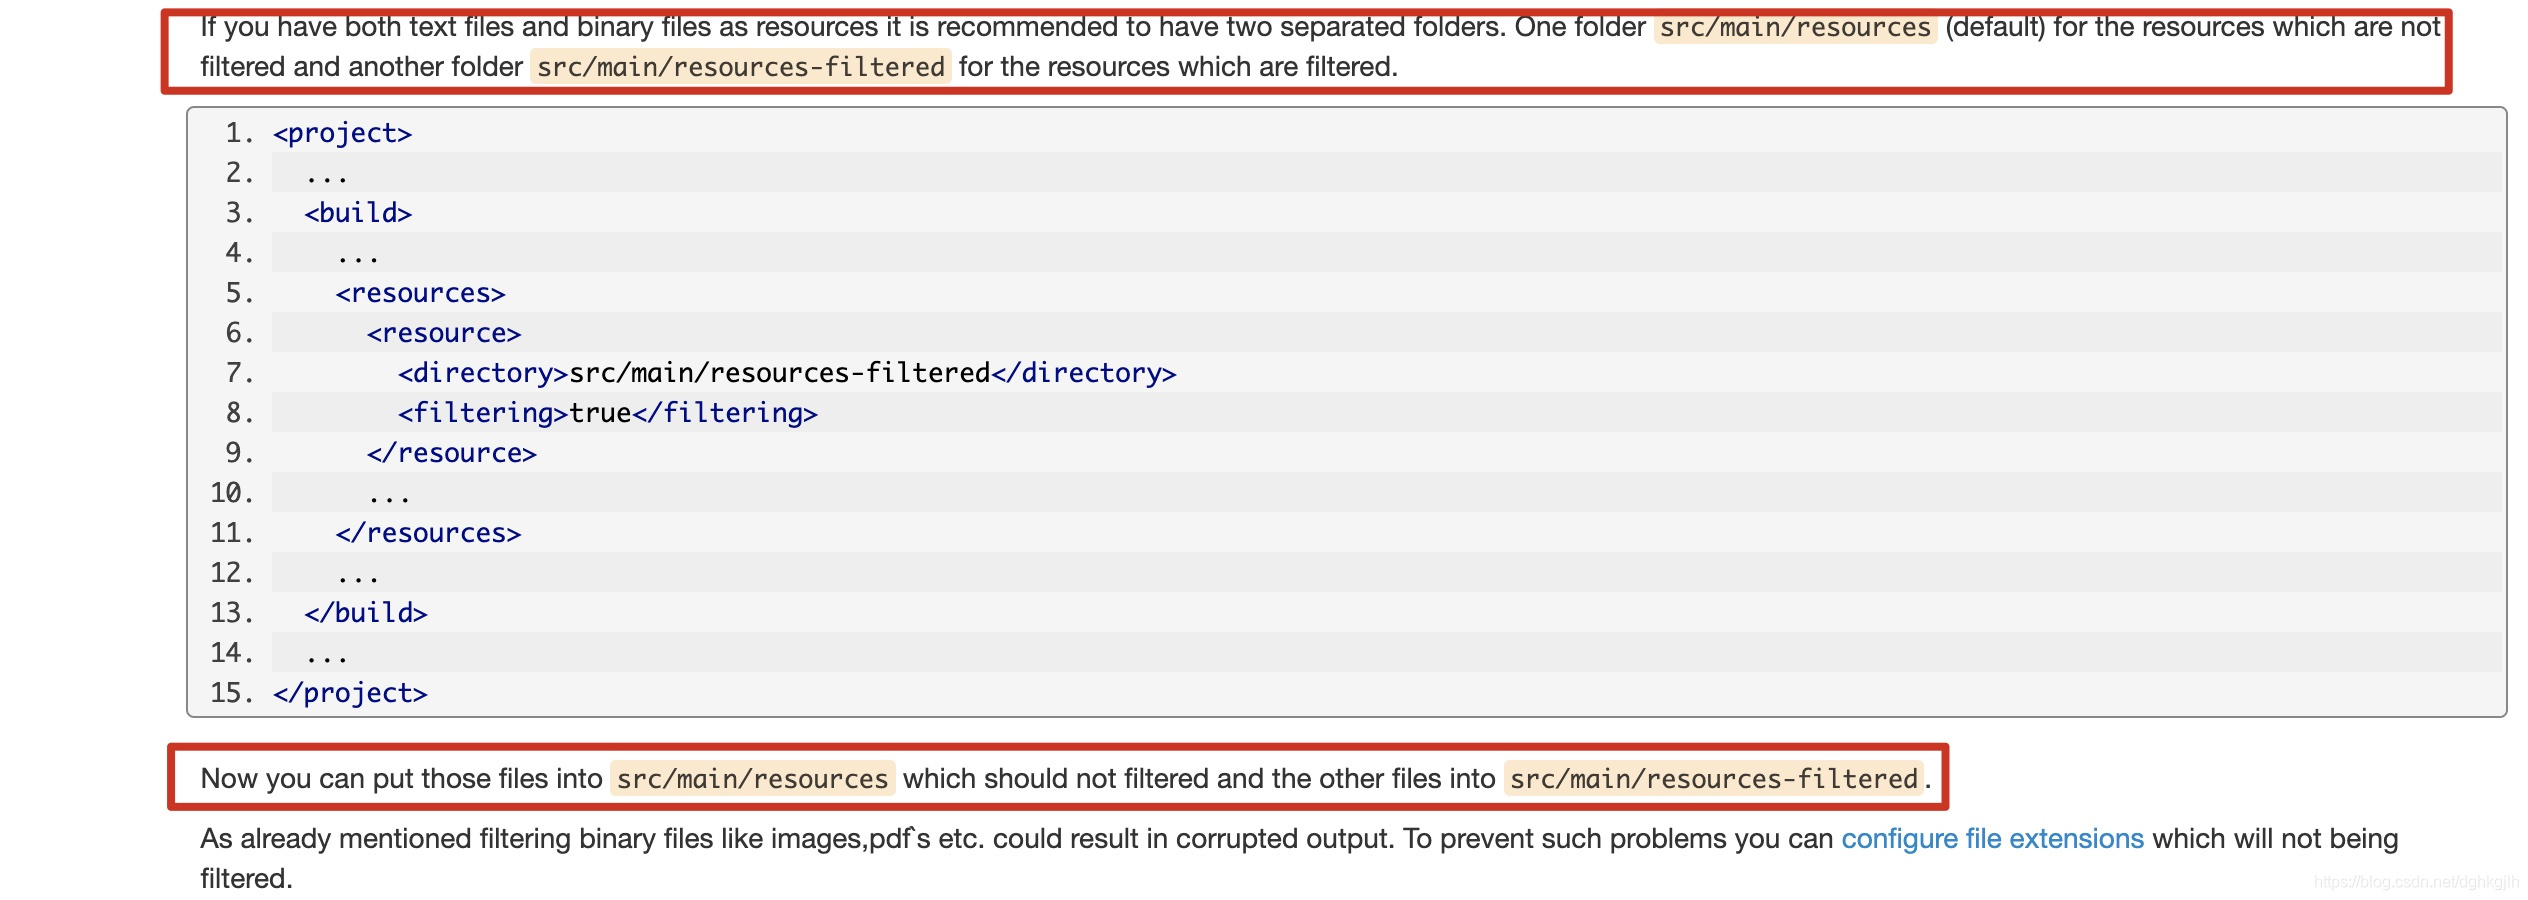
Use maven-resources-plugin with filtering set to true to replace ${value} in selected files with POM properties during packaging. See the documentation for examples.
The official recommendation is to put files requiring filtering in a separate directory.
How Do We Skip Unit Tests?
Configure Surefire’s
mvn install -DskipTests=trueCan the JAR Produced by Maven’s Default Packaging Be Run with java -jar?
The JAR produced by the plugin goal bound to ordinary mvn package cannot be run with java -jar. Spring Boot is now common and typically uses its own packaging plugin; see the executable JAR documentation for details. Still, this distinction is worth explaining.
Run mvn package in the generated project, then try java -jar:
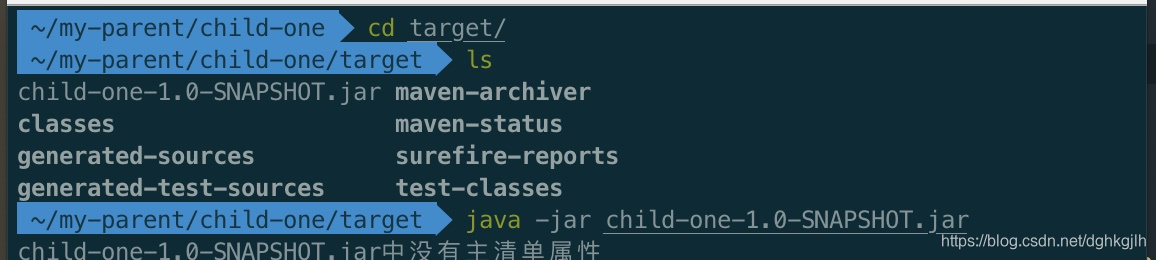
It reports no main manifest attribute. What is that?
The JAR does not specify its runtime MainClass.
How Do We Build an Executable JAR or Fix “No Main Manifest Attribute”?
Use the Assembly Plugin.
Configure it as follows:
<build>
  <plugins>
     <plugin>
          <groupId>org.apache.maven.plugins</groupId>
          <artifactId>maven-assembly-plugin</artifactId>
            <configuration>
<!--Include project dependencies in the JAR-->
            <descriptorRefs>
              <descriptorRef>jar-with-dependencies</descriptorRef>
            </descriptorRefs>
            <archive>
<!--Specify the main class-->
              <manifest>
                <mainClass>com.mycompany.app.App</mainClass>
              </manifest>
            </archive>
          </configuration>
<!--Set the execution phase and goal-->
          <executions>
            <execution>
              <id>make-assembly</id>
              <phase>package</phase>
              <goals>
                <goal>single</goal>
              </goals>
            </execution>
          </executions>
        </plugin>
  </plugins>
</build>
After configuration, run:
mvn packageThis generates an XXX-jar-with-dependencies JAR.
java -jar child-one-1.0-SNAPSHOT-jar-with-dependencies.jarIt now runs successfully.
Inspect the JAR’s contents:
In META-INF/MANIFEST.MF:
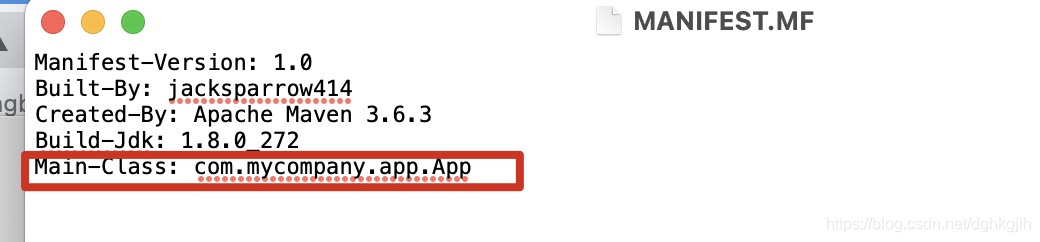 Main-Class is now specified, allowing the application to run.
How Do We Analyze Project Dependencies?
Use the official Dependency Plugin.
mvn dependency:tree -DverboseThe command-line output clearly shows dependency conflicts. To check conflicts for a particular dependency, use:
mvn dependency:tree -Dincludes=org.apache.logging.log4j:log4j-apiDependency-tree filtering documentation
If there are too many dependencies to inspect in the console, write the result to a file. For example, write it to the tmp directory on drive D.
mvn dependency:tree -Dverbose -Doutput=/d/tmp/file.txt -DoutputType=textDuring everyday development, we usually use a graphical interface such as IntelliJ IDEA’s Maven Helper plugin.
You can also open Dependencies in the Maven panel on the right in IntelliJ IDEA, as shown here: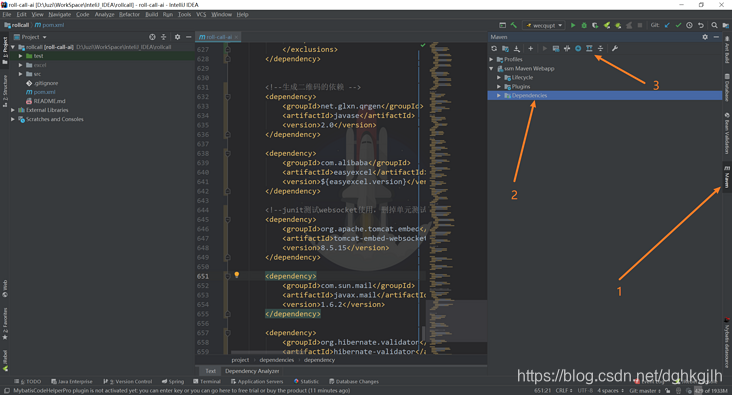 Thanks to this blogger for sharing.
How Do We Install a JAR into the Local Repository?
mvn installHow Do We Deploy a JAR to a Remote or Private Repository?
Use the Deploy Plugin.
First Approach
Configure the POM:
<project>
  <distributionManagement>
        <repository>
            <id>reposity id</id>
            <name>reposity name</name>
            <url>reposity url</url>
        </repository>
    </distributionManagement>
</project>
Configure the global Maven setting.xml file:
   <server>
      <id>internal.repo</id>
      <username>maven</username>
      <password>foobar</password>
    </server>
Then run:
mvn deploySecond Approach
Use this approach to publish a JAR without a POM to the private repository so projects can reference it through their POMs.
mvn deploy:deploy-file -Durl=reposityUrl -DrepositoryId=repositoryId -Dfile=JAR_PATH -DgroupId=com.mycompany.ayy -DartifactId=child-one -Dversion=1.0.0 -Dpackaging=jarHow Do We Connect Maven to a Private Nexus Repository over HTTPS?
- Configure SSL on Nexus.
- Download the private Nexus repository’s HTTPS certificate.
- Import it into the local JDK with keytool.
keytool -importcert -file /home/nexus-cert.cert.der -alias nexus-cert -keystore ${JAVA_HOME}/lib/security/cacerts -storepass changeit -nopromp
Why? As discussed earlier, Maven runs on Java. It uses HttpClient to connect to the private repository, and HTTPS requires certificates. The JDK’s default certificate store does not contain our private repository’s certificate, so these steps are necessary.
The official documentation describes another approach, which I have not tested.
How Do We Check Code Style During a Maven Build?
Add the official Checkstyle Plugin. It checks code conventions during the build and fails the build if they are not met.
See the Checkstyle website for more information.
How Do We Build a Multi-Module Project?
Run the Maven commands in the top-level directory containing the parent pom.xml.
For example, package all modules:
mvn packageHow Do We Speed Up Builds? What Does -T Mean in mvn -T 4 clean install?
See Maven Wiki > Proposals / Backlog > Complete > Parallel builds in Maven 3.
mvn -T 4 clean install # Builds with 4 threads mvn -T 1C clean install # 1 thread per cpu core mvn -T 1.5C clean install # 1.5 thread per cpu core
For more on mvn [options], run:
mvn -hto display the options.
How Do We Replace web.xml Values Dynamically When Packaging a Traditional Web Application?
See this Stack Overflow answer. In practice, different scenarios may require different replacements in web.xml. Combine this with Maven profiles.
First Approach
- Define profiles for the different scenarios and select their properties files through a custom global property.
- Configure that global property in the WAR Plugin’s filter settings. For example:
<build>
<plugin>
<!--Replace web.xml values dynamically when packaging a WAR-->
        <artifactId>maven-war-plugin</artifactId>
        <configuration>
          <webResources>
            <resource>
              <filtering>true</filtering>
              <directory>src/main/webapp</directory>
              <includes>
                <include>**/*</include>
              </includes>
            </resource>
          </webResources>
          <filters>
            <filter>src/main/resources/${build.profile.name}.properties</filter>
          </filters>
        </configuration>
      </plugin>
      </build>
<profiles>
    <profile>
      <id>ticket</id>
      <activation>
        <activeByDefault>true</activeByDefault>
      </activation>
      <properties>
        <build.profile.name>displayTicket</build.profile.name>
      </properties>
    </profile>
    <profile>
      <id>kk</id>
      <properties>
        <build.profile.name>displayKk</build.profile.name>
      </properties>
    </profile>
  </profiles>
The two properties files contain settings like the following. Here is displayTicket.properties:
display.name=ticketThe value to replace in web.xml is:
<web-app>
  <display-name>${display.name}</display-name>
</web-app>
Second Approach
Some examples use the Antrun Plugin to achieve the same result. Article
Useful Resources
The official documentation is the best resource. Read it often and look there for answers. If needed, search Google, which I find more dependable than Baidu.
- Getting started with Maven
- Maven frequently asked questions
- Spring Boot’s Maven packaging documentation