Table of contents
Open Table of contents
Article body
If I am going to do this, I might as well do it thoroughly!
Protecting user information is one of an application’s most basic responsibilities. I will not repeat why login passwords and related passwords need protection.
When creating a user through the frontend, the user sets a login name and password, and Shiro hashes the submitted password. Since I have recently been working with Spring Boot, future Shiro configuration examples will use Spring Boot.
Introduction: how should passwords be stored in a database? The image below comes from the official ByteByteGo GitHub repository.
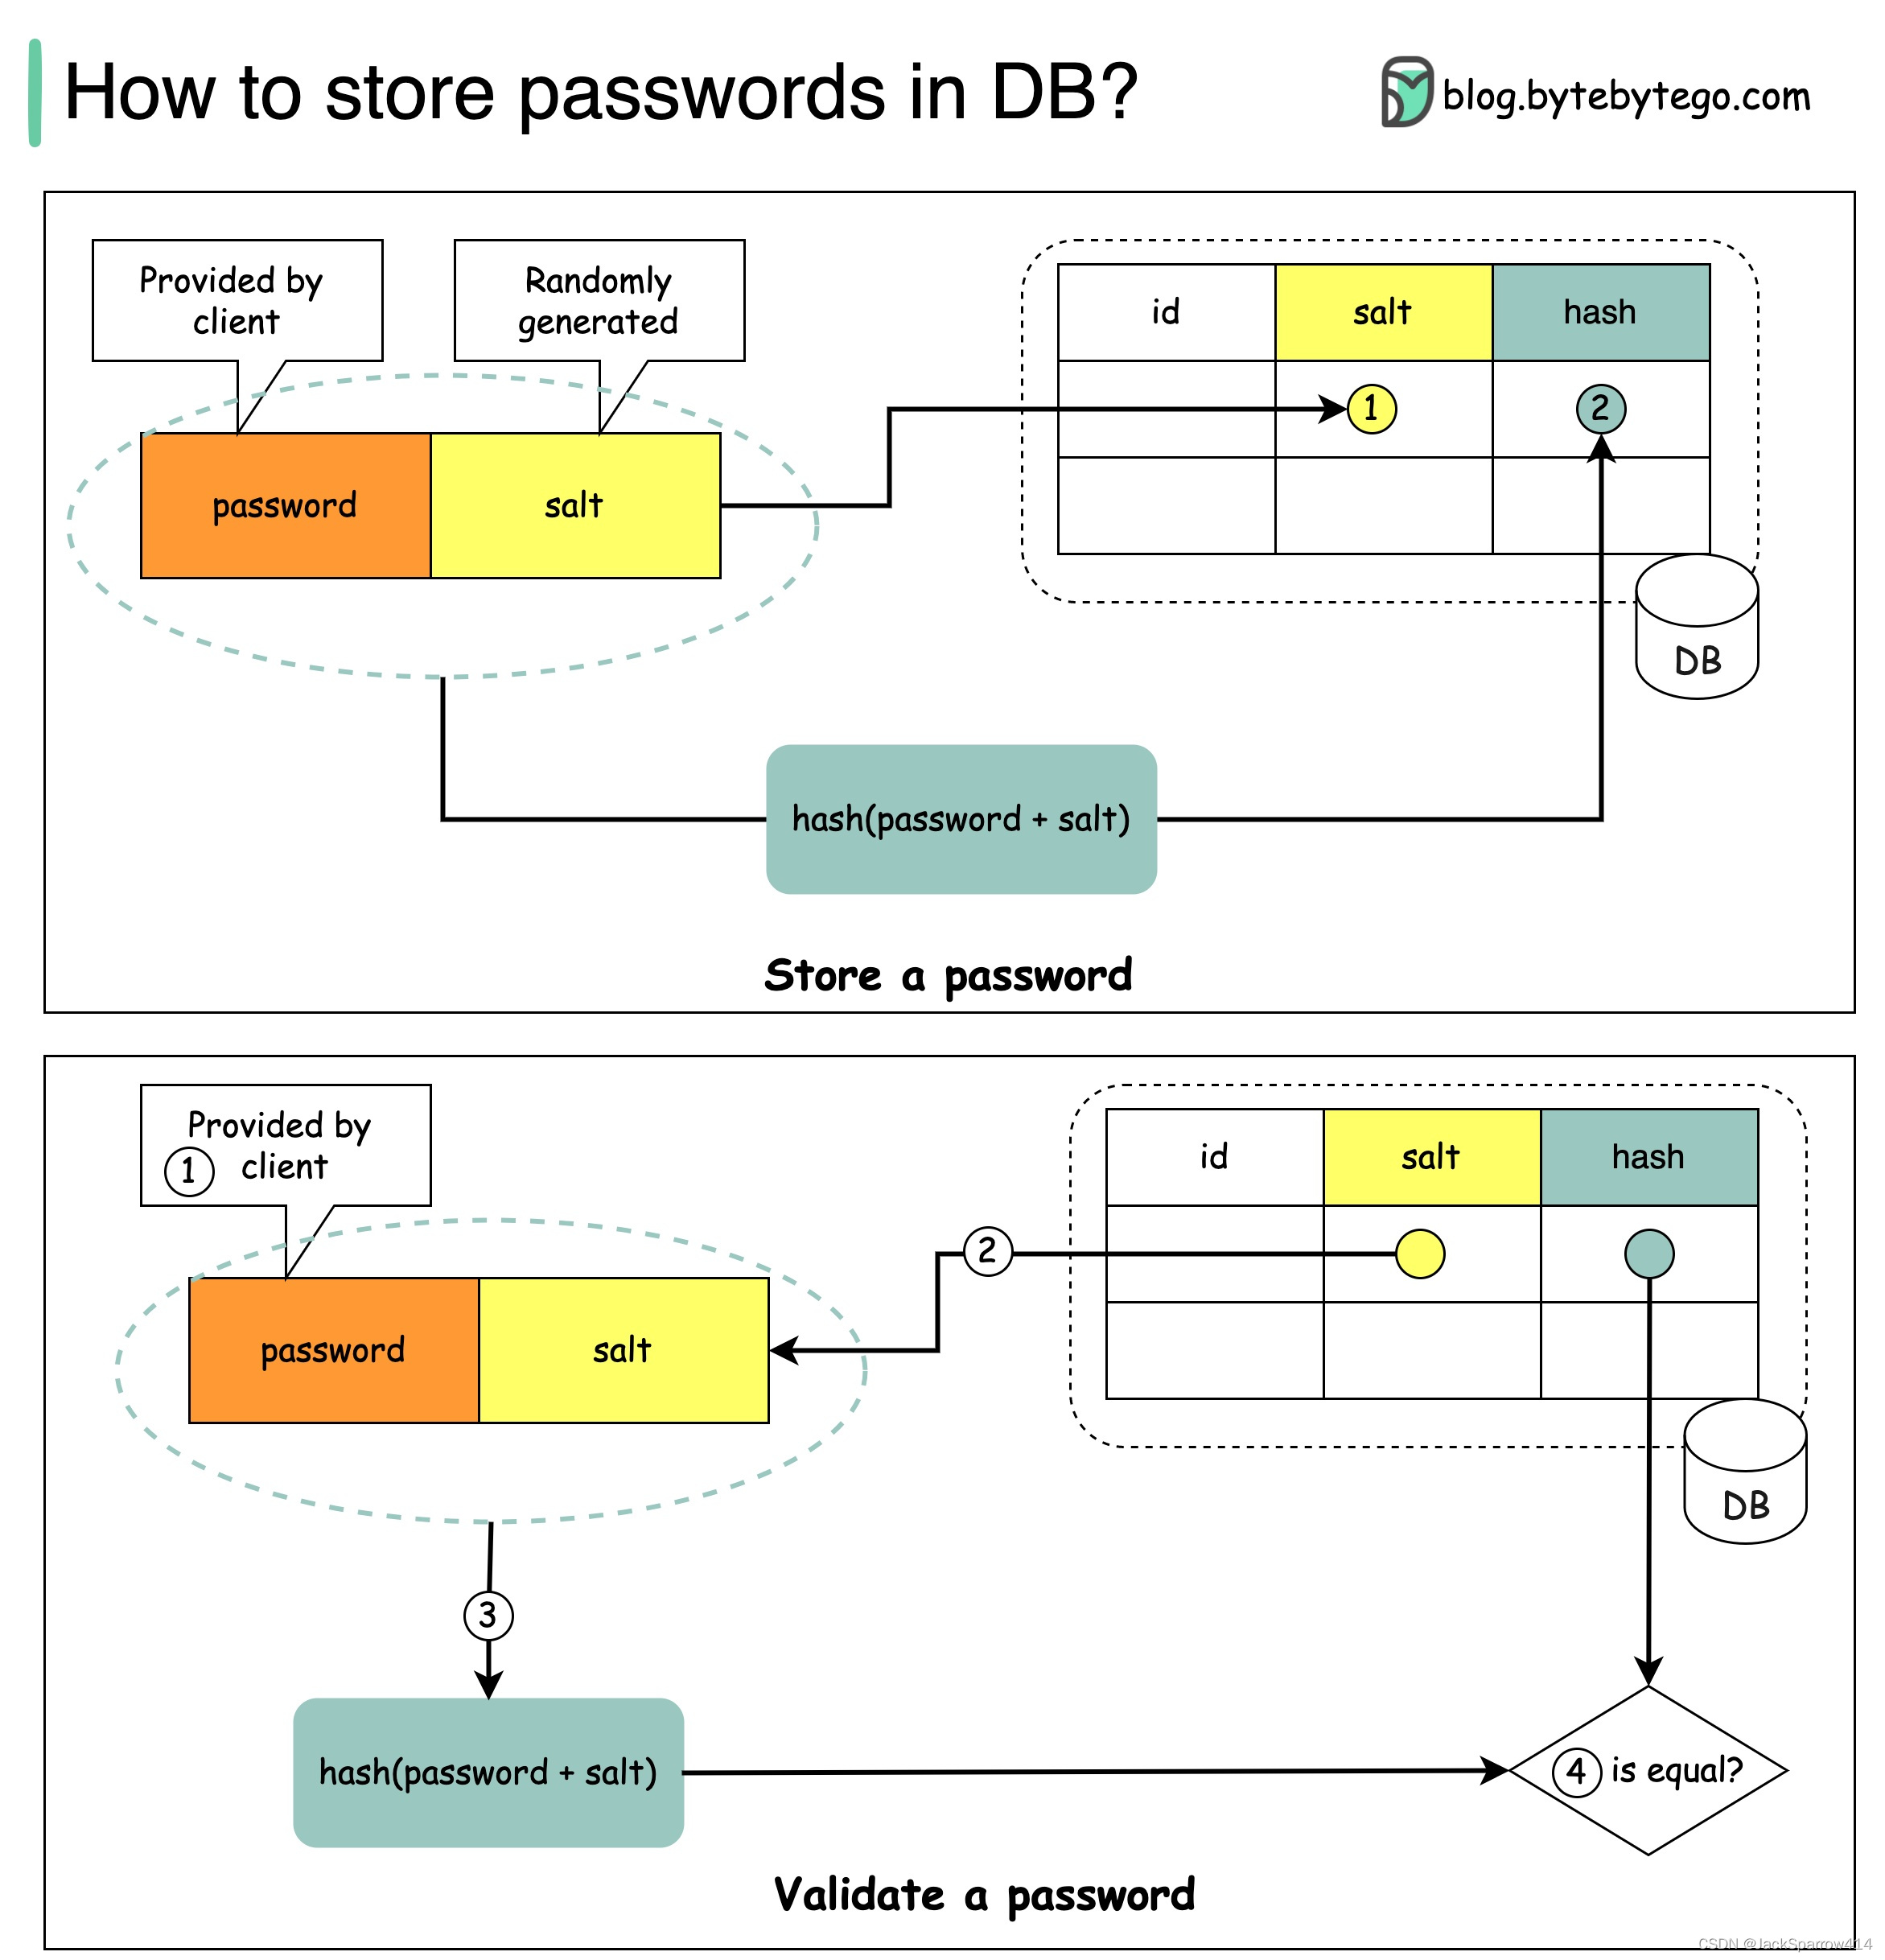 Why add a salt?
-
To prevent rainbow-table attacks and reduce the likelihood of successful brute-force cracking.
-
Every user’s password hash should be unique, even when users have the same password.
See the GitHub repository above for a detailed explanation.
How is a password verified?
Because a hash is irreversible, hash the password entered by the user again with the salt stored in the database, then compare the result with the stored hash. If they match, the password is correct.
Common problems: 1. If the password in the database is still plaintext after hashing, see step 1.
2. If authentication fails after hashing and salting with “Submitted credentials for token did not match the expected credentials,”
see step 3 and the comments in its code snippet.
Implementation flow: hash the password -> check that the database stores the hash -> attempt login verification -> if verification fails, check the backend error -> complete.
Step 1: hash the password in Java when saving the user information.
 @Transactional(rollbackFor = Exception.class)
    public void insert(User user) {
      // Hash the user password
      user.setPassWord(new SimpleHash("SHA-256",user.getPassWord(),null,20))
      // Second form
      user.setPassWord(new Sha256Hash(user1.getPassword(),null,20).toHex())
      this.save(user1);
    }
new SimpleHash() takes four arguments: the algorithm name (MD5, SHA-256, and so on), the plaintext password, the salt (omitted for now), and the number of hash iterations.
Alternatively, use Sha256Hash directly. Its three arguments correspond to the last three arguments of the first approach.
Hashing is now essentially complete. Check the database: the password should no longer be plaintext.
Step 2: “decrypt” at login
P.S. Many articles suggest adding the following configuration in step 1. In fact, the few lines above perform the hashing before storage; that part does not depend on the configuration below.
At login, the user enters the plaintext password, and Shiro also needs the relevant “decryption” rules. Here is part of the Shiro configuration class:
@Bean("credentialsMatcher")
public HashedCredentialsMatcher credentialsMatcher(){
       HashedCredentialsMatcher credentialsMatcher = new HashedCredentialsMatcher()
       // Hash algorithm name; MD5 and other algorithm names can also be configured
       credentialsMatcher.setHashAlgorithmName("SHA-256")
       // Number of hash iterations
       hashedCredentialsMatcher.setHashIterations(20);
       // Store credentials as a hexadecimal hash
       hashedCredentialsMatcher.setStoredCredentialsHexEncoded(true);

       return credentialsMatcher;
 }

@Bean("shiroRealm")
public ShiroRealm shiroRealm(){
       ShiroRealm shiroRealm = new ShiroRealm();
       // Set the hash algorithm
       shiroRealm.setCredentialsMatcher(credentialsMatcher());

       return shiroRealm;
Note that I use “decryption rules” in the prose and “hashing rules” in the comments. These describe how I look at the same code from different perspectives: from the user’s perspective, the system takes my plaintext password to “decrypt”; from the programmer’s perspective, it hashes the plaintext password for comparison. Do not confuse the two descriptions.
Step 3: use this in the custom Shiro realm. If no exception is thrown, Shiro authentication succeeds; otherwise, handle the exception in the service layer for the relevant business logic.
@Override
protected AuthenticationInfo doGetAuthenticationInfo(
     AuthenticationToken authenticationToken)throws AuthenticationException{

     // Query the database by username
     UsernamePasswordToken token = (UsernamePasswordToken) authenticationToken;
     String username = token.getUsername();
     // Represents a database query
     User user = service.getOne();
     // Authentication compares the stored password with the hashed form of the submitted plaintext password
     // Pass the stored password returned by the database query as argument 2, not the submitted plaintext password
     SimpleAuthenticationInfo simpleAuthenticationInfo = new
                SimpleAuthenticationInfo(user,user.getPassword(),getName());

    // Return the authentication information
    return simpleAuthenticationInfo;
Basic password hashing is complete. Normally, we also need a salt, for this reason:
- If different users have the same password, such as 123456, their stored password values will remain the same after hashing. Adding a salt prevents this.
Step 4: add a salt field to the database table and its corresponding POJO. Store the salt alongside the password and use it during authentication.
Set the salt when saving:

In the code from step 1, use this Apache commons-lang method to generate a random value of length 20:

String salt = RandomStringUtils.randomAlphabetic(20);
Replace the null argument in step 1 with salt.

Set the salt in step 3 as well. The third argument is the corresponding salt retrieved from the database:

SimpleAuthenticationInfo simpleAuthenticationInfo = new
                SimpleAuthenticationInfo(user,user.getPassword(),user.getSalt(),getName());
This completes Shiro password hashing, verification, and salting in four simple steps. If you are new to this, following these four steps should be straightforward.
If you want a slightly deeper look at how Shiro compares passwords, keep reading.
Further details: how does Shiro authenticate after receiving the password?
At the end of step 3, we pass a SimpleAuthenticationInfo object to Shiro, which verifies it. The central method is doCredentialsMatch() in HashedCredentialsMatcher, shown below. Pay attention to the objects passed as its two arguments.

The first line hashes the submitted plaintext password using the configured rules and the salt from the database. The method is shown below:

It obtains the stored salt from the object returned in step 3 and sets it. Then:
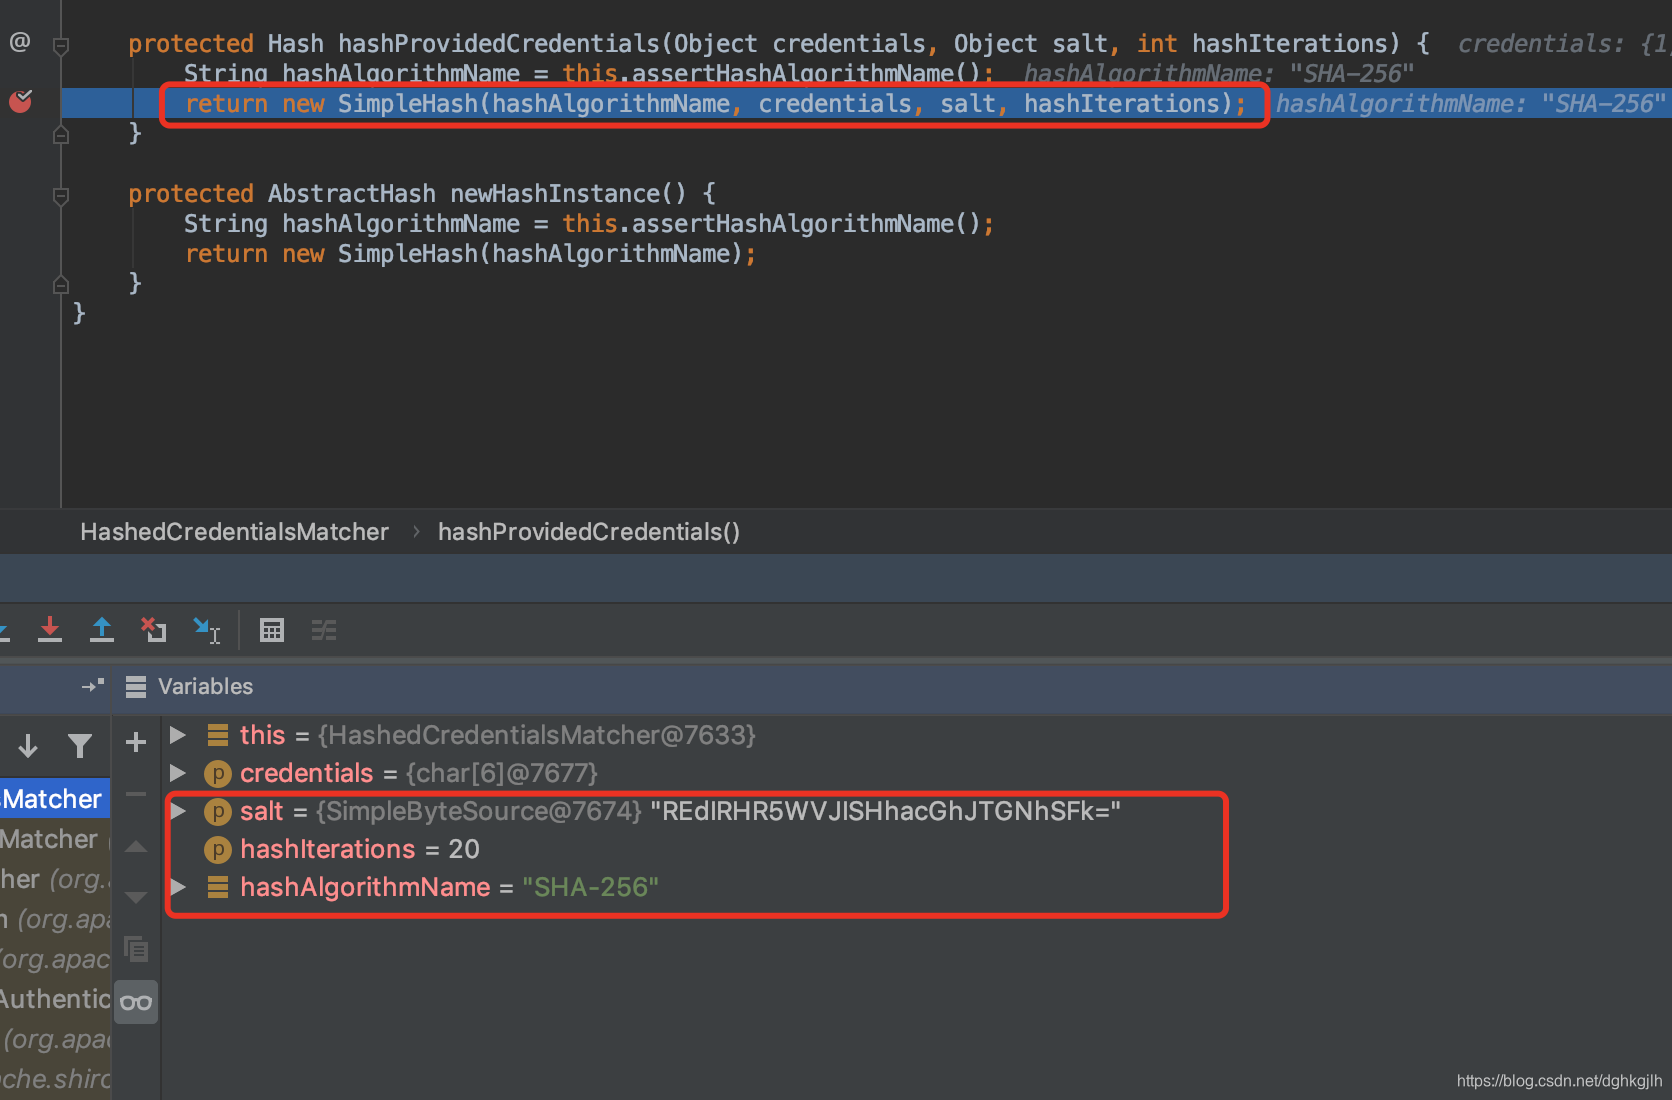
The configured algorithm, iteration count, and salt produce a SimpleHash, just as in the first approach in step 1.
The next two steps are straightforward.
The second line obtains the stored password from the user record.
The third line compares the two values and returns true or false.
That concludes this discussion of password hashing and verification in Shiro.
Do not let ambition outpace hands-on practice!