Table of contents
Open Table of contents
Article body
If I am going to do this, I might as well do it thoroughly!
In the previous article, I implemented token validation with my own very, very simple token. After learning about JWT, which is also widely used, I decided to integrate it with Shiro.
JWT provides solutions to the unresolved problems listed at the end of the previous article.
Approach:
Replace my custom token from the previous article with JWT. The overall approach stays the same.
Step 1: write a JWT utility class to handle token encryption, decryption, expiry checks, and related tasks.
/**
 * JWT token utility for generation and validation
 *
 * @Date 2019-05-25
 * @Description: TODO
 */
@ConfigurationProperties(prefix = "dhb.jwt")
@Component
public class JwtUtil {
    private Logger logger = LoggerFactory.getLogger(getClass());
    private String secret;
    private Long expire;
    private String header;

    /**
     *
     * Generate a JWT token
     * @param userId
     * @return
     */
    public String generateToken(Long userId) {
        Date nowDate = new Date();
        Date expireDate = new Date(nowDate.getTime() + expire * 1000);
        return Jwts.builder()
                .setHeaderParam("typ", "JWT")
                .setSubject(userId + "")
                .setIssuedAt(nowDate)
                .setExpiration(expireDate)
                .signWith(SignatureAlgorithm.HS256, secret)
                .compact();

    }

    /**
     *
     * Parse a JWT token
     * @param token
     * @return
     */
    public Claims parseToken(String token) {
        try {

            return Jwts.parser()
                    .setSigningKey(secret)
                    .parseClaimsJws(token)
                    .getBody();
        } catch (Exception e) {
            logger.info("Error parsing token");
            return null;
        }
    }

    /**
     *
     * Check whether the token has expired
     * @param expiprationTime
     * @return
     */
    public boolean isTokenExpired(Date expiprationTime){
        return expiprationTime.before(new Date());
    }
    public String getSecret() {
        return secret;
    }

    public void setSecret(String secret) {
        this.secret = secret;
    }

    public Long getExpire() {
        return expire;
    }

    public void setExpire(Long expire) {
        this.expire = expire;
    }

    public String getHeader() {
        return header;
    }

    public void setHeader(String header) {
        this.header = header;
    }
}
JWT generation and parsing are handled by jws.builder and jes.parse respectively. Consult the official documentation or search online for the specific methods; I will not explain them in detail here. Note the ConfigeratureProperties annotation on JwtUtil. It maps properties from application.yml to this class, analogous to loading a properties file in a traditional SSM project. Since Spring Boot favors classes for configuration, adding this annotation makes the class a configuration-properties holder.
# JWT configuration
dhb:
  jwt:
    # Encryption secret
    secret: f4e2e52034348f86b67cde581c0f9eb5
    # Token validity: 7 days, in seconds
    expire: 604800
    header: authorization
This is part of application.yml. The prefix on the class corresponds to the path here.
Step 2:
Handle interception in AuthFilter (previously named shiroFilter, renamed to avoid a naming conflict). The logic is the same as in the previous article, except that the logic previously in onAccessDenied() now lives in isaAssessAllowed(). If isAssessAllowed returns false, onAccessDenied can simply return false.
@Component("authFilter")
public class AuthFilter extends FormAuthenticationFilter {

    @Autowired
    JwtUtil jwtUtil;

    /**
     * Check whether the token is missing or expired
     *
     * @param request
     * @param response
     * @param mappedValue
     * @return
     */
    @Override
    protected boolean isAccessAllowed(ServletRequest request, ServletResponse response, Object mappedValue) {
            String token = getRequestToken((HttpServletRequest) request);
            if (ObjectUtils.isNull(token)){
                return false;
            }
            if (StringUtils.isBlank(token)) {
                throw new CustomException(jwtUtil.getHeader()+"不能为空", HttpStatus.SC_UNAUTHORIZED);
            }
            Claims claims = jwtUtil.parseToken(token);
            if (ObjectUtils.isNull(claims) || jwtUtil.isTokenExpired(claims.getExpiration())) {
                throw new CustomException(jwtUtil.getHeader()+"token过期",HttpStatus.SC_UNAUTHORIZED);
            }
        return true;
    }

    /**
     * Called next if the method above returns false; not called if it returns true
     * Check whether this is the login URL, then whether the request is POST
     *
     * @param request
     * @param response
     * @return
     * @throws Exception
     */
    @Override
    protected boolean onAccessDenied(ServletRequest request, ServletResponse response) throws Exception {
        if (isLoginRequest(request, response)) {
            if (isLoginSubmission(request, response)) {
                return true;
            }
        }
        return false;
    }

    /**
     * Read the token from the request header first; if absent, try a request parameter
     *
     * @param request
     * @return
     */
    private String getRequestToken(HttpServletRequest request) {
        String token = request.getHeader(jwtUtil.getHeader());
        if (StringUtils.isBlank(token)) {
            token = request.getParameter(jwtUtil.getHeader());
        }
        return token;
    }
}
Step 3:
After login authentication succeeds, return the generated encrypted token to the frontend. The relevant code is:
 @PostMapping("login")
    public Map login(@RequestBody String info){
        User user = JSON.parseObject(info,User.class);
        Subject subject = SecurityUtils.getSubject();
        UsernamePasswordToken token = new
              UsernamePasswordToken(user.getName(),user.getPassword());
        token.setRememberMe(true);
        subject.login(token);
        // Token to return
        String tokenBack = jwtUtil.generateToken(userId);
tokenBack is the encrypted JWT ultimately returned to the frontend.
Test result:
{
    "token": "eyJ0eXAiOiJKV1QiLCJhbGciOiJIUzI1NiJ9.eyJzdWIiOiI0MTQiLCJpYXQiOjE1NTg3ODk1NTAsImV4cCI6MTU1OTM5NDM1MH0.MzFzdOJCLbrG8c3j7WuJzj9NIPjrtLUL7n_AF913tS4"
}
Include this token in every subsequent request to validate that request. This completes the Shiro–JWT integration. I recommend JWT for its greater security.
Minor issues encountered:
- Initially, jwtUtil in AuthFilter was always null during request validation. I first suspected the properties had not been mapped, but debugging showed they had. That meant JwtUtil was not being injected into AuthFilter. I found the explanation online: when you construct an instance with new, Spring cannot inject dependencies into it through @Autowired. Other objects referenced inside that manually created instance are not injected either.
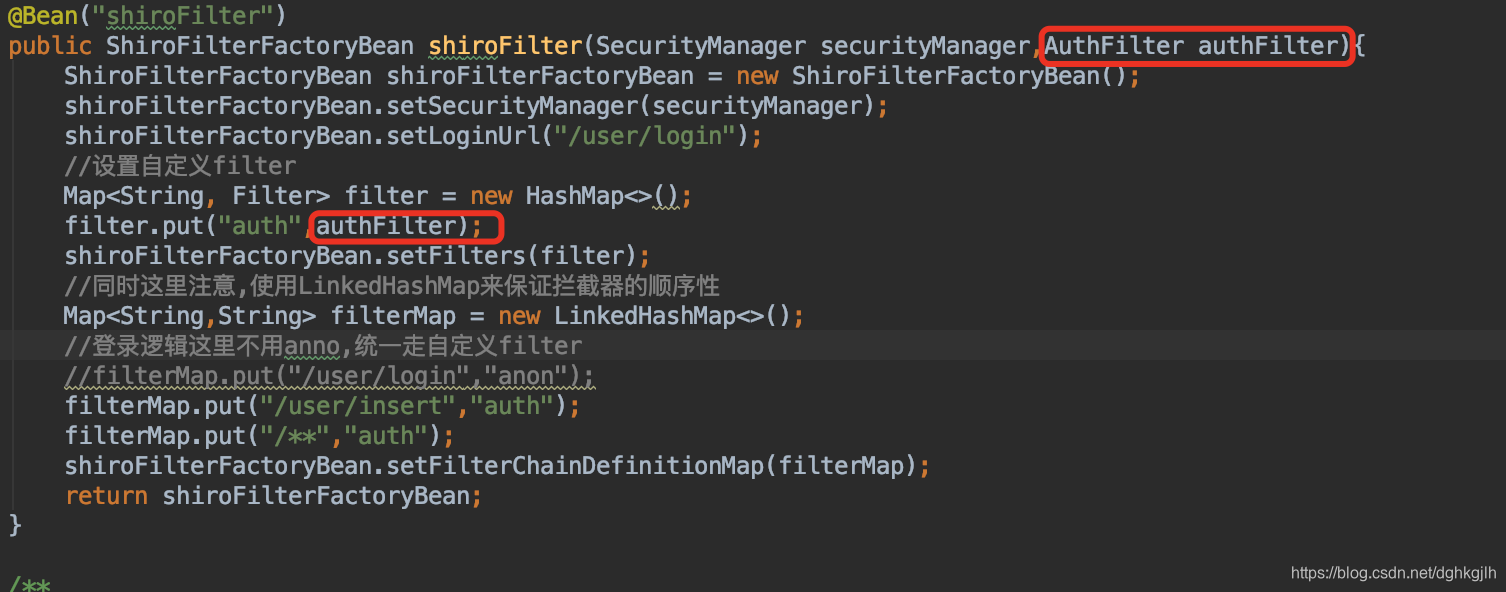
My original call was filter.put(“auth”,new AuthFilter()). Because I constructed AuthFilter directly, its JwtUtil could not be injected even with @Autowired. After changing it to the form shown in the screenshot, I added @Component to AuthFilter. Thanks to this blogger for the explanation.
- After resolving that issue, I thought it would be helpful to see which beans were in the Spring container after startup. That would make diagnosis faster than repeatedly searching online as I did today. Spring Boot does provide such a feature: Actuator. I have not studied it closely yet; here is the official documentation.
For now, the project’s security module—Shiro integrated with Spring Boot and JWT—is sufficient. I can finally move on to other problems.
This series does not include complete code for these examples. However, I have integrated Shiro into a project with both a frontend and backend; the code is here if needed.
December 1, 2021 update
A few additional notes on JWT:
This article focuses on applying JWT to a practical scenario with the io.jsonwebtoken library. For a broader introduction to JWT and other libraries such as Nimbus, see Getting Started with JWT.