Table of contents
Open Table of contents
- Prerequisites
- Background - What Is PKCS#12
- Background - Steps to Generate a PKCS#12 File
- Background - The Differences Between .pem, .key, csr, crt, and .p12
- Generate the CA Certificate and Private Key
- Generate Certificates for Encrypted Communication Between Elasticsearch Nodes Based on the CA Certificate and Private Key
- Generate Certificates for the Other Components: Kibana and Logstash
- Configure elasticsearch.yml
- Configure kibana.yml
- Configure logstash.conf
- Connecting to ES over HTTPS with the Elasticsearch Java Client
- Another Ultimate Solution
- Process Summary
- Using the Official Elasticsearch Script Directly
- Sample Code Repository
- Official Documentation
Prerequisites
-
Download and install Elasticsearch, Kibana, and Logstash locally, and make sure they start up normally
-
The ELK version used in this post is 8.2.0
-
After Elasticsearch 8.2.0 is installed, the corresponding http_ca.cert, transport.p12, and http.12 files are generated by default
Background - What Is PKCS#12
PKCS#12 is a commonly used keystore format and an international standard, widely supported by various platforms and tools. It can store certificates, private keys, and chain certificates, offers good interoperability, and is cross-platform.
JKS, on the other hand, is the keystore format provided by the Java platform.
Nowadays, PKCS#12 is basically what everyone uses.
Background - Steps to Generate a PKCS#12 File
The content of this section comes from a ChatGPT answer.
Below are the complete steps for generating a PKCS#12 file, including generating the private key and certificate and packaging them into a PKCS#12 file:
Step 1: Generate the Private Key and Certificate
-
Generate the private key
Use OpenSSL to generate a private key file, usually saved with a
.keyextension. For example, generate a private key namedprivatekey.key:openssl genpkey -algorithm RSA -out privatekey.key -aes256When you run this command, you will be asked to enter a password to protect the private key file.
-
Generate a Certificate Signing Request (CSR)
Use the generated private key to create a Certificate Signing Request (CSR). A CSR is the standard format for applying for a certificate:
openssl req -new -key privatekey.key -out request.csrWhen you run this command, you will be asked to enter some information (such as country, organization name, etc.), which will be included in the CSR.
-
Generate a self-signed certificate
Use the CSR and the private key to generate a self-signed certificate (
certificate.pem). In production environments, certificates are usually issued by a Certificate Authority (CA), but during development and testing you can sign the certificate yourself:openssl x509 -req -days 365 -in request.csr -signkey privatekey.key -out certificate.pem-days 365means the certificate is valid for 365 days.
Step 2: Create the PKCS#12 File
-
Generate the PKCS#12 file
Use OpenSSL to package the private key and certificate into a PKCS#12 file, setting the entry name to
apple-pay. This generates a PKCS#12 file namedapple-pay.p12:openssl pkcs12 -export -out apple-pay.p12 -inkey privatekey.key -in certificate.pem -name "apple-pay"In this step, you will be asked to enter a password to protect the PKCS#12 file. This password is used to encrypt the contents of the PKCS#12 file, ensuring that only authorized users can access it.
Summary
-
Generate the private key:
- Use
openssl genpkeyto generate a private key file, for exampleprivatekey.key.
- Use
-
Generate the CSR:
- Use
openssl req -newto create a certificate signing request file,request.csr.
- Use
-
Generate the self-signed certificate:
- Use
openssl x509 -reqto sign the CSR and generate the self-signed certificatecertificate.pem.
- Use
-
Create the PKCS#12 file:
- Use
openssl pkcs12 -exportto package the private key and certificate into the PKCS#12 fileapple-pay.p12, and set the entry name toapple-pay.
- Use
These steps cover the complete process from generating the private key and certificate to creating the PKCS#12 file. Make sure to use a secure password and keep the files properly protected in practice.
Background - The Differences Between .pem, .key, csr, crt, and .p12
See the answers:
- difference-between-pem-crt-key-files
- what-are-the-differences-between-pem-csr-key-crt-and-other-such-file-exte
In short:
- .pem is just a file format and can store anything, but in practice it is generally used to represent a public key
- .key is generally used to represent a private key in practice
- csr represents a certificate signing request
- crt represents a signed certificate
- .p12 generally stores the public key, the private key, and the certificate (crt)
With the background knowledge above, reading the content below and the official documentation should no longer be difficult.
Generate the CA Certificate and Private Key
Why generate the private key and certificate in PEM format here instead of the ca.p12 file from the official documentation (which puts the private key and certificate in the same file)? (This question has been updated — please refer to the latest explanation in the Java code section.)
./bin/elasticsearch-certutil ca --days 3650 --pem --out ./tls/ca/ca.zipunzip tls/ca/ca.zipThe ca.crt certificate and the ca.key private key file are generated under the ca directory; both files are in PEM format, as declared in the command above.
Generate Certificates for Encrypted Communication Between Elasticsearch Nodes Based on the CA Certificate and Private Key
The instances.yml file:
instances:
  - name: elasticsearch
    dns:
      - localhost # local connections
    ip:
      - 127.0.0.1 # local connections
Run the command:
./bin/elasticsearch-certutil cert --ca-cert tls/ca/ca/ca.crt --ca-key tls/ca/ca/ca.key --in tls/instances.yml --days 3650 --out tls/certificate.zipUnzip the file:
unzip certificate.zipAfter unzipping successfully, there will be an elasticsearch.p12 file.
Related official documentation
Generate Certificates for the Other Components: Kibana and Logstash
./bin/elasticsearch-certutil httpFollow the prompts to enter the ca.crt and ca.key generated in step one; you can choose to set a password or not.
Eventually, an elasticsearch-ssl-http.zip archive is generated.
unzip elasticsearch-ssl-http.zipAfter unzipping, there are two folders, which contain:
The elasticsearch-ca.pem and http.p12 files
elasticsearch and kibana, each with a README.txt inside explaining how to use them.
Related official documentation
Configure elasticsearch.yml
Note The passwords in all the generation processes above are empty.
Put all the files generated above into one directory, usually $ES_INSTALL_HOME/config/certs. Below is the elasticsearch.yml file:
# files generated in http mode
xpack.security.http.ssl.enabled: true
xpack.security.http.ssl.keystore.path: http.p12

# files generated in cert mode
xpack.security.transport.ssl.enabled: true
xpack.security.transport.ssl.verification_mode: certificate
xpack.security.transport.ssl.keystore.path: elasticsearch.p12
xpack.security.transport.ssl.truststore.path: elasticsearch.p12
Run the following commands — documentation for the specific commands:
# the password is the one set when generating http.p12 in step three
./bin/elasticsearch-keystore add xpack.security.http.ssl.truststore.secure_password

./bin/elasticsearch-keystore add xpack.security.http.ssl.keystore.secure_password

# the password is the one set when generating elasticsearch.p12 in step two
./bin/elasticsearch-keystore add xpack.security.transport.ssl.keystore.secure_password

./bin/elasticsearch-keystore add xpack.security.transport.ssl.truststore.secure_password
Each command will prompt you to enter a password; if there is no password, just press Enter.
Note You can also write the above configuration into the elasticsearch.yml file. However, since password rather than secure_password was already set when Elasticsearch was first installed, it will fail to start.
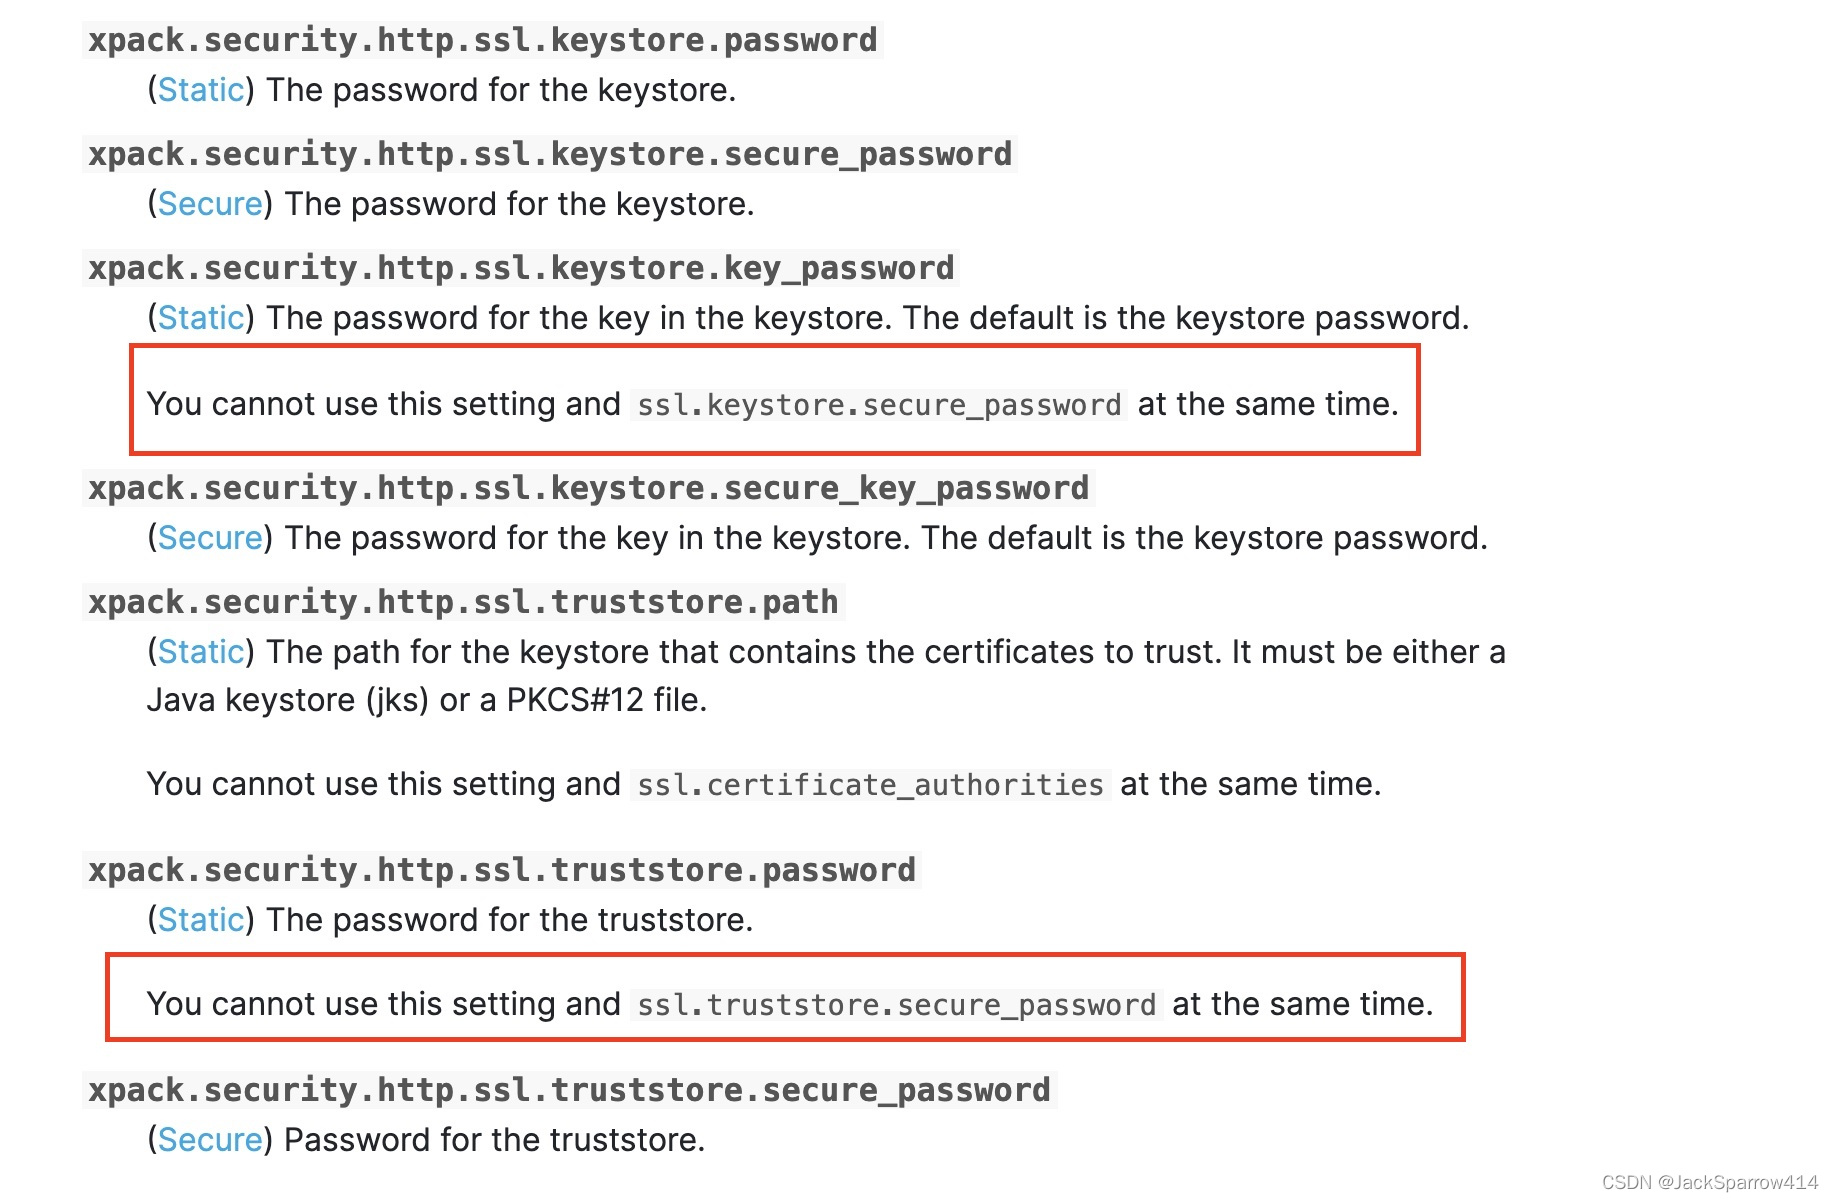
Using the command line should overwrite the password.
After all the configuration is complete, start Elasticsearch and check whether it starts normally.
Configure kibana.yml
Copy the elasticsearch-ca.pem generated in step three to the $KIBANA_INSTALL_HOME/config folder:
# change http to https
elasticsearch.hosts: ["https://localhost:9200"]

elasticsearch.ssl.certificateAuthorities: ["config/elasticsearch-ca.pem"]
Start Kibana and check whether it starts normally.
Configure logstash.conf
Copy the elasticsearch-ca.pem generated in step three to the $Logstash_INSTALL_HOME/config folder.
In the output section of your specific logstash configuration file, add the last two lines of configuration:
output {
	elasticsearch {
		hosts => "localhost:9200"
		user => "elastic"
		password => "password"
		# add ssl configuration
		ssl => true
		cacert => "config/elasticsearch-ca.pem"
	}
}
Start Logstash and check whether it starts normally.
Connecting to ES over HTTPS with the Elasticsearch Java Client
Up to this point, ELK starts normally and TLS is fully configured. Now let’s connect to ES over HTTPS in Java code.
Related official documentation
Why Use the PEM-Format ca.crt Instead of the Officially Recommended ca.p12?
Because JDK 8 has issues parsing .p12 files. According to my Googling, to connect using a .p12 file the JDK version must be at least 11 — though I haven’t tried it — so in a JDK 8 environment, I recommend using the PEM-format ca.crt file.
September 22, 2022 update Only Oracle JDK 8 versions later than 8u301 are free of this problem; for the specific bug, see Oracle Bug 8267837.
However, Oracle JDK versions above 8u202 require a paid license. You can use Adoptium Temurin OpenJDK instead; as of today, the last Adoptium OpenJDK release corresponding to JDK 8 is 8u345-b01.
Also, TLSv1.3 in ES requires a JDK version higher than 8u261, so my personal suggestion — if it is not too much trouble (considering that all online projects would need to upgrade the JDK and be fully tested) — is to upgrade the JDK to 8u345.
If you switch to a higher version on your machine, you can use a .p12 file for the connection: official .p12 connection example; the keyStorePass in the documentation is the password.
The sample code is as follows:
@Configuration
public class ElasticSearchConfiguration {

    @Bean
    @SneakyThrows
    public ElasticsearchClient elasticsearchClient() {
        CredentialsProvider credentialsProvider =
            new BasicCredentialsProvider();
        credentialsProvider.setCredentials(AuthScope.ANY,
            new UsernamePasswordCredentials("elastic", "password"));
//        location of the certificate generated in step one
        Path caCertificatePath = Paths.get("/elastic_install_home/config/ca.crt");
        CertificateFactory factory =
            CertificateFactory.getInstance("X.509");
        Certificate trustedCa;
        try (InputStream is = Files.newInputStream(caCertificatePath)) {
            trustedCa = factory.generateCertificate(is);
        }
        KeyStore trustStore = KeyStore.getInstance("pkcs12");
        trustStore.load(null, null);
        trustStore.setCertificateEntry("ca", trustedCa);
        SSLContextBuilder sslContextBuilder = SSLContexts.custom()
            .loadTrustMaterial(trustStore, null);
        SSLContext sslContext = sslContextBuilder.build();
        RestClientBuilder builder = RestClient.builder(
            new HttpHost("localhost", 9200, "https"))
            .setHttpClientConfigCallback(httpClientBuilder -> httpClientBuilder
                // set ssl
                .setSSLContext(sslContext)
                .setDefaultCredentialsProvider(credentialsProvider));
        RestClient restClient = builder.build();
        ElasticsearchTransport elasticsearchTransport = new RestClientTransport(restClient, new JacksonJsonpMapper());
        return new ElasticsearchClient(elasticsearchTransport);
    }
}
Just write a test case to verify it.
The code above has only one node. If there are multiple nodes, we don’t need to do load balancing in our own code — the Elasticsearch Java Client takes care of it:
The client sends each request to one of the configured nodes in round-robin fashion
At this point, enabling TLS for Elasticsearch and connecting to it with Java code is complete.
Another Ultimate Solution
If you don’t want all the hassle above and just want to use HTTP directly, but it’s a production environment, a fairly time- and effort-saving approach is to use various proxies or load balancers.
Map the exposed domain name to the backend HTTP endpoint. Although it is actually still HTTP, on the surface it looks like HTTPS.
September 22, 2022 update This solution only works for single-node Elasticsearch; in a cluster environment this solution fails, and you must configure certificates for each node. The following is quoted from the official documentation:
To secure your cluster, you must ensure that internode communications are encrypted and verified, which is achieved with mutual TLS.
Process Summary
The following process can be found in the official documentation here.
The elasticesearch-certutil command used to generate certificates:
- Generate the CA certificate. This certificate can be two separate PEM-format files (certificate and private key) or a single PCKS#12-format file; the pem parameter ultimately generates two PEM-format files, ca.crt and ca.key, while PCKS#12 generates a single file, ca.p12.
- Based on the certificate from step one, generate certificates for communication between the cluster nodes, using cert mode.
- Based on the certificate from step one, generate certificates for communication between Kibana, Logstash, the Java Client, and Elasticsearch, using http mode.
This post only provides an example based on PEM-format files. Readers can generate PCKS#12 certificates according to the process summary above and the documentation given at the end of this post, and then configure them.
Personally, I recommend using PCKS#12-format certificate files, together with the latest releases of each Adopt OpenJDK version (8, 11, 17).
Using the Official Elasticsearch Script Directly
If you just want to learn locally and quickly set up a three-node cluster on your local machine, you can directly use the officially provided docker-compose.yml file. You only need to change a few configurations to quickly start a cluster — very convenient.
The official documentation provides a docker-compose.yml file for a cluster with three nodes, which you can use directly for local testing. Official documentation link Note: in the docker-compose.yml in the official documentation, only es01’s port 9200 is exposed.
Sample Code Repository
Official Documentation
Strongly recommended: read through the official documentation below, especially if this is your first time configuring this. The steps are basically very detailed, and it also explains the role and purpose of each configuration in more depth.
- Elasticsearch Security configuration — strongly recommend reading everything under this chapter
- elasticesearch-certutil is responsible for generating the certificates needed between internal cluster nodes and for external HTTP access to ES
- elasticsearch-keystore
- Setup Basic Security
- Detailed Steps for Setting Up HTTPS
- ElasticSearch Java Low Level Client Connect Https
- Further reading about Java KeyStore